Posted in Mom Talk

Mom Talk: Chores Ideas

Hey Dearies! I wanted to go over some chore ideas that you can do with your kiddos! I will be listing stuff for all ages too as well because you can start chores or the idea of chores as little as 2 years old.

My daughter is now 5, which is still crazy to me because yesterday I remember bringing her home from the hospital and now she is in preschool. Now that she is older, I wanted to start doing a chore chart for her and introduce chores and the idea of helping out around the house.

I bought her a chore chart that is magnetic and they give you options for different chore ideas, of course, some of them didn’t pertain to my daughter yet, such as homework. Every time they would do something on the chore chart, she would get to put a star next to it.

I haven’t been strict with her about it, yet, but I did get her excited to want to start doing chores around the house if it meant she got to put a star on her chore board. Lately, to get her to get stuff done, to reward her with some screen time or mostly playing Minecraft or Animal Crossing.

Here are her usual list of chores is just simple stuff, such as brushing her hair, brushing her teeth, getting dressed, picking up toys, setting the table, etc. Simple things that she can do. I haven’t pushed her to follow through with the other types of chores I want her to start doing because I don’t want to overwhelm her with them.

You don’t want to overwhelm them with a long list of chores because then they will never want to do it. I have started her with 5, which seems to go well and she still needs to be told to do them, but she will usually do them, if not I just tell her no Minecraft and she will start getting them done.


Now that you sort of know what I’ve got my daughter doing at home, let’s talk about what kinds of chores you can introduce to the little ones.

Chore Ideas for Ages 2-3 Years Old

Of course kids, this age don’t need to enforce it, but you can start introducing to them to some simple chore ideas such as these:

  • Pick up toys & books
  • Put trash in the garbage can
  • Dust
  • Put away silverware
  • Wipe baseboards
  • Fold rags &dishcloths
  • Put clothes in the hamper
  • Put clothes away in drawers

Chore Ideas for Ages 4-6 Years Old

At this age, is when you should start making a few chores mandatory for them to do. I would start with at least 3-5 chores that they are responsible for. You can also include some of these from up above:

  • Take care of the pets
  • Set & clean the table
  • Match Socks
  • Wipe down dirty walls
  • Empty trashes
  • Sweep

Chore Ideas for Ages 7-11 Years Old

At this age, doing chores should be something they should be doing every day. You might be also including allowance for them or treats for completing chores. They should be doing at least 5-10 chores a day and if you want to include one day of their choosing that they don’t have to do it. Here are some stuff they should be able to do:

  • Fold laundry
  • Sweep
  • Vacuuming
  • Take out the trash / Taking it out to the curb on trash day
  • Wash mirrors
  • Meal prep
  • Weed flowers / Garden
  • Clean out the car
  • Clean toilets
  • Clean room
  • Organize toy room
  • Bring in mail / newspaper

Chores Ideas for Ages 12+ Years Old

At this age, they should be doing chores all week long. They might be getting more of an allowance or none at all because they know they should be doing chores without being told to do so. Here are some other chore ideas that the older kids should be doing now:

  • Mow lawn
  • Babysit siblings
  • Wash windows
  • Iron
  • Wash car
  • Cook simple meals
  • Laundry
  • Mop floors
  • Clean bathroom
  • Clean out fridge

Of course, you don’t need to do it the way that I suggest because every parent has a different way of raising their children. I was raised to do chores and as we got older, my mother stopped paying us for it once we got older because when we lived on our own, we would have to do these things for ourselves.

What kind of chores do you have set for your kiddos? When did you first start them out with chores or at what age do you think they should start doing chores? Let me know in the comments!

Posted in Products, Reviews

Product Review – HUE HD Webcam

Hey Dearies! Forgot to post this Saturday, but I wanted to review this webcam since it was something that I ended up getting for myself when I was doing Facebook lives all the time.

One of the reasons as to why I was looking into webcams that were overhead, was because I wanted to record videos of my crocheting so that I could post them on my blog and/or to YouTube.

Most of the camera’s that I found were between $99-$200. Since I didn’t know anyone else, I figured to see how well the cheaper camera would do. Now, a lot of the time it is a hit or miss when you buy something that is cheaper, so I took a chance.

When I got this item, I paid $50 buck for it on Amazon, which wasn’t too bad, I just hoped that it would do the job that I was hoping it would do, which is sort of did. It also came in four different colors: green, red, blue, and of course black. I got the green one.

Here is the link for the Webcam: https://www.amazon.com/gp/product/B000TTFEWG/ref=ppx_yo_dt_b_asin_title_o01_s01?ie=UTF8&psc=1

If you have been following me since the beginning, you know that some of my lives are used with my phone and a tripod, but in some of the other videos, you couldn’t see the tripod, which was when I was using the HUE Webcam.

Now, before I purchase any products, especially on Amazon, I always just see the reviews, both good and bad, which for this product, it was kinda split in half. Meaning it worked for some and others, not so much.

For me, the first few times I worked with the camera, it worked great, downloading the CD program worked on my computer and it worked with no problems, but after a few times of trying to record longer and live, it started cutting out or not working.

I’m not sure if it was my computer or not, but it made it really hard for me to want to record or try to go live. I would even uninstall it and reinstall back onto my computer, sometimes it works that way, other times, not to much.

The good thing that I liked about the camera when it was working for me, was when I could adjust the picture or video clearly by turning the lens of the camera. I also like how there is a light to indicate when the webcam is plugged in, however, there is no manual control to turn it off and on.

Also, another feature is that you can attach and detach the camera from the base, which I found really helpful because if the base doesn’t want to work for you, you can always plug the camera directly into your computer base.

I might have to try it out on my laptop, and see if it works or not, and I will update when I do that.

Overall, for the price, it was okay, I wouldn’t get it again unless it was a last resort or they had it upgraded to something that was better than before. If anything, I would try out one of the more expensive ones, just to see if there is a major distance.

The good news is that, in good lighting, it records great! I just don’t understand why it was cutting in and out all the time. One of the options that I found very helpful, was that you could adjust the camera very easily, to any angle you needed it to be.


Have you tried out this camera? How was it for you? Or did you have the same problems as I did? Let me know in the comments down below and if there are any products you would like me to try out, let me know in the comments as well.

Posted in Writing Works

Finally Free – Friday’s Short Stories

Finally Free

Hey Dearies! So, this one is another short story based on an idea or prompt! This one inspired me or gave me the idea from Safe Haven, but with a different twist to it. This one has mentions of abuse, so if you are triggered by that, please don’t read! 

What would freedom really be for those who are trapped?

Hailey didn’t know what freedom was until she got dropped off at the docks of Hawaii. She had finally left the pain and hurt that had been damaging her for years. She never thought that she would have to be on the run, but she figured being in Hawaii would give herself and her ex more distance between each other.

She looked around in amaze as she took a deep breath of her new surroundings. Picking up her bag pack that only held a few essentials that he grabbed in rush from leaving Kevin. She shook her head as she wandered around the street, she was amazed at the beautiful view of the ocean.

Hailey had always wanted to come to Hawaii, but after high school, her plans completely changed. They had especially changed since she met Kevin. The worse regret of her life. If she would’ve known what he would’ve been like before she had got with him, she would’ve run for her life.

Now she is running for her life.

Discouraging the thought of Kevin, something caught her eyes, as she watched him walk by. He looked familiar to her and it took her only a second to realize it was him, the real reason why she ran to Hawaii, all because of Ethan Brooks.

Her heart started to beat faster as he gazed into her eyes and stopping right in front of her.

“Hailey? Is that really you?” Her heart dropped, he still remembers her. Especially, since it’s been almost 3 years since she last saw him.

She was silent, a tear had fallen from her cheek, as she didn’t expect to cry in front of him. Instead of walking away from him, Ethan embraced her in his arms, holding her tightly. It made her feel safe and at home.

They stood there for a few minutes before Ethan pulled away from his embrace and took another look at her. Even though was in Hawaii, Hailey didn’t dress like she was comfortable. Wearing jeans and a tank top with a sweater covering her arms and zipped up to her neck.

Ethan noticed the bruise that slowly healing on her neck. Once he noticed that, he noticed other bruises of hers that were now more noticeable. “Walk with me, my beach house isn’t that far from here.” He grabbed her hand and took her bag of hers, throwing it over her shoulder, as he led to his beach house that was down the street from the boardwalk.

As soon as they got into Ethan’s beach house, Hailey was shocked at the place that she was in. She never knew that Ethan was rich, but he sure lived like it. She then took a view of the balcony that showed over the ocean, waves crashing onto the beach. It was heaven to her.

“Why didn’t you meet up with me that night?” Ethan spoke, he wasn’t going to catch up with her once he saw her bruises. Hailey beats herself up over not leaving to go with Ethan. She had met him in a nightclub, it was right after she 21, she went out with her friends to celebrate.

Hailey was talking to Kevin, but she was single when she met Ethan. When they danced, they clicked just like that and she followed him home where they had an amazing time. He told her he was leaving to go back to Hawaii and he wanted to take her with him, but before she could, she tried to explain it to Kevin, but it ended badly.

Hailey didn’t want to think about it, but she had to give Ethan an answer. “It’s harder for me to explain.” She spoke, turning to face him, tears fell from her eyes. “You don’t want to know what he did to me.”

Ethan, hugged her again, she hugged him back as she tried to maintain her crying, but it came out like waterfalls. “I’m sorry. I wanted to. I was ready to go and then he found out-”

“You don’t need to explain. You’re here with me now, aren’t you?” Ethan smiled, wiping her tears away as she gave him a smile in return. “Feel free to stay with me. I’m gonna make you something to eat, why don’t you go take a shower.”

Haily nodded as Ethan showed her the bathroom, giving her a set of sweat pants and shirt, then handing her a towel before walking out into the kitchen.

Hailey shut them down and started to strip out of her old clothes and looked at her naked self in the mirror, the black and blue bruises that were up and down on her body. She turned and looked at the deep scar that planted down her back, that hadn’t started to heal.

That scar was what gave her strength to leave Kevin.

After her shower, she got dressed in the clothes Ethan gave her and then headed into the kitchen, he was just finishing up cooking burgers. Her stomach growled, she hadn’t had anything since she left California except a cereal bar.

They ate together in silence. As Hailey was washing the dirty dishes, Ethan noticed the scar on her back, he was shocked at how bad the situation she was in. He turned her around, which scared her, she gazed into his eyes.

Ethan leaned his forehead against hers and studied her eyes, kissing her forehead. “I promise I won’t let anything bad happen to you. Stay with me.” He promised as Hailey was in shock, but it felt so right. She then nodded and then went to kiss his cheek, but Ethan turned his head, having her miss his cheek and plant a kiss onto his lips instead.

They kissed for a second, Hailey’s heart fluttered as she missed his kiss. Ethan pulled her closer and held her close, as they both had missed each other, more than they had known. In his arms, it was like wrapping yourself in a heavy blanket.

In the next few days, Ethan and Hailey caught up on what they missed in each other lives. The more time they spent together, they ended up growing closer to where they before. Hailey started to see a better version of herself in his arms, but having Ethan around made her forget all the pain and hurt that Kevin had ever put her in.

She was finally free from it all. The best part is that she was finally happier, stronger, and more empowered about her life choices. She was a bird that was finally free to fly where ever she wanted to go.


Let me know in the comments of what you thought about this short story! These will be posted every Friday and if you have a prompt or idea that you would like me to try out, let me know in the comments! 

Posted in Books, Reviews

Book Review – Ever After (Laurel-Leaf Books)

Hey Dearies! Back with another book review for you all! So, this one I never thought this was really a book, but it is and you can find it on Amazon.

Ever After is a motion picture that Drew Barrymore stars in as the main character, Danielle. This movie is one of my all-time favorite version of a Cinderella story, next to Hillary Duffs more modern version in A Cinderella Story.

The ‘Cinderella’ story has been told in many different ways in, by different writers and in different genres. In my opinion, ‘Cinderella’s story is one of the easiest recreations that any writer can do, but I’m always curious to see what writers come up with and try to do.

The same goes for any other fairy tale story, but I think this version is the best because not only is it in the perfect timeline and location to do it.

The theme of where this Cinderella story is set more like how the original Cinderella story started. Danielle lives with her father, her more died in childbirth and her father raises her the best he can. Of course, when she is 8, he re-marries Baroness Rodmilla of Ghent, otherwise known as her evil stepmother, and has two daughters of her own.

However, the reason why Rodmilla marries Danielle’s father is to get further up the line, or into the castle, basically wanting to live the life of riches. So, she really doesn’t care about Danielle, anyway, makes Danielle a ‘slave’ when her father dies.

I will say, Danielle puts up with a bunch of crap as a servant, but how she meets Prince Henry is even funnier than how the other versions. She ends up meeting him and throws apples at him thinking that he is stealing their horse.

The entire book is an exact play-by-play of the movie, which made me feel like I was just reading the movie and I ended up finishing it in a day. So, instead of watching the movie, you can read it, however, depending on how fast you read, it could take a day, perfect for passing the time.

There are only a few slight things that weren’t in the movie, but even if it wasn’t, it doesn’t change the way the book is, instead, I feel like it gives more of a backstory to some of the parts that are ‘rushed’ when created into a movie, or they were parts that they didn’t put into the movie.

Overall, this is an amazing book, even though it is literally the movie script, but in a book form and since I don’t own the movie, it’s not a bad way to pass the time. Perfect for a rainy or snowy day when you can’t go anywhere and want to snuggle up to a good book.

I also think that it would be a great bedtime story or a book that you could read to your kids before bed, you won’t finish it all before bed, but you could finish a chapter a night before bed no problem.

So, since I’ve reviewed the book, later in this month, I will be reviewing the movie because you know that’s what makes sense to do, right?

What do you think about the book? Were you as shocked as I to find out that there was a book to the movie? Let me know in the comments below.


Posted in Arts and Crafts, Crochet, Top Projects for Crochet/Knitting

Crafty Sassy: Top 10 Easter Free Crochet Patterns

Hey Dearies! Easter is right around the corner and if you are at a loss of what to make for this year or want to make gifts isn’t just buying chocolate for the kids, then look no further! I have found 10 FREE patterns for you to check out!

There is a mix of patterns that aren’t just for kids, but for babies as well, especially if this is their first Easter!

Note: These are NOT my patterns, I will leave a link to where I found the original pattern. All rights go to the original creators. The only pattern that is mine is the last one. 


1. Chocolate Easter Bunny

Crochet-Easter-Bunny-Pattern.jpg

This little guy is perfect for the kids, especially for the younger ones that aren’t ready to have chocolate, but they don’t have to be left out in not getting a ‘chocolate’ bunny, except this one, they can cuddle with.

Link to pattern: https://crochet-news.com/crochet-easter-bunny-pattern/#_a5y_p=6626917


2. Marshmallow Bunny Baby Booties

BABY-BOOTIES-2-1170x1170.jpg

This one is for the babies! Especially, if you are unsure what to get them, these booties are super cute and perfect for Easter! The best part about these is that they aren’t just for the bunnies, but they come in 3 different styles.

Link to pattern: https://www.passionatecrafter.com/marshmallow-baby-boots/


3. Easter Bunny Mug Cozy

IMG_8708_text-1.jpg

Of course, knowing me I would have to have a mug cozy on here, this one really fits for the Easter season! This pattern is also super easy to create, not to mention, look at his little fluffy butt! I can’t get over this pattern, it’s just too cute! These look like they would be killer sellers for any craft fair!

Link to pattern: https://haakmaarraak.nl/free-crochet-pattern-easter-bunny-mug-cozy/


4. Belle The Bunny

2.jpg

I had to have another stuffie on this list, but the funniest part about this little guy, is that it has the same name as my daughter, Bella, but instead of an ‘a’ at the end, its an ‘e’. This one is perfect for those younger kiddos to have for a gift!

Link to pattern: https://yarnsociety.com/patterns/belle-the-bunny/


5. Carrot Treat Pouch

2020-03-31.png

These aren’t just for the bigger kids, but for the younger ones too, just instead of jelly beans, you can fill these up with the Gerber puffs or yogurt melts! You can even make these for the older kids to have a little ‘jiggle’ from Easter.

Link to pattern: https://pattern-paradise.com/2019/03/18/free-crochet-pattern-carrot-treat-pouches/


6. Easter Wreath

easter-wrap-700x350.jpg

Another item that I just had to find, but I just had to! Plus you just have to have a wreath for every season. This one might take some time to do, especially when it comes to making the bunny, but once it’s complete, it would look so cute on your door. However, like I’ve said before, I would keep these wreaths away from rain or snowy, just because it can ruin them.

Link to pattern: https://www.dailycrochet.com/fabulous-crochet-easter-wreath-pattern-to-make-now/


7. Bunny Ears Headband

BunnyHeadband-min.jpg

I think this one is for those little girls that actually keep headbands in their hair. The best part about this pattern is that you can try out different colors for the roses to either match what they are wearing for Easter or have them pick out the colors and just have fun with it!

Link to pattern: https://www.graceandyarn.com/2018/03/crochet-bunny-headband-free-pattern.html?utm_medium=social&utm_source=pinterest&utm_campaign=tailwind_tribes&utm_content=tribes&utm_term=586785218_20891078_493480


8. Marshmallow Bunny Peeps

Peeps1.jpg

Okay, so ‘Peeps’ are a hit or miss type of item that comes out EVERY Easter, whether you are a fan or not, these ones are too cute to make for the babies. I’m not a big fan of the actually marshmallow ‘Peeps’, but I LOVE the shapes that they have for the chicks and bunnies, which in the end, makes it more fun to create these little guys instead of eatting them.

Link to pattern: http://whiskersandwool.blogspot.com/2011/04/easter-marshmallow-bunnies-free-pattern.html


9. Mini Easter Basket

crochet-basket-800x1148.jpg

I have to include a type of basket, especially when the you need one for holding the eggs that the Easter bunny left behind for the kiddos. However, this one is more for decoration to hold those mini chocolate eggs or jellybeans for anyone one to take. Or you can get a little creative and put in ‘nips’ for the adults.

Link to pattern: https://www.skiptomylou.org/crochet-basket-pattern/


10. Stuffed Easter Egg

20190226_112407.jpg

This pattern is the one I posted last year, that went with the actual baskets I was selling for Easter. However, I still think these are an awesome idea to make for the babies to have for Easter. Not to mention, they would look super cute in a photoshoot for Easter!

Link to pattern: https://katiesblog96971617.com/2019/02/26/crafty-sassy-crochet-stuffed-easter-egg-easy/


Which ones are your favorites? Any of them catch your eye for you to want to make this year for Easter? Let me know in the comments down below!

Make sure to like my Facebook page to find out when my next blog post or updates on my blog!

Posted in Products, Reviews

Product Review: Make-up Brush Cleaner

Hey Dearies! So, this month’s product review is actually gonna be for make-up. Now don’t worry, I’m not reviewing any make-up palettes or lipsticks, we are going to be focusing on a product that is supposed to make it easier to clean your brushes.

So, where did I see this product?

As you know, if you have been following me on Instagram, you have probably noticed I’ve been wearing make-up more or testing products out, lately. So, I’ve been using my brushes quite a bit, to the point where I didn’t even know that you had to clean them on daily.

Which, I was told, that you don’t have to clean them every day, but at least once a week, if not more, depending on how often you use them. Which is also what lead me to purchase this make-up brush cleaner.

Now, since I didn’t have any knowledge of how to clean make-up brushes, I figured I would look on Amazon for an easier way to do so. Originally, I wanted to get this product as a gift, for a few people, but me being curious, I wanted to know if it really worked.

All you do is load up your brush, you can choose any of the different options for each different type of brush. Then a drop of dish soap, or make-up brush cleaning solution, to the mixing bowl and slowly dip the brush in and out of the solution, while it’s spinning. Then let it dry spin for a few and it should be dry or barely wet.

download

The max it should take, for each brush, is about 10 to 30 seconds. Which to a lot of make-up people is AMAZING timing! I like the fact that it’s that quick that it dries.

  • How’s the quality? 

Because I’m not a great make-up artist and almost have no idea what I’m doing, the quality of how clean these brushes get is not bad, but it’s not great either. Setting it up is a pain in the butt, but I feel that it doesn’t clean enough.

  • Does it work for me?

In all honestly, yes, this product does work, but for someone who isn’t a HUGE make-up guru’s. I recommend getting this for someone who is or does use their make-up brushes all the time. Although it doesn’t clean the brushes well, it does make it quicker for them to get dry quickly.

  • Is it worth the money?

At the time, I paid about $17.00, for it on Amazon. I’ve seen them range from $9.99 – $25.00, if not more depending on the brand. It is worth the money, but if you don’t use it all the time, this product is more of a waste of space.

  • Overall, is it something I would use or buy again?

I wouldn’t buy this again since I already own it, but I do see myself using this again, just because it drys the brushes so quickly! I do however, see this as a great gift to those who are make-up lovers.


What do you think about this product? Is it something that you would use or have used? Let me know what you think about it in the comments!

Posted in Random, Reviews

Random Review: Crochet/Knit Electronic Finger Counter

Hey Dearies! So, this month, we had an extra Saturday and instead of doing nothing on that Saturday, I figured I would do something a little bit different. The random reviews are a review that are based off of anything, could be from arts and crafts supplies to kitchen or office stuff.

This week, I wanted to talk about these super cool finger counters and if they are really worth it or if they are helpful.

So, when I first got into crocheting, I was counting rows on paper and pen, which does make it easier to follow rows because I write out the rows on paper and cross them out when I’ve completed that row.

Plus if I have to go back or figure out exactly what row I’m on, I can look down onto that sheet of paper and find out where exactly I left off. However, there are a lot of downfalls to using pen and paper, especially if you have younger kids that LOVE to get into anything.

Which is when I next looked into other ways to count my rows, without dragging the paper and pen around. I wanted something that was portable and easier to keep tract of counting, which is when I found the electric row counters for your fingers.

First, let me start off by saying that I got really excited to use these, which I ended up getting myself a pack of 2, just in case, which there is really no harm in doing so.

I honestly loved them!

However, as much as I loved them, I did have a few minor complaints.

Having this on your finger, to me, was a pain in the butt. Then again I have really long and thick fingers, which doesn’t help the fact that the adjustable band doesn’t fit ‘perfect’ on my finger.

To me, it’s a little too loose for my liking. Other than that, it worked great!

One of the best features of these little counters is that after a few minutes of not counting your rows, it would shut off, but keep track of what row you were on when you turned it back on.

Another great feature it has is that it’s not just in one boring color, but can come in many different colors, currently, I have a green and pink ones since those are my two favorite colors!

Not to mention, it does a better counting, I feel than any other app that is out there. (Which I will review that in the future.)

What do you think about this little gadget? Do you have one or wasn’t sure about getting one? Leave a comment down below and let me know what you think about them!

Posted in Writing Works

Ain’t Your Mama (Friday’s Short Stories)

Ain’t Your Mama

Hey Dearies, so this week is another song that I’ve turned into a short story. I’m a big fan of JLo and ‘Ain’t Your Mama’ is one of my favorite songs that she has done. The song is about how women shouldn’t be treated to be someone’s slave. What I have gathered from it is that women shouldn’t be the only one to do everything, but 50/50 and sharing the responsibility in a partnership because we ‘AINT NO ONE’S MAMA!’ The only mother we want to be is our children’s mama.

Jackie watched as she slaved over the stove, making another meal for her boyfriend, Will. She was already over this life she was doing, ever since she moved in with him. Before that, their life was great.

They would go out for dates at least once a week, they would make time for each other and they were so in love, but that all changed when she agreed to move in with him.

She never thought that she would be cleaning up after him every day and night. She never thought she would have to come home from work and make sure he had a hot meal to eat every night.

Jackie felt more like a zombie, repeating the same things every day. Wake up, clean, cook, go to work, and repeat.

She craved the love that they used to have together, the nights that they would cuddle on the couch together and spent time playing games or watching movies. She missed those times, but now, all Will seemed to want to do was be on his phone or play video games without her.

As she was stirring the boiling pasta, it hit her. She was doing everything that his mother would be doing for him.

For weeks and weeks, she had asked him to help her or split up the chores, like they did with bills, but she would get the same old saying:

“I’ll do it later.”

Which was Will’s code for ‘I ain’t doing it at all.’ Jackie was over it all, she was tired of the same old stuff that she didn’t think she was signing up for when she moved in. She thought that he would do his part, too.

Jackie knew how much she loved Will, but the pattern had to stop, she couldn’t keep living like this, she wanted to respect and help, not because she asked, but because that’s what was needed.

The thought of marriage and having children with Will scared Jackie to think that it would be even worse than it already was now.

As she turned off the stove, drain the pasta, as she heard Will screaming through the headset. She placed the pasta in with the sauce and mixed it, then took the bowl to the kitchen table, where she had hoped they could’ve eaten together since she had gotten everything ready for the kitchen table and not for their TV food trays.

Will finally came into the room, smiling at her and then grabbing what he wanted for food and then walking back in the living room.

Jackie has had enough, she wasn’t going to spend another night sitting at the table alone, she wasn’t going to spend another day catering to his needs while hers are put on the back burner, and she wasn’t going to spend another day waiting for Will to change his ways.

She grabbed the bowl of salad, that she had just made and walked into the living room, dumping the salad all over him.

“I’m so sick of this, Will! I’m done!” She said, dropping the bowl onto the floor as Will didn’t know what to react.

“What the hell? Your gonna clean this up, aren’t you?” He snapped back at her, which made Jackie’s blood boil more.

“I’m going to clean this up? What do you think I am, your maid?” She yelled, crossing her arms across her chest. Will stood up, as the salad pieces fell to the ground. “If you want someone to clean up after you then you might as well go move back in with mommy.”

Jackie then left the living room and went into the bedroom, packing her stuff and leaving Will. As hard as it was to do that, she couldn’t help but cry. Deep down, she knew she couldn’t change him, unless he was willing to change for himself.

As she drove off to her sister’s house, she cursed how lazy he had become and how his mother pampered him so much that he wasn’t able to do anything for himself, but it was one less thing she was worried about.

She was more focused on herself and if love did happen to knock on her doorstep, she would make very clear that she wouldn’t end up being someone bitch ever again.


Let me know what you think about this week’s short story! Comment down below if you have a song in mind for what I should do next for next Friday’s!

Posted in Writing Works

Kerosene – Friday’s Short Stories

Kerosene

Hey Dearies! Sorry that this one is a little late, but I decided to mix it up by taking a song and turn it into a short story! So, I went with the song Kerosene by Miranda Lambert. 

Well I’m giving up on love ’cause love’s given up on me

The sun was setting on a long hot day and Sasha Kendel had just lit a cigarette, sitting outside her shitty trailer. She never liked the taste of cigarettes, but there was nothing else for her to do.

She never thought her life would be exactly like her father’s, living in a small crappy town where everyone knows your business and what you do. That was one of the reasons why her mother left, but Sasha got suckered into coming back to Fairfield, Georgia.

All her plans to leave went down the drain when she met Frankie Londe. He had walked into her life and at the time, made it worth wild. She was also in love with the idea of being in love that she forgets all of her original plans.

But that went all down the drain after Sasha found him with her.

It was a late night, she had taken the late shift at the only dinner they had in Fairfield. It had been a long day that she just wanted to go home and relax. She hoped that Frankie would be at their trailer, waiting for her when she got home.

As she walked to her car, she caught a glimpse of the bar, that was just across the street, she saw drunk people dancing and having a good time, but what stopped her in her tracks as she noticed someone.

Frankie was in the middle of the dance floor locking his lips with some blond that she had never met. At that moment, her heart dropped. She never thought in a million years that the love of her life would betray her.

As Sasha took another drag of her cigarette, then tossing the butt into the grown. She was so angry, she didn’t know what to do. She knew that Frankie was inside, making love to that blond that he was with last night. She never gave a notice that she was home, yet.

She got up from the porch and walked over to the kerosene that had caught her eye and grabbed it. Opening the container and pouring it all over her shitty trailer, dumping it all over the front door, around the trailer and back over to his black Ford truck.

She threw the container in the middle of the field and got into her car, taking out another cigarette and taking a match to lite it, then tossing it to the kerosene path that leads up to her trailer.

The flame took quickly, as it rapidly burned the path of kerosene, leading up to the front door and blazing the entire trailer in flames. Sasha took another drag and drove up the path and onto the highway.

She took one look in her rearview mirror and watched as her old life had burnt away, watching two naked people jumping from the window, half-naked and running away as the trailer blew up.

Sasha smiled and then placed her eyes back on the road. “Cheaters never prosper.” She said, driving down the highway and heading towards her new fresh start.


Let me know in the comments of what you thought about this short story! These will be posted every Friday and if you have a prompt or idea that you would like me to try out, let me know in the comments! 

Posted in Mom Talk

Mom Talk: It’s Okay To Not Keep Everything (Baby Stuff)

Hey Dearies, I wanted to talk about another big problem that us moms have that I don’t think anyone has mentioned. What’s worth keeping and what’s not worth keeping from your baby’s stuff.

I know a few are you are problem screaming at me through the screen saying, ‘WHAT?!’, but let me tell you why.

As a mother who has lost a child and is currently raising one at the moment, we want to keep stuff that they have ever use, such as outfits, blankets, shoes, bibs, toys, etc. The list goes on and on, to the point you have to ask yourself one question:

Where am I going to put this all?

But, I’m here to tell you, it’s okay that you don’t keep everything. If you are like me and live in a tiny trailer, then you understand where I’m coming from. When you have a baby, you get lots of stuff and most of the stuff is NEVER used or is used maybe once or twice.

When my son passed away, I wanted to keep all of his stuff, even stuff that he had never used, not just for memories, but for our next baby. Not to mention, I made sure his stuff, that he did wear, would be in his own tote.

Growing up, my mom make sure us kids had 3 totes. Inside, she had a few of our favorite outfits, first pairs of shoes, baby books, and some other stuff. I loved the idea of keeping a tote for each of my kids, which is exactly what I did.

Even when I kept my son’s stuff, I still had a LOT stuff that I was never been able to use, not to mention, a lot of family member also get you stuff for the baby to be, which can be super helpful, but sometimes you feel like you HAVE to keep stuff like that. But let me tell you something:

ITS OKAY TO NOT WANT TO KEEP IT!

Don’t let friends and family make you think you HAVE to keep stuff that you don’t have room for or you just don’t want to keep. There are plenty of parents and parents-to-be who are in need of stuff as such.

Yes, you can save those items for the next child you plan to have, but if you don’t have space, sell it or give it to those who need it! Don’t have your house cluttered just because you want to save it for the next baby because when you do plan to have another baby, someone else will be willing to give you the same stuff that you gave them.

So, I bet you are probably wondering, why I even wanted to bring this up. Well, let me get to that because it wasn’t just because I had a lot of leftover stuff, it had more to do with the fact that my daughter was getting older and her room was turning more into storage, than an actual bedroom.

Yes, we do have closets, but living in a small trailer, you don’t have much room to begin with, so you have to work with what you got.

Since my daughter was getting older, I decided that it was overdue for me to go through her stuff and figure out what I was going to do with it all because she needed a room that she can actually play in.

I went through any baby stuff, such as clothes, rockers, bouncy seat, bibs, walkers, etc. Since my daughter was too old to be using those, I sold them. Which, to me, isn’t a big deal because they didn’t have any attachment to it.

So, what did I actually keep?

  • Baby Book
  • Hospital Bracelets
  • First outfits
  • First pairs of shoes
  • An outfit that she wore, only one from each size.
  • First pacifier
  • First blanket
  • The first dress I crocheted her
  • The crib
  • The bassinet
  • Baby swing

That’s it. The last three are because they had a meaning to me, which I am going to keep for that sake, but everything else fits in her tote. Also, when I mean I’m saving an outfit from each size, it’s one outfit from newborn to 12 months. Anything else, I have either donated or sold to those who really need it.

d661d95443839c9f82d4d1797c3723dd

But as moms or new moms, don’t feel pressured to keep everything, it’s okay to not want to. And it’s okay to keep everything, if you have the room and space for it, go for it!

Whatever preference you decide, it’s okay. Just remember, the moments and memories you create, is worth more than items itself.

Posted in Arts and Crafts, Crochet, Top Projects for Crochet/Knitting

Crafty Sassy – Top 10 Crochet Valentine’s Day Projects

Hey Dearies! With Valentine’s Day just around the corner, I figured I would find some free patterns for this lovely holiday! Even if you don’t do anything, these ideas are perfect to make for the kiddos of your family!

Note: These aren’t my patterns, but free patterns that I have found and will have the website link for that pattern. All rights go to the creators of these patterns!

1. Valentine’s Day Cat

2020-02-04 (2).png

If you are a cat lover, then you should definitely add this to your do-to list! The cutest thing about this cat is that it’s shaped in a heart! Not to mention, you don’t have to sew on the whiskers, another option would use some puffy paint, but it can be challenging to do.

Valentine’s Day Cat crochet pattern


2. Valentine Heart Flap Hat

2020-02-04 (1).png

Super cute hat and since February can still be a little nippy out, these are a perfect gift to gift the kiddos for Valentine’s Day! The best part about these is that you can wear them for all the winter season.

https://classycrochet.wordpress.com/2014/01/21/free-pattern-crochet-valentine-heart-earflap-hat/


3. Crochet Rose Wreath

heart-flower-wreath-1-1.jpg

I’ve actually made a wreath, something like this, but it was so difficult to do and if you have been following me for a while, you’ll know that wreath, such as these, take a very long time to do, but once they are finished they are so worth all the hard work!

Crochet Rose Pattern: Learn How to Crochet a Rose Wreath!


4. C2C Heart Table Runner

ValentineC2C-728x991.jpg

As you know, I love to include kitchen sets, especially when it comes to holiday stuff like this! These are a super cute idea to have for the month of February! This also gives you more on practicing the C2C stitch and how to change colors.

Crochet C2C Valentine’s Heart Table Runner


5. Valentine’s Day Bag

DSC01413.jpg

This is another cute idea to make for the kiddos, especially perfect for putting in some chocolate kisses! This type of pattern is something that you can also use to practice changing colors, as well as switching colors!

https://www.littledoolally.com/2014/02/valentines-day-gift-bag.html


6. Valentine’s Day Mini Gift Bags

VdayGiftBag2wm-1024x711.jpg

When I saw these, all I could think of was what a great idea these would be for teachers! These are small but super easy to make and to make many of these! I’ve always wanted to be a teacher and if  I prepared myself, I would have these for my students!

Valentine’s Day Mini Treat Bags


7. Heart Butterfly

Crochet-butterfly-applique-free-pattern-1.jpg

These are more for decoration when it comes to placemats, blankets, clothing, and even bibs. However, they are also perfect for making them into magnets! Not to mention, these are perfect practice for those that learning to sew pieces of their projects together!

Crochet Butterfly Applique


8. Valentine Bear

2020-02-04.png

I know, this bear is too cute! The best part about this pattern is that there is a FREE PDF print out! Which makes them perfect to add to your binder of patterns! These bears are super soft and perfect for those babies that were born or will be born around Valentine’s Day!

https://www.yarnspirations.com/bernat-velvet-valentine-crochet-bear/BRC0334-012696M.html?utm_source=pinterest&utm_medium=social&utm_campaign=2019_02_Curated_Valentines&utm_content=BernatVelvetValentineCrochetBear


9. Light Heart Valentine Dishcloth

crochet-light-heart-dishcloth-naztazia_small2.jpg

From one of my favorite crochet YouTubers, Naztazia has created this amazing pattern that is perfect for Valentine’s Day or for people who have a theme of Hearts for their kitchen! The best part, there is a video to show you how to create this amazing dishcloth!

https://www.ravelry.com/patterns/library/893330


10. Heart-Shaped Bookmark

20180821_123805.jpg

Doesn’t this one look familiar? It should because this was the first pattern that I have EVER created and posted on my website! If you have been following me since day one, this was when I was first starting out or getting into crocheting! This is perfect for beginners!

https://katiesblog96971617.com/2018/08/21/crafty-sassy-how-to-make-a-heart-shape-bookmark-for-beginners/


Which ones were your favorites? Which one would you love to create for yourself? Let me know in the comments!

Make sure you like my Facebook page! I post updates on my blog, Youtube channel, and anything else on there!

https://www.facebook.com/katiesblog96971617/

Posted in Products, Reviews

Product Review: Color Street Nails

Hey Dearies! So, our first product review of the year will be from Color Street. Now, if you haven’t heard about this product before, they are an ‘MLM’ business that sells an easier way to applying nail polish in less time than it takes you to actually take the time to get your nails painted.

This company also offers the same opportunity to those who would like to be apart of this brand and sell it themselves, kinda like Avon or Paparazzi.

Now, this product, not only does it make it easier to apply nail polish, but there are tons of different designs and colors to try from.

If you are a mom like me, it can be difficult to actually take the time to paint your nails, not to mention having enough time to let them dry as well. So an easier way to not only apply nail polish but also not having to deal with having to air out your room or house because of the smell sounds like a plus to me!

Here’s what they look like:

Color-Street-Nail-Polish-Strips-New-and-Halloween
By the way, if this hasn’t already caught your eye, noticed how photoshopped the nail polish are to the fingers? Not kidding, this is how they show you what it looks like on their website!

I know what you are thinking, ‘Sounds good, but are they really worth it?’.

Well, let’s talk about it some more. So, when I am doing these types of reviews, I like to ask myself a few questions about the product before coming to a final conclusion. Because this is part of an MLM, I’ll be asking myself some other questions, such as these:

  • How’s the quality? 
  • How long does it last?
  • Does it work for me?
  • Is it worth the money?
  • Would it be worth signing up?
  • Overall, is it something I would use or buy again?

-How’s the quality?

I would say the quality looks pretty good in person versus online or in pictures. If this product isn’t shown on actual fingers and not ‘photoshopped’ on the same hands over and over, I think it would catch the eyes of customers better.

As you see in the photo above, if I didn’t mention the photo was clearly photoshopped, were you able to notice?

maxresdefault.jpg

-How long does it last?

These last about a week, depending on how active you are with your hands, it can last longer, but the real problem is that you can’t keep them on for long periods of time. My mom kept her Christmas ones on for little over 3 weeks and they turned her nails yellow.

Not to mention that once they start chipping off, they become pretty easy to peel off and once you start, you’ll keep going until they are completely off.

download.jpg

-Does it work for me?

Yes, it does. Even though the process can be a pain in the ass, they are definitely worth trying at least once. I hate to paint my nails and especially during the wintertime when you can’t or don’t want to open a window to air out the fumes of actual nail polish, they are very easy to put on either during the kiddos nap time or after they go to bed.

-Is it worth the money?

As of February 2020, they are priced at $13.00. You 2 full sets of nail strips to do both of your hands twice. They also have them in different sizes, so they should fit for all sizes if not, they can stretch a little bit to make them fit.

In one of the full strips, they only recommend you to use one of the full strips for each hand, but if your nails aren’t as long, you can definitely get to wear these or try them out 2 times and see if you like them or not to purchase again or give to a friend to have them try it out.

images.jpg

Another downfall with these as well is that once they are opened from that plastic seal they tend to get hard if they are left out for too long. I recommend putting your extra strips in a plastic baggie and making sure there isn’t any air for them to get dried up.

Overall, if you want a quicker way to do your nails, they are worth it, but because they have so many options, it’s hard to want to try out only a few.

-Would it be worth signing up?

The big question that everyone asks or should ask before joining an MLM company, is it truly worth it? Remember, if you aren’t passionate about the product or products you are selling, DON’T waste your money over it!

As always, before joining one of these groups, you have to have the extra money to purchase a ‘kit’ that is needed in order to start selling.

In my honest opinion, as much as I love doing my nails, I wouldn’t sign up. To me, I wouldn’t want to spend $125 dollars on a kit when I can use that money towards something else. Even though its a one time purchase, even after that, you still got to buy more products and get more people to join in order to make money.

86a64b4f9f14500a91bb676628dda7ff.png

This is something that you would have to look into and DO RESEARCH on BEFORE joining. Also, talking to current members and ex-members is very helpful, they can tell you if it’s worth it or not.

-Overall, is it something I would use or buy again?

Sure, it’s an easier way to put nail polish on, but I don’t think this would be something I would buy all the time. I do love the options they have on different colors, designs and glitters to choose from, but with it being $13 dollars for about 2 tries, it might be cheaper for me to get my favorite plastic stick-on nails that it would be to buy these.

I think these are perfect for holiday gifts and even if you want to have salon nails for the holidays. It’s hard to not want to try them all, but the fact that they have to photoshop their nail design, instead of placing them on actual nails, really bothers me.


What do you think about Color Street Nails? Have you tried them or have seen your friends selling them? What do you think about them? Let me know in the comments below!

Posted in Writing Works

Rewriting My Story (Friday’s Short Stories)

Rewriting My Story

Hey Dearies! So, this one is about heartbreak and how it is to start all over after a relationship ends. Hope you all like it! Let me know in the comments!

A woman who is deeply in love is crushed when her fiancé breaks up with her. “In life, every ending is just a new beginning,” says Dakota Fanning’s character in Uptown Girls.

Natalia never thought she would have to start all over again, but after being crushed by the love of her life, she didn’t know what to do or where to start. It was so unexpected, but she still didn’t understand why.

Collin Mather was someone she never expected to fall in love with, but she did. Having met him freshman year of high school, he was apart of the baseball team and hockey, always busy with sports that she was surprised that he had time with her.

They met at one of the home games of his, Natalia was a reporter for the school newspaper and since no one else that day wanted to go to the baseball game, she ended up going. Natalia never minded sitting by and watching the sports games, as long as she got the score and a little bit of the action, she would be set.

She watched as Collin stepped up to the plate, getting ready to swing his bat, it was the end of the game, as Natalia watched intently as he glared at the pitcher. They needed this win to be in the school finals, they were tied with the other team and just needed a home run.

Natalia sat on the edge of her seat as she wanted Collin to hit the home run, she needed this article to be on the front paper before school. The writing was always her passion, but she wanted to be more than just a side-stage reporter, she wanted to be apart of something huge, and her school winning to go to the finals was what she was waiting for.

The pitcher threw the ball and Collin’s bat hit the ball, as he threw it to the ground and ran as fast as he could to first base. The ball was way out in the field, too far for the outfielders to catch it as he hit first base and ran to second.

Before they even managed to get the ball, Collin They needed this win to be in the school finals, they were tied with the other team and just needed a home run.\nNatalia sat on the edge of her seat as she wanted Collin to hit the home run, she needed this article to be on the front paper before school. The writing was always her passion, but she wanted to be more than just a side-stage reporter, she wanted to be apart of something huge, and her school winning to go to the finals was what she was waiting for.\nThe pitcher threw the ball and Collin\’s bat hit the ball, as he threw it to the ground and ran as fast as he could to first base. The ball was way out in the field, too far for the outfielders to catch it as he hit first base and ran to second.\nBefore they even managed to get the ball, Collin had already hit the third base and was working on getting the home run they needed. Quickly the opposite team grabbed the ball and threw it to third, Collin threw himself to slide into home base, just in time before the ball was thrown to home base\nThey had won the game and made it on the finals. Natalia couldn\’t believe it, but when she looked at Collins\’s face, as the team collapsed around him, she could tell that this was something that he was waiting to happen. He was only a sophomore, but he was the first to take the school to the finals.\nAfter they won, Natalia went to the team and started to interview the captain of the team, Jerry, Collin\’s older brother. As she was taking some notes down, she noticed from the corner of her eye, Collin was watching her.\nThe next school day, they managed to print out the paper early that morning and lots of people were paying to read the main article, her article. Natalia was smiling as she handed out the papers.\n\”I can\’t believe you managed to pull this off!\” Joyce said as she handed out another paper, Natalia smiled at her best friend.\n\”I know, but the best part was, I think I have a crush on Collin,\” Natalia whispered as Joyce giggled, but then turned back to the front of the stand were Collin was standing right there.\n\”Speaking of crushes, I\’m going to go out back and get more copies.\” Joyce winked to Natalia as she didn\’t want her to leave her by herself with her crush.\nCollin smiled as Natalia felt her cheeks get warmed, she had never had a crush before. \”Natalia, isn\’t it?\” Collin asked as she nodded.\nJoyce came back with the extra copies of the paper as Natalia handed one of them to Collin, as she returned the smile. \”I\’ll see you around,\” Collin said, as he started heading down the hall.\n\”Wait till he reads the article, he\’ll be head over heels in love with you,\” Joyce smirked as Natalia covered her eyes.\nLater that day as Natalia was leaving her newspaper club meeting, she was shocked to find Collin waiting outside the room for her. She slowly walked by him, gripping her books tightly around her chest.\nShe feared the worse, thinking that he might have not liked the article and wanted to confront her about what she wrote. \”Natalia, wait a second,\” Collin said, catching up next to her.\nNatalia turned to face him as he looked like he was about to speak, but she stopped him from doing so. \”I\’m sorry if you didn\’t like the article that I wrote. Did I say something wrong? Or was I wasn\’t supposed to put your nickname that your teammates call you. I\’m really sorry, I can go back and see about getting it change-,\”\nCollin had put a finger on her lips to shush her. \”Nothing is wrong with your article. I loved it.\”\nNatalia\’s face started to warm up, she was so thankful that he didn\’t like the article, but what else did he want with her? \”T-Thank you.\” She managed to speak after his finger away.\n\”No problem. Finals are next weekend, are you going?\” He asked as she nodded. \”Alright, how about if we win again, I get to take you out on a date?\”\nYou can probably guess what happened next, Collin won the game and Natalia went on her first date with him. After that, they started dating and stayed together after high school. Natalia never thought that she would be alone, after 6 years together, he finally popped the question.\nNever did she think that two weeks before the wedding was planned to happen, he would call it off. She was heartbroken, but he wanted to focus on his career, while she wanted to start a family. Not to mention, she had found out that there was someone else he wanted to be with instead, too.\nWhen that was all said and done, she felt empty, didn\’t understand why she wasn\’t good enough for him or what she did wrong to make him not love her anymore, but it gave her a new meaning of life. A fresh start.\nShe always wanted to be a writer and decided to write about her relationship, changing the names and town, she wrote her heart out about it all. The first date, first kiss, first time together, and so much more.\nAfter she had finished, she sent it to her publisher and once it was published, it became the next bestseller, it sold out more than Twilight and Hunger Games combined. She got her dream and after finishing the book, she came to understand and realized why he left her and that it\’s always okay to be alone because sometimes that\’s the best.had already hit the third base and was working on getting the home run they needed. Quickly the opposite team grabbed the ball and threw it to third, Collin threw himself to slide into home base, just in time before the ball was thrown to home base

They had won the game and made it on the finals. Natalia couldn’t believe it, but when she looked at Collins’s face, as the team collapsed around him, she could tell that this was something that he was waiting to happen. He was only a sophomore, but he was the first to take the school to the finals.

After they won, Natalia went to the team and started to interview the captain of the team, Jerry, Collin’s older brother. As she was taking some notes down, she noticed from the corner of her eye, Collin was watching her.

The next school day, they managed to print out the paper early that morning and lots of people were paying to read the main article, her article. Natalia was smiling as she handed out the papers.

“I can’t believe you managed to pull this off!” Joyce said as she handed out another paper, Natalia smiled at her best friend.

“I know, but the best part was, I think I have a crush on Collin,” Natalia whispered as Joyce giggled, but then turned back to the front of the stand were Collin was standing right there.

“Speaking of crushes, I’m going to go out back and get more copies.” Joyce winked to Natalia as she didn’t want her to leave her by herself with her crush.

Collin smiled as Natalia felt her cheeks get warmed, she had never had a crush before. “Natalia, isn’t it?” Collin asked as she nodded.

Joyce came back with the extra copies of the paper as Natalia handed one of them to Collin, as she returned the smile. “I’ll see you around,” Collin said, as he started heading down the hall.

“Wait till he reads the article, he’ll be head over heels in love with you,” Joyce smirked as Natalia covered her eyes.

Later that day as Natalia was leaving her newspaper club meeting, she was shocked to find Collin waiting outside the room for her. She slowly walked by him, gripping her books tightly around her chest.

She feared the worse, thinking that he might have not liked the article and wanted to confront her about what she wrote. “Natalia, wait a second,” Collin said, catching up next to her.

Natalia turned to face him as he looked like he was about to speak, but she stopped him from doing so. “I’m sorry if you didn’t like the article that I wrote. Did I say something wrong? Or was I wasn’t supposed to put your nickname that your teammates call you. I’m really sorry, I can go back and see about getting it change-,”

Collin had put a finger on her lips to shush her. “Nothing is wrong with your article. I loved it.”

Natalia’s face started to warm up, she was so thankful that he didn’t like the article, but what else did he want with her? “T-Thank you.” She managed to speak after his finger away.

“No problem. Finals are next weekend, are you going?” He asked as she nodded. “Alright, how about if we win again, I get to take you out on a date?”

You can probably guess what happened next, Collin won the game and Natalia went on her first date with him. After that, they started dating and stayed together after high school. Natalia never thought that she would be alone, after 6 years together, he finally popped the question.

Never did she think that two weeks before the wedding was planned to happen, he would call it off. She was heartbroken, but he wanted to focus on his career, while she wanted to start a family. Not to mention, she had found out that there was someone else he wanted to be with instead, too.

When that was all said and done, she felt empty, didn’t understand why she wasn’t good enough for him or what she did wrong to make him not love her anymore, but it gave her a new meaning of life. A fresh start.

She always wanted to be a writer and decided to write about her relationship, changing the names and town, she wrote her heart out about it all. The first date, first kiss, first time together, and so much more.

After she had finished, she sent it to her publisher and once it was published, it became the next bestseller, it sold out more than Twilight and Hunger Games combined. She got her dream and after finishing the book, she came to understand and realized why he left her and that it’s always okay to be alone because sometimes that’s the best.


Let me know in the comments of what you thought about this short story! These will be posted every Friday and if you have a prompt or idea that you would like me to try out, let me know in the comments!

Posted in Arts and Crafts, Beginner Patterns, Crochet

Crafty Sassy – Crochet C2C Baby Doll Sleeping Bag (Beginner)

Hey Dearies! I know this is a day late, but here is it! So, this idea was also based on my daughter and her love of baby dolls, this project is a sleeping bag or pouch to put her babies in.

20200129_182731.jpg

This again is another C2C design, which is also great practice if you are wanting to get better at the stitch!

Another note I wanted to add that I did not add a pillow to attach to it, but here is my pattern from last week if you want to add a pillow to this project. Here is the link for that pillow:

https://katiesblog96971617.com/2020/01/21/crafty-sassy-crochet-c2c-baby-doll-pillow-beginner/

Let’s talk about what you will need!

  • Medium Size Yarn
    • I am using a Red Heart Yarn Pink.
  • 4.5mm hook
    • If you want to make the pouch bigger or small, all you have to do is adjust your hook.
    • This size is more like a small/medium size for a baby doll
  • Sewing

Now, if you aren’t familiar with the ‘C2C’ stitch, here is a wonderful video that Heart Hook Home has, that not only helped me understand how to do the stitch but also shows how to increase and decrease. Here is the video:


This pattern is great for learning and getting familiar with the ‘c2c stitch before moving on to bigger and more complicated projects.

The sleeping bag size is 25×41 squares, you can, of course, add or decrease squares to fit a small or large size baby doll.

Let’s Begin!

Sleeping Bag

Chain 5.

Row 1: Double crochet into the 3 chains from the hook and in the next 2 stitches.

Row 2: Chain 5. Repeat from row one. (This is how we increase.) Then flip your ‘square’, like you are going connect it. Slip stitch in the chain three, from the last square. Chain 2. Make 3 double crochets in that same space.

Repeat until you have 25 squares across. Once you do, after making your last square, slip stitch on the top of the square. (This is how you decrease). Chain 2 and make 3 double crochets in that chain 3 space.

Keep going until the other side has reached 41 squares and on that finally square, slip stitch on the top of the square. Chain 2 and make 3 double crochets in the chain 3 space. As you continue to go back and forth, you’ll notice the rows start to get smaller.

Chain 1 and single crochet about the piece and fasten off.

In the next part, you can either hand sew together or single crochet the two sides together.

Assembly:

Fold your project, the long way, or the ‘hotdog fold’. Taking your crochet hook (or needle) crochet or sew one of the longer sides. Once you reach the shorter side, fasten off. Then repeat on the other side.

Then you are done! Fasten off and weave in any loose ends.


20200129_182731.jpg

There it is! A very simple sleeping bag for the baby dolls! Remember, you can always add a pillow as well! I just didn’t have time to do so.

Make sure you like my Facebook page and follow me on Instagram. I’m more active on my Facebook page than I am on Instagram.

Posted in Writing Works

The Art of Love (Friday’s Short Stories)

The Art of Love

Hey Dearies! I know this one is a little late, but I wanted to make sure I took a little extra time on this one. It’s not exactly like the prompt, but I did add in a little twist of it. 

Two dirt-poor art students survive by sharing a nasty little apartment above a bodega. They struggle through four years, barely making ends meet, comforting one another through tragedies and triumph, but never openly admit how they feel about each other…until they graduate, and one of them gets a job in another city. Is it too late to confess their love?

Living in New York City wasn’t easy, let alone being a paint. Jackie Brown wanted to see her name on every billboard, street store, and all over New York. Since she was 3, that was always her dream.

Her father was a famous painter himself, as so as her mother. Once they had her, Jackie’s mother felt that her child was holding her back from becoming famous and so let Jackie and her husband to New York.

Last time Jackie saw her mother, was 10 years ago. Now, she was 23, fresh from college and off to make her hobby into her dream, however, New York was expensive. Jackie’s father wanted to come with her, to make sure her dreams really did come true, but Jackie didn’t want her father to help her on that journey.

She wanted this one by herself.

After being in New York for a few days, she managed to find a place for her to stay in. Kenny Hunt was her only available option, especially with money being so tight, she didn’t want to be left on the streets.

Climbing up to the 3rd floor, onto an old book store, she knocked onto the door, with the faded ‘3C’ that sat on an old wooden door. After a minute or two, the door finally opened with Kenny behind it.

“Jackie, right?” He asked.

“Yes.” She nodded, giving him a soft smile as he opened the door more for her to come in. “Thank you again for this.”

She turned to face him, looking at his dirty blond hair and bright blue eyes. As she gazed into his eyes, he looked like he was hurt inside, like someone has ripped his heart out from his body and stuffed it in a trash can.

Kenny turned away, walking back to his canvas, ignoring her. As she looked around, she notices this was a very old room, it was a room that didn’t look like it was used for sleeping at all. The wide-open space had faded, cracked dark wooden floors. The paint used for the walls was faded and looked like there once were mirrors that inclosed the place.

As she turned to her left, there was a mini hall, looked like there were a few other rooms and hopefully a bathroom. Behind her was a stove, sink, and fridge that looked out of place from this room, but more than an old dance studio was out of place for any of this.

She didn’t see any mattresses or beds for her, in the opened space. Instead, the opened spaces were covered with canvases, paint, and brushes. It was like heaven to Jackie, making this choice the best one she had made for herself.

“Where can I put my stuff?” She asked, as his blue eyes looked up from the canvas.

“Down the hall to the right. Just don’t go into my room.” Kenny snapped as he went back to painting. Jackie was curious to know what he was painted but instead went to put her stuff away.

After being there for a few weeks, Jackie got herself comfortable, but Kenny seemed to rather ignore her. She had tried to work up the courage to place an empty canvas on one of the many empty easels, but hadn’t.

Brushstroke after brushstroke, she watched him from afar, not wanting her to see her eyes on him, she watched him move the brush back and forth like it was a dance he knew how to dance. Not to mention she couldn’t help but notice his arms had a few tattoos, but the one that caught her eye the most was the tree tattoo inside his left arm.

She wanted to ask him about it, it was the only one that she had noticed that was fairly new to his body, as the other tattoos he had were more faded. It took her a minute to realize that the tattoo was the tree from Lord of the Rings.

She got up and walked out of her room and slowly approached Kenny. He looked up for a second but turned away back to his piece. As she got closer, she noticed that his painting wasn’t of any object or item, that she thought it was, it was simply a mess of different colors of blacks and greys.

It was different from what her parents have painted before, but they were more into landscapes, such as mountains, hills, forests, and lakes. This was solid, but it spoke to her that something in his past had made him paint this way.

“What?” Kenny snapped, jumping Jackie, as she was zoned into his piece, rather than him.

“I-I was wondering if could use that spare easel?” She spoke nervously, she wanted to ask about his tree tattoo, but she had forgotten it, getting lost in his eyes.

Kenny changed his emotion, looked rather more confused like he didn’t think she would ask something from him so bold. “You paint too?” He asked as she nodded.

“I do, my parents do, too.” She said as he looked at her.

“Go for it.” He said, going back to his easel. Jackie was so enlightened that she ran to grab her supplies and set them up next to the easel.

Over the next couple of months, the started to bond over their love of painting and art. As much as they wanted to spend all of their time painting, Kenny had a part-time job down at the book store and Jackie had just gotten a job as a florist, that was also down the street.

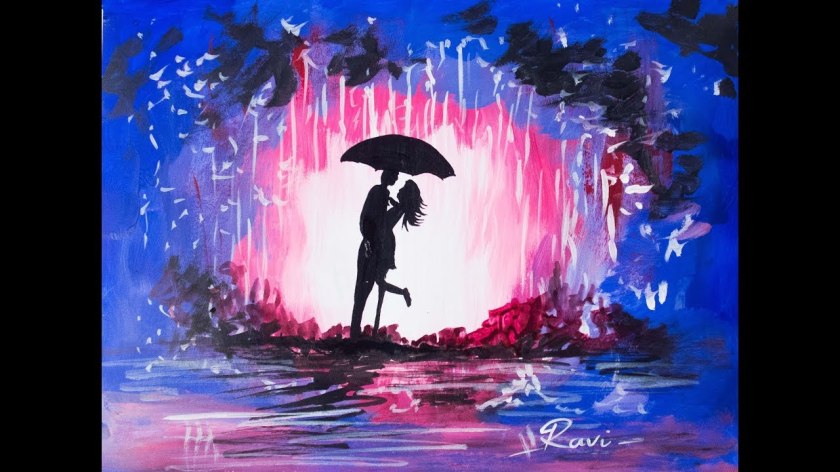
Jackie had just finished her latest creation, it was of a couple, standing in the middle of the rain, sharing a deep kiss, with the background having rainfall underneath them all, not giving a care in the world as to what would happen.

It reminded her of her last love, that were that couple she painted. He had her heart, but she didn’t want it. She had gotten pregnant, but ended up losing the baby, which changed their relationship although. He wanted to settle down and build a giant family, as Jackie just wanted to paint and when she was ready, start a family.

That was their last kiss goodbye. They didn’t want to hold each other back and wanted to have one last kiss before they moved onto different lifestyles. Hence, why she wanted to leave New York.

Kenny came over, as she signed off of her painting. “Incredible, really.” He touched her shoulder as she watched him look into every detail she put into the painting. “What are going to call it?”

Jackie took a minute to think about it, coming up with the titles of her paintings was harder than it was for her parents. “Not sure yet.” Still admiring her work.

She glanced at Kenny’s easel, he had just a blank canvas, naked, as Jackie liked to call it. Ever since she started to paint in the same room as him, his painting has changed from dark and depression, to more artistic and creative, making them more appealing to the eye.

Her heart fluttered each time he would come up to her and watched her paint, as she would do the same. She had tried to open him and get him to talk to her, but he was a locked door, not letting anyone in.

That all changed. Jackie was working at her job when she got a phone call from the office from her mother. She wanted to let her know she was dying from cancer. That was the real reason why she left in the first place, she didn’t want Jackie to see her.

Jackie’s heart dropped as she got off the phone, it all made sense, she wondered why her father was always upset and depressed, but she thought it was because her mother had left, choosing her work over the family when really she was getting treatment for her breast cancer.

After work, when she got home, she didn’t say anything to Kenny, as he watched as she sadly went into her bedroom. She wasn’t in the mood to talk, didn’t even feel like painting, which was a first for her because she had always loved to paint.

“Jackie?” Kenny called out, but there was no reply from her, he didn’t want to intrude. It made him worry about her. Her happy self was what was keeping him inspired to paint masterpieces ever since his little sister had passed away.

Instead of answering Kenny, she curled herself up in a ball on her mattress and started to cry. There was nothing she could do, but felt like she needed to do something. She wanted to go to her happy place, but painting sounded so foreign to her.

She felt Kenny’s eyes on her like he was drilling a laser into her head. As much as she wanted Kenny’s attention, there was something more that she wanted. A distraction.

Siting up from her bed, she looked over at Kenny, as he sat on the bed beside her, gazing at his blue eyes, but her eyes wandered to his lips. “Is everything okay?” He asked, but instead of answering him, she leaned into his faces and pressed her lips against his.

Kenny froze for a second, not realizing that her lips were upon his, he didn’t know how to react, but before he could embrace the kiss, she had pulled away. Kenny’s mind was questioning if he should kiss her back or leave the room awkwardly.

Jackie looked back at him, waiting for his response, but his face looked confused. Did she kiss him wrong? She thought, but maybe it was too sudden for him, she thought again.

Until he caught her off guard and very slowly placed his lips together with hers.

She was lost into the moment, embracing Kenny’s warmth that she so craved, however, instead of taking their clothes off to get further lost into each other’s arms, they both laid down on her bed, and had him embrace her, snuggling up close together and making her feel something that she hadn’t felt in a long time.

Safe.

As he brushed a strand of hair from her face, she finally spoke, telling him about her mother and her condiction.

“Go to her, you should spend your last moments together,” Kenny spoke, as much as it killed him to see her go, not knowing how long she would be gone for or if she would ever come back, he didn’t want to miss out on those final moments that he did with his sister.

“I can’t, I don’t have the money,” Jackie said as he understood her situation, he was in the same boat, being an inspiring artist wasn’t easy. He had been doing odd jobs, just to save up for an apartment, but it was never enough.


The next morning, Jackie was left alone in her bed, Kenny had stayed with her all night long, just to make sure she was okay, but he wasn’t next to her. She got up and started getting ready for the day, when she saw a note on the fridge, with enough money to get her to see her mother and possibly come back.

‘Don’t miss another moment away from your mother. You’ll regret it in the end.’ – Kenny

She smiled, as he was right. Quickly, she packed a few things and took the train to the other side of town, trying to make sure she was able to get to the hospital in time. Once she arrived, she was greeted by her father.

He hugged her tightly in his arms. “I missed you, buttercup.” He said, calling her by her childhood nickname. He started calling her that when she picked out some flowers from their garden and they happened to be buttercups.

Jackie didn’t want to let go from her father’s embrace, but slowly turned to look into the small hospital room, she could see her mother, looking pain and cold.

Her eyes started to water as he came closer to her mother’s bed, she was still alive but looked like she was barely holding on. “Mommy?” She spoke, making her mother awake and open her eyes to see her daughter.

Jackie came closer to her mother and hugged her tightly as she could, she was so weak, but was glad her daughter was sitting next to her. “I’m sorry I didn’t tell you.” Her mother spoke, as she held onto Jackie’s hand.

“Don’t worry about it, what matters is that I’m here for you,” Jackie said, kissing her mother’s hand and wiping her tears.

Jackie shared everything that was going on in her life, now. She even talked about Kenny, to her surprise, her mother said that he would be perfect for her. They played a few games, up until her mother was too weak to do so.

She died 2 months later after their last game of Uno. The last thing Jackie told her was to never give on chasing your dreams. Jackie knew she would never forget, but it made her think about Kenny. He was her new dream now, she needed to share her life with someone and he was perfect for her.

After the funeral, she said her last goodbyes to her father and headed back on the train, even though her mother had passed, she was wanting to get back to Kenny and to tell him how she felt about him.

Going up to their apartment, she was worried that he wouldn’t want to talk to her, after taking the money he gave to her to see her dying mother, but maybe he would. Taking a deep breath, she opened the door, watching Kenny stand in the middle of the studio, painting, he almost dropped his paintbrush when he saw her.

Jackie dropped her bag, and ran to him, embracing into his arms, not caring if he was covered in paint or not. She looked into his eyes and the waterworks just came down. He understood her pain as to lose something, but kept her in his arms.

“I missed you so much, Jackie. You have no idea.” He said, looking into Jackies eyes, wiping away the tears from her face, as he turned to face her to all the work he had done when she was gone. It was all pictures of her.

One of them was when she was puzzled on painting and ended up getting paint on her face. Another was of her dancing. The more she kept looking at the paintings, she realized that he returned the feelings for her, but there was one painting that caught her eye.

It was a painting of them, laying on her bed together, after their first kiss and how she told him about her mother. She didn’t know how he did it, but it was perfect. “I love this one,” Jackie said as Kenny came closer.

“Not as much as I love you,” Kenny spoke as Jackie stared at him in amazement. “I understand if you don’t return the feelings, but I do love you and I just needed to tell you.”

Jackie then pressed her lips against his, embracing his presence and telling him that she accepted his feelings for her. She pulled away, leaning their foreheads together as she smiled. “I love you too.”


Let me know in the comments of what you thought about this short story! These will be posted every Friday and if you have a prompt or idea that you would like me to try out, let me know in the comments! 

Posted in Beginner Patterns, Crochet

Crafty Sassy – Crochet C2C Baby Doll Blanket (Beginner)

Hey Dearies! So, for our first pattern of the year, I decided to create something that’s a little different. For Christmas, my daughter got quite a bit of baby dolls. It got me thinking and searching on Pinterest, what ideas they had for baby dolls.

What really got me to create this idea is when my 2-year-old came up to me and said, “Mommy, baby is cold.” I could’ve given her one of her old receiving blankets that I still had, but what fun would that be? While she was napping, I crocheted her baby doll a blanket.

20200114_141649.jpg

Let’s talk about what you’ll need for this project:

  • Medium Yarn
    • I used I Love This Yarn in the color Green, Turquoise & Red Print.
    • You’ll need only 1 skein.
  • 4.0 mm hook
  • Sewing needle.

Now, if you aren’t familiar with the ‘C2C’ stitch, here is a wonderful video that Heart Hook Home has, that not only helped me understand how to do the stitch but also shows how to increase and decrease. Here is the video:

This pattern is great for learning and getting familiar with the ‘c2c stitch before moving on to bigger and more complicated projects.

The blanket size is a 22×25 square project, you can, of course, add or decrease squares to fit a small or large size baby doll.

Let’s Begin!

Chain 5.

Row 1: Double crochet into the 3 chains from the hook and in the next 2 stitches.

Row 2: Chain 5. Repeat from row one. (This is how we increase.) Then flip your ‘square’, like you are going connect it. Slip stitch in the chain three, from the last square. Chain 2. Make 3 double crochets in that same space.

Repeat until you have 22 squares across. Once you do, after making your last square, slip stitch on the top of the square. (This is how you decrease). Chain 2 and make 3 double crochets in that chain 3 space.

Keep going until the other side has reached 25 squares and on that finally square, slip stitch on the top of the square. Chain 2 and make 3 double crochets in the chain 3 space. As you continue to go back and forth, you’ll notice the rows start to get smaller.

Once you are at your final stitch, slip stitch the top of that last square and fasten off.

Sew in any loose ends and you’re done!

20200114_141617.jpg

There you have it! A perfect mini blanket for those baby dolls! Make sure you check back in next Tuesday, I’ll have a crocheted pillow that goes with this baby doll blanket set!

Make sure you like my Facebook page and follow me on Instagram. I’m more active on my Facebook page than I am on Instagram.

Posted in Arts and Crafts, Crochet, Top Projects for Crochet/Knitting

Crafty Sassy – Top 10 Snowman Crochet Projects

Hey Dearies! Since it has been snowing quite a bit in Maine, I figured I would share some patterns for snowmen! Now, snowmen aren’t just for the Christmas season, since you can make them whenever it snows!

Note: These are NOT my own work, as I will be providing the link that goes with each free pattern. All rights go to the creators.

 1. Snowman Potholder

Snowman-Pot-Holder-Crochet-Pattern.jpg

This snowman is so cute! Even though it says it’s for a potholder, but you can definitely make a few of these to add onto a snowflake or even Christmas blanket!

Click here for the free pattern: https://melodys-makings.com/snowman-pot-holder/


2. Snowman Coffee Cup Cozy

DSCF0289.jpg

Again, as you know, I LOVE coffee cup cozies and this one is too cute not to make one for yourself or others! Most of the ones I’ve found didn’t have the cute little hat, but this one did!

Click here for the free pattern: http://hamburke.blogspot.com/2013/12/another-easy-crochet-pattern-share.html


3. Snowman Wall Hanger

Snowman-Wall-Hanging_Large500_ID-1553903.png

Wall hangings are something I usually don’t have, but when I saw this pattern, I thought about making one for my house! As long as you keep this little guy inside, he will stay nice and neat, these are also perfect for those new homeowners!

Click here for the free pattern: https://www.allfreecrochet.com/Christmas-Crochet/Snowman-Wall-Hanging


4. Snowman Hanging Dishcloth

2020-01-07 (1).png

Dishcloths aren’t something I’ve been known to create, but this little guy is too cute! Not only could you use this as a decoration, but it would look pretty cute hanging from the oven handle!

Click here for the free pattern: https://snappy-tots.com/free-pattern-snowman-hanging-dishcloth/


5. Melted Snowman

2020-01-07 (6).png

I’m melting for this project! This is one I have never seen, but once I did, I was even more excited to see that the pattern was FREE! This little guy is not only the perfect decoration for the holiday season but he could even work as a newborn gift idea as a snuggle! As long as the buttons aren’t added!

Click here for the free pattern: https://www.highlandhickorydesigns.com/melted-snowman/


6. C2C Snowman Scarf

2020-01-07.png

Ah, you know me and my love for C2C projects! This snowman will keep you nice and warm until Spring! As the pom-pom adds the perfect touch to make this project an amazing gift for someone, or even yourself!

Click here for the free pattern: https://www.windingroadcrochet.com/c2c-snowman-scarf-free-crochet-pattern/


7. Snowman Towel Topper

2020-01-07 (2).png

Towel Toppers I just LOVE! This one really takes my breath away, with so much detail, I didn’t think it was free, but I had to double-check! The creator of this piece of work took such great time and detail to this project for sure, definitely going to put this on my list of stuff to make this year!

Click here for the free pattern: https://www.ravelry.com/patterns/library/snowman-towel-topper


8. Snowman Hat

2020-01-07 (5).png

Hats are always great to make, especially if it is still snowing outside! This pattern is not only free but comes in all sizes so that you can make your entire family snowman hats!

Click here for the free pattern: https://www.repeatcrafterme.com/2016/01/crochet-snowman-hat.html


9. Snowman Hanging Towel

2020-01-07 (4).png

This towel hangs without a button, which is something that I have not quite tried, yet. This one has a lot of detail put into it, but this same pattern can be used to making Santa or a Gingerbread, but if you aren’t ready to start going down the Christmas train, this guy is something you’ll want to make for sure!

Click here for the free pattern: https://www.acrochetedsimplicity.com/snowman-kitchen-towel-free-crochet-towel-pattern/


10. Snowman Stuffie

2020-01-07 (3).png

Last, but not least, one of the cutest stuffies I’ve ever seen! There are a few of stuffy snowmen and women, that you can choose to pick from, but this one looks so soft and cuddly, I just had to put him on this list!

Click here for the free pattern: https://www.amigurumiforum.com/free-snowman-amigurumi-crochet-pattern-for-chirstmas/


There you have it! Snowman ideas for the snowy season! Which one did you like the best? Or which one can’t you wait to try out next? Leave a comment down below to let me know!

Posted in Crochet Blanket 2019

Temperature Blanket Update – December 2019 (Finished)

Hey Dearies! I am finally finished with our 2019 temperature blanket! The reason it has taken me a few days to post, because I did have a gap where some more squares could’ve gone, so I crocheted some white ones to fill in the blanket.

The only thing I want to do next adds a simple single crochet border and crochet the numbers to make 2019 and add them to the blanket as well! However, I will try my best to post the update of the blanket on my Facebook Page and Instagram, so make sure you are following me on there to check it out!

December came and went as soon as it did! Lower temperature, lead to more blues and purples when it came to squares. I’m just so grateful that this project is now done and finished!

Makine a temperature blanket isn’t as easy, as I thought it was going to be, but I managed to create one! As this being my first blanket to ever work on, I’m really proud how it came out!

Here is the list of colors I used for the blanket:

20181222_124142
100 degrees – Fire Red (I Love This Yarn)
90 degrees – Pumpkin (Red Heart Super Saver)
80 degrees – Bright Yellow (Red Heart Super Saver)
70 degrees – Jelly Bean (I Love This Yarn)
60 degrees – Green (Main Stays Basic Yarn)
50 degrees – Turqia (Red Heart Super Saver)
40 degrees – Soft Blue (I Love This Yarn)
30 degrees – Dark Orchid (Red Heart Super Saver) *Changed to the following – Violet (Red Heart With Love)
20 degrees – Orchid (I Love This Yarn) *Changed to the following – Orchid (Red Heart Super Saver)
10 and below – Light Gray (I Love This Yarn)


How do you tell which color to use?

I, personally, go with the overall temperature. So, let’s go by today, for example:

Today in Maine, the overall temperature is 17 degrees. I would choose the light gray.

Let’s say that it was an overall temperature of 22 degrees, I would choose the Orchid color. All my temperatures, for my colored yarn, has to have the same number first number. If that makes any sense, I’m sorry if it doesn’t!

What was the highest temperature for this month?

Sadly, we didn’t get a 60-degree days, but have had quite of bit of 50 degree days, which isn’t bad, but I prefer my 60 degree days any day!

What was the lowest temperature for this month?

We did hit below 10 degrees, which isn’t fun, but now, I’ll be able to snuggle in this blanket to keep me nice and warm.

Do you post daily updates?

Yes, I do. On my Facebook page, I post a picture of the square for each day. I also tried to post every week’s worth, but it was hard to keep track of, so I’ll be posting monthly and daily instead.

If you haven’t liked my Facebook Page, here is the link below! It keeps you posted and updated on my temperature blanket and any updates for my blog and YouTube channel, as well!

https://www.facebook.com/katiesblog96971617/?ref=bookmarks

Thank you all for watching how this blanket turned out to be! I’m so glad that it’s finally done and the amount of support and motivation that I had was so helpful, so thank you to all that have watched this blanket go from just a few squares to a giant masterpiece!

Here is a slideshow of the progress of the blanket from month to month:

This slideshow requires JavaScript.

Note: The month of February, I forgot to take a photo of, but other than that they are all there!

Posted in Arts and Crafts, Crochet

Crochet Temperature Blanket: Tips and Tricks for Starting One

Hey Dearies! As you all know, I’ve been working on a temperature blanket all year long! If you are a follower and like my Facebook page, you will know that I have been posting updates and squares, as I go along, but because this was my first ever temperature blanket, I’ve picked up on some tips and tricks to help out anyone who wants to create one.

Now, I want to explain that a temperature blanket isn’t a bunch of granny squares that you sew together as you go. You can choose to use any type of blanket for this, although, if you want to do a C2C blanket, you’ll have to work on a lot of planning to make one of those. Here are a few examples:

This slideshow requires JavaScript.

Any blanket pattern you can think of, you can pretty much make it into a temperature blanket! If you are still confused about what a temperature blanket is, let me explain a little better:

A temperature blanket is when someone who knits or crochets the temperature of each day for a year. Using different colors to represent all of the temps.

That’s just a quick explanation of what it is. Let’s talk about what you are gonna need to do, in order to actually start this blanket. I really wished I did some more digging on what colors and how big or small I needed to make my squares.


Making a color chart

This is one of the most important things you need to think about before even starting the temperature blanket! I looked on Pinterest, just to get an idea on what others have done for their temperature blankets, but here’s mine:

20181222_124142
100 degrees – Fire Red (I Love This Yarn)
90 degrees – Pumpkin (Red Heart Super Saver)
80 degrees – Bright Yellow (Red Heart Super Saver)
70 degrees – Jelly Bean (I Love This Yarn)
60 degrees – Green (Main Stays Basic Yarn)
50 degrees – Turqia (Red Heart Super Saver)
40 degrees – Soft Blue (I Love This Yarn)
30 degrees – Dark Orchid (Red Heart Super Saver) *Changed to the following – Violet (Red Heart With Love)
20 degrees – Orchid (I Love This Yarn) *Changed to the following – Orchid (Red Heart Super Saver)
10 and below – Light Gray (I Love This Yarn)

See anything wrong with it? I had to scratch out the original colors, for a few of the temperatures, due to me not having enough yarn for a few of the temperatures. Not to mention, the way I planned this out, wasn’t the best idea. Let’s look at a few other peoples temperatures charts:

7a545-Untitled

I based my chart off of this person temperature chart, which isn’t a bad idea, but if you are going to do it this way, make sure you have a few skeins stocked for each color, which I did not, hence why I wouldn’t update on time because I ran out of color.

This slideshow requires JavaScript.

These two examples are what I wished I went with because there are more colors for all the temperatures. When I mean by that, more colors means more yarn, but less likely of a chance of running out very quickly.

Not to mention, more colors, the more you’ll be able to have a rainbow blanket.

If you aren’t a big fan of rainbow colors, it doesn’t mean you have to do them. I’ve seen people do different shades of one color, with the added greys, browns, or whites added in.

image1_small.jpg

The best part of these, you can switch out the ‘purple’ color for any color you wish! Not only are these are a little different than the normal temperature blanket, but these would make a great gift to crochet the temperature of their baby’s first year!

With whatever you decide to do, making a chart by scratch or following someone else temperature chart, make sure you have the extra yarn for each temperature, just in case so you have back up!


-Picking out the supplies

This is another step that determines, not only how much yarn you’ll go through, but also how thick or thin your blanket will me. I used a size 5.0mm hook, which is the normal size that most projects require, I consider this to be the normal hook that most people and beginners, work with a lot.

Of course, you can change the hook to be bigger or smaller, depending on what you are going for.

Remember, the small the hook, the thinner or smaller your stitches will me.  The bigger the hook, the thicker or bigger your stitches will be.

Either way, whatever hook size you chose to use, should be decided on the type of yarn you use. Not all yarns are the same. For my temperature blanket, most of my yarn was a mix of ‘I Love This Yarn’ and ‘Red Heart Super Saver’.

20181222_122613.jpg

I do recommend using the SAME brand when it comes to your temperature blanket. If you want it to look good, I would use the same brand, but if you are going through your stash of yarn, that’s okay too.

If this is your first time creating a temperature blanket, using your stash or straps isn’t a bad idea, but will give you a chance to make trial and errors, when starting this project.


-How to start working at it?

Once you have the temperature color chart ready and what type of supplies you need, its time to make time for this project. Since you are crocheting a color according to the temperature, doing it every day can be a challenge or you may not have the time.

Writing the temperatures is never a bad idea, but I also found it very helpful, especially when I get behind or run out of yarn, you can always look back and have the temperature written down and ready to go when you need it so.

I want to say that I used to crochet a square a day, which wasn’t a bad idea, but sometimes I would forget to do so. That’s why I started writing down the days and what their temperatures were so that I could catch up during the weekend.

This system not only made it easier but also gave me more time to spend with the project itself. Whatever works for your schedule.


-Don’t forget to have fun!

Temperature blankets always sound fun to make in the beginning, but don’t just work on that project, have a few mini-projects to work on along with your temperature blanket. Sometimes only working on a temperature blanket can become boring, especially if you have been doing the same stitch.

If you are like me, and only thought of having one project at a time, versus working on 5 to 6 unfinished projects. I didn’t think I could be someone that got bored, but I understood that once you start a big project, it can get bored or old faster if that’s the only one you are currently working on.

I’ve learned that having a few or more projects unfinished is okay to have, but it keeps the balance of making sure that you are always doing something different versus repeating the same stitch over and over again.

da9b6-1


That’s all the tips and tricks I have for you this year! I’m not sure if I’m going to be making a temperature blanket for 2020, but if I do, I’ll let you all know all the details when I do.

Are you working on a temperature blanket? If so, what design are you going for? Let me know in the comments!

Make sure to follow me on my Facebook page, Twitter, and Instagram, to keep up with what my final result will be when I finish my 2019’s temperature blanket. Not to mention, I’m usually active on Facebook, especially when it comes to my blog.

And also, have a Happy New Year!

Posted in Crochet

Crafty Sassy 2019 Pattern Recap

Hey Dearies! Sadly, 2019 is coming to the end and I posted my final pattern for this year, but I wanted to do a recap on all the patterns that I have shared with you for the year of 2019!

I will be doing a mini description of them and adding the link, just in case you would like to check out that post or you missed it.

Crochet Mug/Coffee Cozy w/ Pocket

20190108_121100.jpg

This one was super fun to make! I wanted to have a mug cozy that worked for both mugs and regular coffee cups, not to mention, having a pocket for holding sugar or a tea packet, especially if you are on the go!


Crochet Coin/Gift Card Purse

20190205_210348.jpg

I came up with this idea for my daughter since she was only a year old, this purse fit her size. Not to mention, I wanted to make sure it would fit the size for a gift card because I didn’t find any patterns that looked this cute!


Crochet Stuffed Easter Egg

20190226_112352.jpg

This one I thought about selling these with a basket that I made during Easter, but they were a pain in the butt to make, so I decided to have the pattern free for all of you! They look perfect for baby’s first Easter!


Crochet Tablet Cover 

20190312_090346.jpg

I made this for my kindle, since the case it came in was very broken, not to mention, I wanted to try this pattern out for it. However, I made it too small, as to why I choose to work around it with a different color. But in the end, I came out really cute!


Crochet Completely Solid Granny Square

20190416_084708.jpg

I wasn’t going to post this pattern, but at the time, I was working on a project and was looking everywhere for a pattern of a completely solid granny square. I figured there was someone else that was looking for the same thing. These are perfect for creating a pixel blanket, however, it will take forever to sew them together.


Crochet Adult Size Dragon Ball Z Hat

20190521_164846.jpg

My fiance requested this one, saw it on Pinterest and I had to make him one. Sadly, the owner of the original hat didn’t sell the pattern, but the hats themselves, so I decided to create it but looking at the picture, which is harder than it looks, but not impossible.


Crochet Ice Pop Cozy

20190611_101847.jpg

These were pretty simple to make and when I first got into crocheting, ice pop cozies are one of the basic projects that every beginner should make because they not only give you some practice working in rounds but are really easy and quick to make quickly for a craft fair.


Crochet Striped Washcloth

20190709_123421.jpg

Usually, washcloths are the first thing beginners make, when they first start to get into crocheting, but I didn’t make one until a customer asked me. Don’t get me wrong, making washcloths were on my list to make, but I wanted to do something that was a challenge for myself.


Crochet Circle Coaster 

20190716_095621.jpg

Coasters are another fun and cool idea to make, if you have been following for a while, you know that I love to crochet coasters! The only downfall with some of these coasters that they have out there, they don’t make them big enough for a normal size mug, I make sure to make my coasters to be as big, if not bigger, for all mug sizes.


Crochet C2C Phone Case

20190723_094737.jpg

Ever since I learned the C2C stitch, I love working with it! It’s just so much fun to create and so many ideas I can’t wait to make in the future with it! Once you know how to work with the C2C stitch, the ideas of making pixel designs are endless!


Crochet C2C Wrist Pocket

20190730_085129.jpg

Again, this year I was trying out new patterns that had to do with the C2C stitch. I figured this idea would be useful for holding cash, when out and about. Or for kids who lose their teeth. Another idea would be to use this to hold your buttons or stitch markers as you crochet or knit!


Crochet Can Cozies

20190806_162214.jpg

Cozies are also one of my favorite things to make, as well! Whether they are for cans, mugs, or coffee cups, I love to decorate my drinks, cold or hot! Don’t be surprised to see some more of them coming up in 2020.


Crochet Basic Square Coaster

20190813_083031.jpg

As I have said, I love making coasters! You’ll be most likely seeing more of them in the new year, but I want to make it more creative and festive for all the seasons and holidays.


Crochet Travel Bag

20190816_160820.jpg

Crocheted bags and purses are always something that I loved to see made, they aren’t always the easiest bags to make, but seeing how creative some of the bags come out is so amazing! Made this one for my niece, she loved it!


Crochet Halloween Coaster

20191001_160937.jpg

These coasters aren’t just for Halloween, but if you try out different colors, you can make them for any time of year! This one goes with a placemat, which I love the placemat sets that have coasters!


Crochet Halloween Placemat

20191009_130822.jpg

Placemats are another pattern that I hope you will see this new year! These aren’t the ones you see all the time, but placemats are something that I think brings out a kitchen or dining room nicely.


Crochet C2C Scarf

20191213_205336.jpg

Scarfs are a first for me to make this year and I hope to come up with more fun and bright ideas as well! This idea came from the C2C Grinch scarf but made it like a candy cane or peppermint stick.


Crochet Child Size Mittens

20191213_205605.jpg

Are these super cute? Yes, but they were a real pain in the butt to make, especially when it came to the thumb part of the mitten. Not to mention, I wanted to make my nieces and nephews all a set, but because of how I don’t like working in small circles, I ended up making something else instead.


Crochet Child Size Hat w/ Pom Pom

20191213_205419.jpg

Last, but not least, the hats! These are based on how the Dragon Ball Z hat, but sized to fit a child. When it comes to hats, go bigger than the actual size. Going bigger isn’t a bad idea because, knowing how fast kids grow, they can just grow into them.


There they are! All the patterns from 2019! I know I haven’t been as active as I wanted to, but with starting college and being a stay at home mom with a 2-year-old, it’s been really busy!

However, I am planning out how I want to be more active for 2020. If you have any ideas or have something you would like me to create or come up with, feel free to let me know!

And as always, make sure to follow me on my Facebook page, Instagram, and Twitter. I’m more active on my Facebook, so make sure you are following!

I hope you all have a wonderful rest of the year and we will see you all back in 2020 for new patterns, crafts, stories, and so much more!

Posted in Arts and Crafts, Crochet Blanket 2019

Temperature Blanket Update – November 2019

I know this post has been way overdue, with my college classes and the holidays being around the same time, I have put this project on due, but now that I am currently on ‘break’ for college and holidays are just about over, I can put my focus on finishing this blanket.

Now that the temperature has gone down, for November, it has been getting cold, and we even hit the 20s. Lower the temps, more chance for snow and we have gotten a few snowstorms up here in Maine.

20191228_142604.jpg

We only have a month left! I can’t wait for this project to be completed, not only does this take forever to make, but it was also a pain in the butt for me to do, just because of how unprepared I was, but I will make sure to create on a post on how I would change or become more prepared on creating a temperature blanket.

As always, here is the list of colors and what temperatures they represent:

20181222_124142
100 degrees – Fire Red (I Love This Yarn)
90 degrees – Pumpkin (Red Heart Super Saver)
80 degrees – Bright Yellow (Red Heart Super Saver)
70 degrees – Jelly Bean (I Love This Yarn)
60 degrees – Green (Main Stays Basic Yarn)
50 degrees – Turqia (Red Heart Super Saver)
40 degrees – Soft Blue (I Love This Yarn)
30 degrees – Dark Orchid (Red Heart Super Saver) *Changed to the following – Violet (Red Heart With Love)
20 degrees – Orchid (I Love This Yarn) *Changed to the following – Orchid (Red Heart Super Saver)
10 and below – Light Gray (I Love This Yarn)

How do you tell which color to use?

I, personally, go with the overall temperature. So, let’s go by today, for example:

Today in Maine, the overall temperature is 17 degrees. I would choose the light gray.

Let’s say that it was an overall temperature of 22 degrees, I would choose the Orchid color. All my temperatures, for my colored yarn, has to have the same number first number. If that makes any sense, I’m sorry if it doesn’t!

What was the highest temperature for this month?

Well, we haven’t seen anything higher than 50s degrees, which is cold, but I would prefer 60 degree days. As we get closer to the end of the year, we most likely won’t see anything warmer than 50 degrees.

What was the lowest temperature for this month?

We actually hit 20 degrees a few times this month, but nothing colder than that and we had to make sure we were bundled up. Best part about making this blanket during the winter, it definetly keeps you warm while you add the squares to the blanket.

Do you post daily updates?

Yes, I do. On my Facebook page, I post a picture of the square for each day. I also tried to post every week’s worth, but it was hard to keep track of, so I’ll be posting monthly and daily instead.

If you haven’t liked my Facebook Page, here is the link below! It keeps you posted and updated on my temperature blanket and any updates for my blog and YouTube channel, as well!

https://www.facebook.com/katiesblog96971617/?ref=bookmarks

Posted in Arts and Crafts, Crochet, Top Projects for Crochet/Knitting

Crafty Sassy: Top 10 Free Thanksgiving Crochet Patterns

Hey Dearies! So, to start out this wonderful month out, I figured I could do some searching to find some super cute and amazing decorations for Thanksgiving since it’s almost here!

Note: I don’t own any of these patterns, all rights go to their original creators. I will be proving the link to the original patterns. Make sure that if you create any of these, please don’t claim the patterns as your own, these creators work hard to create these patterns!

I wanted to get a variety of Thanksgiving stuff, so it won’t just be placemats or potholders. Its a little bit of everything. Without further ado, here are some free patterns just in time for Thanksgiving!

1.Pumpkin Pie Pot Holder

IMG_20181129_115124_small2.jpg

This pie looks so good enough to eat! Just kidding, but it makes a very festive potholder for Thanksgiving Dinner or for those who just LOVE the famous pumpkin pie!

https://www.ravelry.com/patterns/library/pumpkin-pie-pot-holder

2.Fall Maple Leaves

2019-11-12.png

These are perfect for adding more of a ‘3D’ effect to blankets, hats, or anything! Of course, you could use them as coasters, if you make them big enough!

Fall Maple Leaves Free Crochet Pattern

3. Thanksgiving Wreath

2019-11-12 (1).png

Ain’t this the most cutest thing ever?! If you are looking for something to hang on your door for Thanksgiving, this would be perfect! Not to mention, you could even hang this on your wall, as well.

Thanksgiving Wreath

4. Autumn Placemat

Autumn-Placemats-Free-Crochet-Pattern-6.jpg

Now, if you are looking for a simple, yet festive for a placemat, these are for you! Very simple to make, but also are perfect for the big turkey day! Not to mention the color pattern that they chose for the yarn is beautiful!

Crochet Autumn Placemats

5. Pumpkin Pie Cuddler

2019-11-12 (2)

If you are a big pumpkin pie fan, then you definitely need to make this cuddler for yourself! Not to mention, these creators have a lot to offer, especially when it comes to free patterns, but this pie is too cute!

Pumpkin Pie Kawaii Cuddler™ – Free Crochet Pattern

6. Falling Leaves Afghan

EYJIDW~1

Now that it’s getting colder, time to make some blankets! This one is perfect for the fall, especially if you love to cuddle up in a blanket on the colder days!

https://www.favecrafts.com/Crochet-Afghans/Falling-Leaves-Afghan-Crochet-Pattern-from-Red-Heart

7. Turkey Coasters

2019-11-12 (3).png

These turkey coasters are by far the cutest I’ve ever seen! The creator put a lot of detail into these and I think they are just too cute! These can be perfect for coasters for the kids for Thanksgiving!

Turkey Coasters Crochet Pattern

8. Thanksgiving Turkey Stuffie

2019-11-12 (5).png

Looking for something cute to make for a shelf for Thanksgiving, this little guy is just too adorable to not want to make! I love how his feathers came out!

Thanksgiving Turkey Crochet Pattern

9. Chestnut Leaf Table Runner & Placemat

1329.jpg

I just LOVE this design! Even if it isn’t for Thanksgiving, having these places mats up during the fall would be too cute to have! Not to mention, you crochet three of the placemats to get the runner!

https://www.abc-knitting-patterns.com/1329.html

10. Pumpkin Placemat Set

Pumpkin_Set-296x278.jpg

Are you one of those people who just LOVES pumpkins? Then you need to make yourself a table set of these! Even if you don’t like the pumpkins, this would make a wonderful placemat come Thanksgiving time or just in general for your everyday use!

https://www.momsloveofcrochet.com/PumpkinSet.html


There you have it! New free patterns for you to try out, even if it isn’t Thanksgiving, these are still a fun idea to try out in time for the holidays. They would also make great gifts for new newlyweds or new homeowners as well!

Which ones were your favorites? Which one would you love to create for yourself? Let me know in the comments!

Make sure you like my Facebook page! I post updates on my blog, Youtube channel, and anything else on there!

https://www.facebook.com/katiesblog96971617/

Posted in Arts and Crafts, Crochet, Top Projects for Crochet/Knitting

Crafty Sassy: Top 10 Free Crochet Halloween Stuffies

Hey Dearies! Since we are in the last week of October and Halloween is just days away, I figured I would share some of these super cute stuffies that you can make for this spooky holiday!

Note: I don’t own any of these patterns, all rights go to their original creators. I will be proving the link to the original patterns. Make sure that if you create any of these, please don’t claim the patterns as your own, these creators work hard to create these patterns!

Now, some of these patterns might be a little hard for beginners, but we love to challenge our skills! These are also perfect gifts to that person who are big fans of the Halloween season.

1. Cute Baby Ghost
https://www.windingroadcrochet.com/pretty-little-ghost-free-crochet-pattern/

2019-10-29 (2).png

This is super cute! I also love the little spider that they added on the side for the ghost! If you are wondering how their cheeks get pink, any lite blush or eyeshadow can create that effect.

2. Little Bat
https://coolcreativity.com/crochet/amigurumi-little-bat-free-crochet-pattern/

Amigurumi-Little-Bat-Free-Crochet-Pattern-.jpg

This is another adorable pattern, I just love these cute baby bats!

3. Little Pumpkins
https://stringydingding.com/pumpkin-amigurumi-free-crochet-pattern/

2019-10-29.png

Last year, I made a bigger version of these mini pumpkins, although, I didn’t have enough time to make it more adorable. I’m tempted to make a mini one!

4. Sharlotte The Spider
https://woolpatterns.com/cute-halloween-amigurumi-free-crochet-patterns/

2019-10-29 (1).png

If you don’t like real spiders, I think you’ll be on board with Sharlotte! This reminds me of Charlotte’s Web book I read back in elementary school.

5. Frankenstein
https://spinayarncrochet.com/frankensteins-monster-free-crochet-pattern/

2019-10-29 (3).png

This little guy is freaking cute! These are perfect for the little ones to cuddle with at night. This creator has a few of these little guys and the next one is on this list!

6. Classic Vampire
https://spinayarncrochet.com/vampire-amigurumi-free-crochet-pattern/

2019-10-29 (4).png

I’m a big vampire fan and the reason why I said this was a ‘classic vampire’, because, well, it is. That and it doesn’t sparkle in the sunlight, that’s for sure. However, putting a little bit of highlight on it could make this little monster shine in the daylight.

7. Candy Corn Cuddler
https://3amgracedesigns.com/candy-corn-kawaii-cuddler/

2019-10-29 (5).png

This is something I would definitely create and put on my couch, however, my two-year-old would most likely take it whenever I wanted to cuddle with it. I can’t blame her either, that cuddler is too cute!

8. Zombie Bear
https://www.ravelry.com/patterns/library/zombie-bear-2

zombie1_small.png

This bear is cute and spooky, just look at him. Now, this stuffy is one of those fun one that you can use your scrap yarn for. If you are a big Halloween fan, this might be something that you want to make for your spooky collection.

9. Oogie Boogie
https://www.ravelry.com/patterns/library/oogie-boogie

2019-10-29 (6).png

If you already know who this guy is, then you must either have seen The Nightmare Before Christmas or are a HUGE fan of the movie. I couldn’t forget this guy, that’s for sure, but the best part, he’s a free pattern. And if you check out the creator, you’ll also find that they have created Zero and Jack, as well.

10. Hocus Pocus Witches
http://thecrochetqueendesigns.com/free-pattern-red-haired-witch/

2019-10-29 (7).png

Well, I had to save the best for last! Hocus Pocus is one of those movies that you have to see every year for Halloween and when I saw this on Pinterest, I was so excited! More excited that the pattern was free!

Which ones were your favorites? Which one would you love to create for yourself? Let me know in the comments!

Make sure you like my Facebook page! I post updates on my blog, Youtube channel, and anything else on there!

https://www.facebook.com/katiesblog96971617/


Posted in Crochet, Easy Patterns

Crafty Sassy: Crochet Halloween Coaster (Easy)

Hey Dearies! I know it has been quite a while since I’ve posted for Crafty Sassy, but because Halloween is one of my favorite holidays, not to mention my birthday is in October, I had to share this super cute pattern with you all!

So, this is part of a set, but the placemat will come out next week. This pattern set was part of my Mother’s Day giveaway, while I used a light purple and white. However, this is Halloween, so the colors will be black and orange.

Here is the link for the matching placemat that goes with this coaster: https://katiesblog96971617.com/2019/10/09/crafty-sassy-crochet-halloween-placemat-easy/

20191001_160907.jpg

As much as I love working with black, it’s very difficult to see the stitches, but here are a few tips to help you out.

Tips for working with black yarn:

  1. If you are lucky enough to be a crochet hook collector, you might have heard of the ones that light up, and yes they do work great, especially when you are working with darker colored yarn.
  2. If you don’t have those light-up hooks hanging around, a lamp or overhead lights will be your best friend. I always use an overhead light for my life and when working with darker colors.
  3. If you don’t have any of the 2 above, sunlight or daylight works well!

Let’s talk about what you will need:

  • Medium Size Yarn
    • I’ll be using Pumpkin, in Red Heart Super Saver, and Black, in I Love This Yarn.
  • 5.5mm hook
  • Sewing needle

Take the color you would like to use for the middle. I’ll be using black as my middle.

Chain 6.

Round 1: Chain 3 (counts as double crochet on thisd rounds and the others). 9 Double crochets in the ring. Join at the top of your chain 3. (10 dc)

Round 2: Chain 3. Double crochet in the same chain as joining. 2 Double crochets in each stitch. Join at the top of your chain 3. (20 dc)

Round 3: Chain 3. Double crochet in the same stitch as joining. 2 Double crochets in each stitch. Join at the top of your chain 3. (40 dc)

You can stop here if you want, but if you want to make it bigger, do Round 4. If you want to stop here, skip to the border step. 

Round 4: Chain 3. Double crochet in the same stitch as joining. *Double crochet in the next stitch, make 2 double crochets in the next stitch.* Join at the top of chain 3.

Border

Grab the second color and chain 1 with it.

Round 1:  Single crochet in that same stitch you joined in the last round and all around. Slip stitch into the first single crochet.

Round 2: Chain 1. Skip the next stitch. *Make 5 double crochets in the next stitch. Skip the next stitch. Slip stitch in the next stitch.* Repeat until you reach the end and slip stitch.

Fasten off and sew in any loose ends.

There you have it! Make sure to check in next Tuesday for the placemat that goes with this coaster.

Also, don’t forget to like my Facebook page, I update it on a daily and it let’s you know when another blog post or free giveaway is!

https://www.facebook.com/katiesblog96971617/

Posted in Crochet, Easy Patterns

Crafty Sassy: Crochet C2C Phone Case (Easy)

Hey Dearies! I’ve got another free pattern for you guys and I can’t wait to show it to you all! So, as you all know, if you follow me on Instagram, I showed you one of my pieces that was a C2C (Otherwise called a Corner 2 Corner), that I sadly rushed and didn’t pay attention to the details and ended up taking it apart.

Now, I am currently been practicing with the C2C stitch and I figured this pattern would be an awesome idea, especially if you want to try and make this particular stitch. This phone case is a basic ‘sleeve’ case.

For this case, I ended up pulling out an unused skein of yarn that has been sitting in my closet of yarn, that I got for Christmas. I also know a LOT of people and family members who just LOVE camo stuff and I figured, why not use it for this!

Let’s talk about what you will need:

  • Medium Yarn
    • I am using the Red Heart Super Saver in Camo.
    • You can use whatever colors you wish, but using a mixed colored yarn makes it more fun!
  • 5.0 mm hook
  • Sewing needle

Let’s Begin!

Making the Base

First thing is first, grab your yarn and make a slip knot onto your hook!

Row 1: Chain 5. Double crochet into the 3rd chain from the hook. Double crochet into the next 2 chain stitches.

Row 2: Repeat row 1. *Slip Stitch into the opening gap of the last square you made, in the chain 3 space. Chain 2. Make 3 double crochets in the same gap that you made your slip stitch in. * Repeat * one more. Turn your work.

Repeat Row 1 and Row 2 until you reach your desired height. Mine has 12 squares for my height, I wanted to make it a little bit bigger so it wasn’t so snugged tight. 

When you reach the desired height, turn your work and slip stitch into the next 3 stitches. After that, Chain 2 and make your 3 double crochets. You do this same thing for your width as well. (I did about 13, making sure it wrapped around my phone, but adding an extra row, making it 14 just so it wasn’t as snug.

I know this can sound confusing, but if you need to watch someone do this, I will be leaving a link from Heart Hook Home, that shows you what you need to do. If you are like me, you want to see what you need to do, but once you learn to do it, you’ll catch on pretty quick!

This video was SO helpful when I was looking for a good C2C teaching video. You see, when you do a normal C2C, they have you chain 6 instead of 5, making the project have more of a gap between squares.

Anyway, how long you want to make your width, is totally up to you. I based it on how long it needed to be to wrap around my phone, but I added another row so that it wouldn’t be so tight.

Here is what it will look like:

20190723_085157.jpg
As you can see, my length is about 12 squares going up and my width is about 14 squares going across. 

Border/Sewing Together (Optional)

Now, for the next part, you can do of 2 ways.

  1. Single crochet around the entire base. 
    1. I went with the first one because it does make it easier to add the buttonhole to the case itself. It also makes it look nice and neat.
    2. When you single crochet around, make sure to make 3 single crochets in all of the corners. You’ll see why when we come to the next step!
  2. Fold it and sew it together. 
    1. You can do the second way, but if you are looking for an easier, and simple way to sew them together, step one is the way to go! If you are set on step 2, just skip down to the buttonhole step.

Once you have finished with step 1, grab your sewing needle, sew in any loose ends before we begin. Get enough yarn, that you will think will be enough, and thread your needle.

Note: I usually grab more than necessary, but the extra yarn that is leftover, we are going to use for the buttonhole or you can use it for any scrap projects in the future! NEVER THROW YOUR SCRAPS!

Once your needle is threaded, line the two ends together and tie a know. This will make it so that our sewing is a little thicker. Then start sewing! I went back an forth, going through both of the stitches from the single crochet.

Sew ONLY 3 of the sides, one of the short sides will be the opening for the case itself. Cut any extra yarn and weave in any loose piece of yarn. Any extra yarn we will be using for our next step!

20190723_093834.jpg

Here is what mine looked like, once I sewed around it all!

Buttonhole and Button

By the opening at the top, find where you want to place your buttonhole.

Slip knot the extra yarn onto your hook and insert it onto the top. Single crochet in that same spot.

Chain 20.

Note: You can chain more or less, depending on where you want your button to be, just remember, you need to make sure that it will reach the button. You can always sew the button to where you want it to be and then create the buttonhole. 

Single crochet into the next stitch/and or place.

Fasten off and weave the ends. Add your button and you are done!

20190723_094737.jpg
This is what mine turned out to be!

There you have it! I think these would be perfect gifts for stocking stuffers for the teens or adults. I won’t be surprised if you can fit a PSP or DS in these no problem!

Don’t forget to follow me on Instagram or like my page on Facebook. I update my Facebook page, a lot, so if you are wondering when I’ll have a new post or when I go live, that is the place to check out!

https://www.facebook.com/katiesblog96971617/?ref=bookmarks

Posted in Crochet Blanket 2019

Temperature Blanket Update 2019: June

Hey Dearies! Another month as went and gone, but we officially in the summer months for sure! I’ve already had to re-stock on the 70 degrees weather since I really didn’t plan this too well, but it was something that was completely new to try out.

Lately, it has been either raining or just too hot to do anything. For us crocheter’s or ‘hookers’, we would rather be inside in the cool AC, working on our projects, especially if you are working on blankets.

Although I will admit, I did go outside a few times with my hook and crocheted outside, but once the sun starts to move around, you just want to find another place with shade. Not to mention the bugs are crazy this year!

Now, let’s take a look at what we have so far:

20190702_145618.jpg
January, February, March, April, May, and June

As this blanket is getting bigger, it’s been harder to take pictures of it, not to mention each of my squares is bigger than a normal temperature blanket would be.

Oh, and don’t mind the toys that are scattered around the blanket, I was taking this photo, just after my daughter woke up from her nap. I had to rush a little bit, just to make sure that I got the entire blanket in the frame.

Not to mention, my daughter wanted to have fun on the blanket itself!

20181222_124142
100 degrees – Fire Red (I Love This Yarn)
90 degrees – Pumpkin (Red Heart Super Saver)
80 degrees – Bright Yellow (Red Heart Super Saver)
70 degrees – Jelly Bean (I Love This Yarn)
60 degrees – Green (Main Stays Basic Yarn)
50 degrees – Turqia (Red Heart Super Saver)
40 degrees – Soft Blue (I Love This Yarn)
30 degrees – Dark Orchid (Red Heart Super Saver) *Changed to the following – Violet (Red Heart With Love)
20 degrees – Orchid (I Love This Yarn) *Changed to the following – Orchid (Red Heart Super Saver)
10 and below – Light Gray (I Love This Yarn)


How do you tell which color to use?

I, personally, go with the overall temperature. So, let’s go by today, for example:

Today in Maine, the overall temperature is 17 degrees. I would choose the light gray.

Let’s say that it was an overall temperature of 22 degrees, I would choose the Orchid color. All my temperatures, for my colored yarn, has to have the same number first number. If that makes any sense, I’m sorry if it doesn’t!

What was the highest temperature for this month?

Yes, we have hit the high 80’s, which means it won’t be much longer until we start to see some higher temperatures. For the most part, it’s been in the ’70s, but as we start to get into July, the temperature is sure to crank up.

What was the lowest temperature for this month?

We only had maybe a day or two that was just in the ’60s, which is just the way I like it. As we get more into July, we may not see another 60-degree day for a little bit, but hopefully, it will and give us a chance to cool down.

Do you post daily updates?

Yes, I do. On my Facebook page, I post a picture of the square for each day. I also tried to post every week’s worth, but it was hard to keep track of, so I’ll be posting monthly and daily instead.

If you haven’t liked my Facebook Page, here is the link below! It keeps you posted and updated on my temperature blanket and any updates for my blog and YouTube channel, as well!

https://www.facebook.com/katiesblog96971617/?ref=bookmarks

Posted in Arts and Crafts, Beginner Patterns, Crochet

Crafty Sassy: Crochet Ice Pop Cozies (Beginner)

Hey Dearies! So, since we are in summer, I wanted to give you all a pattern that was perfect for this season! As I was growing up, one of the favorite cold treat to have on a hot day, other than ice cream, was freeze pops!

We would always have so many of them that the only ones that were left in the fridge were the colors that we didn’t care to have. My favorites were red, pink, and of course blue!

These cozies are not only super cute, but they are perfect for the little ones and those who don’t like holding cold stuff in their hands. These are just a simple and very basic to make, so if you are short on time, these can be finished within a  few minutes, depending on how fast you crochet.

I have also included two sets of the same pattern, one for switching colors and the other one for making just solid colors. The color switching one will be first and the solid color one will be after that.

Here’s what you will need:

  • Medium Yarn (In any color you would like, or have two colors for more fun!)
  • 4.5 mm hook
  • Stitch Markers (This is optional, but if you are a beginner, I highly recommend to use.)
  • Sewing Needle

Let’s Begin! (Color Switching)

20190611_101902.jpg

Chain 13 and slip stitch into the first ch to create a ring.

Round 1: Ch 2. 13 half double crochet in the ring, slip stitch on the top of your ch 2 to close. Work each round continuously; use a stitch marker to help keep track of the rounds.

Round 2: 13 half double crochet around.

Round 3: 13 half double crochet around.

Round 4: 13 half double crochet around. (This is where you can choose to switch colors if you like.)

Round 5: 13 half double crochet around.

Round 6: 13 half double crochet around.

Round 7: 13 half double crochet around. (This is where you would switch your colors again.)

Round 8: 13 half double crochet around.

Round 9: 13 half double crochet around.

Finish off and sew in ends.


Let’s Begin! (Solid Color)

20190611_101853.jpg

Chain 13 and slip stitch into the first ch to create a ring.

Round 1: Ch 2. 13 half double crochet in the ring, slip stitch on the top of your ch 2 to close. Work each round continuously; use a stitch marker to help keep track of the rounds.

Round 2-9: 13 half double crochet.

Finish off and sew in ends.

This is something that can be done very quickly and it’s also fun to mix the colors around. These are also perfect for selling at craft fairs since it is something simple to create!

Also, if you don’t like the size of the cozie, you can always add more rows to make it longer.

Another thing, if you wanted it to sit at the end of the freeze pop, you can always sew the bottom of it. However, I like the cozy being the size it is since it’s easier to move and adjust when you are eating the freeze pop.


Don’t forget to check out my Facebook page! I try to go live on Tuesdays and if you like my page, I do polls and free giveaways as well! Also, this is usually the first place that I post updates on my blog as well!

https://www.facebook.com/katiesblog96971617/


Posted in Crochet Blanket 2019

Temperature Blanket Update 2019: May

Hey Dearies! Another month has passed for 2019! We FINALLY are getting some warmer weather, just in time for summer! As you can see, I have taken the picture from the floor and not on my bed because the blanket is starting to get really big!

I bet you are wondering how long it will get, huh? Well, not much longer because once the end of June has come and gone, I will be starting July from the beginning of our blanket. I know that it’s not something people do normally when it comes to temperature blankets.

So, let’s talk about this month some more! So, we finally hit a few 70 degree days, but nothing has gotten warmer than that, though, it has felt like that. Not very many 40 degree squares, but it looks like we won’t be seeing days like those for awhile!

20190603_201720.jpg
January, February, March, April, and May.

Sorry for the picture quality not being the best, but we can see every square all in one frame, which is harder, especially trying to fit it on the bed to take a perfect picture of it.

As always, here is the chart of colors that I am using, nothing has really changed, but I think I did switch out a brand for the 60 degrees color to a Red Heart brand since my entire blanket is almost completely made up of it.

The good thing is, the color didn’t really change at all, still the same color, just a different brand.

20181222_124142
100 degrees – Fire Red (I Love This Yarn)
90 degrees – Pumpkin (Red Heart Super Saver)
80 degrees – Bright Yellow (Red Heart Super Saver)
70 degrees – Jelly Bean (I Love This Yarn)
60 degrees – Green (Main Stays Basic Yarn)
50 degrees – Turqia (Red Heart Super Saver)
40 degrees – Soft Blue (I Love This Yarn)
30 degrees – Dark Orchid (Red Heart Super Saver) *Changed to the following – Violet (Red Heart With Love)
20 degrees – Orchid (I Love This Yarn) *Changed to the following – Orchid (Red Heart Super Saver)
10 and below – Light Gray (I Love This Yarn)

How do you tell which color to use?

I, personally, go with the overall temperature. So, let’s go by today, for example.

Today in Maine, the overall temperature is 17 degrees. I would choose the light gray.

Let’s say that it was an overall temperature of 22 degrees, I would choose the Orchid color. All my temperatures, for my colored yarn, has to have the same number first number. If that makes any sense, I’m sorry if it doesn’t!

What was the highest temperature for this month?

We finally got to 70 degrees, but haven’t reached that 80 degrees either. As we keep going into June, the weather will start to warm up a little more for us.

What was the lowest temperature for this month?

We had a few days that were 40 degrees, which aren’t that cold, but I would rather them be 50 degree days instead. We might see another 40-degree day, but I think we are in the clear and might only see 50-60 degree days in the future.

Do you post daily updates?

Yes, I do. On my Facebook page, I post a picture of the square for each day. I also tried to post every week’s worth, but it was hard to keep track of, so I’ll be posting monthly and daily instead.

If you haven’t liked my Facebook Page, here is the link below! It keeps you posted and updated on my temperature blanket and any updates for my blog and YouTube channel, as well!

https://www.facebook.com/katiesblog96971617/?ref=bookmarks


Posted in Arts and Crafts, Crochet, Easy Patterns

Crafty Sassy: Crochet Adult Size Dragon Ball Z Goku Hat (Easy)

Hey dearies! Today I am back with a NEW pattern that I had to try and recreate. As you all know, some patterns can be available for a limited time or a price. A lot of creators rather create the items instead of having an option to buy the pattern.

Especially, if you know someone or really want something that they have created. Well, that’s what happened to me. As I was scrolling on Pinterest, I happened to see this hat set:2019-05-21.png

As soon as I saw it, I showed it to my fiance, who is a HUGE Dragon Ball Z fan and loved it! So, I looked into seeing if there was a pattern or someone who sells the pattern itself. Sadly, I didn’t get a pattern or couldn’t purchase a pattern.

When you can’t get a pattern, what do you do?

Recreate it, of course! Now, this was a simple recreate because the beanie is simple and those patterns are free, but I put a little twist to mine. I’m going to show you how to make the orange hat, the green one I am still currently looking for another pattern for the antenna’s, but once I do, I’ll have that pattern up for you all!

Let’s talk about what you will need:

  • Medium Size Yarn (In Orange, Black, and White)
    • I used Red Heart Super Saver Pumpkin, since I still have a huge skein of that left and same with the white.
    • I also used I Love This Yarn for the black, since I didn’t have any Red Heart in black.
  • 5.0mm
    • You can change the hook size to a 5.5mm or 6.0mm because the beanie will be really snug when it’s finished.
  • Sewing Needle
  • Scissors

*Note: This size fits an adult. My fiance’s head size is 21 inches, but I did adjust the pattern so that it wasn’t so tight. If anyone wants me to re-adjust the size if you want me to make one for the kiddos or baby sizes!

Let’s Begin!

-Hat-

Starting with the orange yarn, chain 5 and slip stitch in the first stitch chain to form a loop

Row 1: Chain 2. Make 10 double crochets in the loop. Join at the top of the first double crochet with a slip stitch. (10)

Row 2: Chain 2. Make two double crochets in each stitch. Join as you did before in row 1. (20)

Row 3: Chain 2. *Double crochet in the first stitch, Make 2 double crochets in the next stitch* Repeat * around. Join. (30)

Row 4: Chain 2. *Double crochet in the next 2 stitches, 2 double crochets in the next stitch* Repeat *around. Join. (40)

Row 5: Chain 2. *Double crochet in the next 3 stitches, 2 double crochets in the next stitch* Repeat * around. Join. (50)

Row 6: Chain 2. *Double crochet in the next 4 stitches, 2 double crochets in the next stitch* Repeat * around. Join. (60)

Row 7: Chain 2. * Double crochet in the next 5 stitches, 2 double crochets in the next stitch* Repeat * around. Join. (70)

Row 8: Chain 2. *Double crochet in the next 6 stitches, 2 double crochet in the next stitch* Repeat * around. Join. (80)

Row 9-15: Chain 2. Double crochet in each stitch. Join. (80)

Row 16-19: Switch to the black yarn. Chain 2. Double crochet in each stitch. Join. (80)

Row 20: Chain 1. Single crochet in each stitch. Join. Fasten off. (80)

Now that our hat is done, we need to create the circle part.

-Symbol Base (White circle)-

Grab the white yarn, chain 5 and slip stitch into the first chain to create a loop.

Row 1: Chain 2. Make 10 double crochets in the loop. Join. (10)

Row 2: Chain 2. Make 2 double crochets in every stitch. (20)

Row 3: Chain 2. *Double crochet in the first stitch, 2 double crochets in the next stitch* Repeat * around. Join. (20)

Row 4: Chain 2. *Double crochet in the next 2 stitches, 2 double crochets in the next stitch* Repeat * around. Join. (30)

Row 5: Chain 2. *Double crochet in the next 3 stitches, 2 double crochets in the next stitch* Repeat *around. Join. (40)

Row 6: Chain 1. Single crochet in each stitch. Join

Row 7: Change to black yarn. Chain 1. Single crochet in each stitch. Join. Fasten off.

The next part is totally up to you. My fiance didn’t want the symbol that they had, in the original picture, so he wanted me to do this symbol instead:

2019-05-21 (1).png

I’m sorry that I don’t know the symbols, but this is what he chose. You have to do one of two things to get the symbol on the white piece.

  1. Sew on the symbol.
  2. Puffy Paint it on.

I’ve never used puffy paint, but I wanted to give it a try and still give the ‘3D’ effect. I can sew, but let’s be honest, I got very frustrated on trying to do so. The good thing about sewing is that you can pull it from your project.

Here’s how the puffy paint came out:

20190521_164903.jpg

You don’t have to do either of the symbols, get creative and put whatever you would like!

Once you are done with the symbol, make sure that if you used the puffy paint, let it dry for about 4 hours before touching it or doing this next step.

Take your hat and white symbol circle, grab some black yarn and sew on the circle symbol piece to the hat. And you should be all set to wear it!

I’m going to try my best and create the other hat, but make sure you are following my Facebook page! I usually update when I’m about to create a new pattern or if you want to suggest any ideas that you would like me to recreate!


Posted in Arts and Crafts, Crochet, Easy Patterns

Crafty Sassy: Crochet Mug/Coffee Cup Cozy w/ a Pocket (Easy)

Good morning dearies! Today is it snowing, in Maine, and I wanted to tell you about a pattern that I have found, on Pinterest, the other day, that is actually perfect for today, because of the cold weather we got going on.

As you all know, if you don’t already like my Facebook page, I show two different patterns and which ever one wins, I go live, showing you how to make them! This week, it was the coin purse vs. the mug cozy. So, I guess you can already think what won, by the title of this blog post!

Here is the link for the pattern itself:

https://www.thestitchinmommy.com/2014/09/give-sugar-coffee-cozy.html

I want to shout out to the Stitchin Mommy for making this pattern available for us today! I’ll be making her pattern later tonight on my Facebook Page, when I go live!

You all know that I just love making mug cozies, they are perfect for the cold or chilly weather and they prevent you from burning your hand, when you are craving that hot cup of coffee, tea, or hot coco.

This pattern just showed up, out of no where, but I’m glad it did! I have always wonder if someone had came up with pockets for their mug cozy. This pattern is simple and very easy to make, perfect for holiday gifts, but since the holidays are over, I will be making one of these for myself, or for someone in the family.

Best part of this pattern, is that you get to try out different colors, or mix and match the colors for the pocket and the mug base.

The only downfall of this pattern, is that it isn’t for all mug types. This ‘mug cozy’ is technology a ‘coffee cup cozy’. So, chances are, this won’t find on your favorite coffee mug at home.

HOWEVER! I have came up with another pattern idea, that is based off a simple mug cozy, and all I did was add the pocket on the side! Which is what this pattern is really for.

If you just started to follow me, I made a mug cozy pattern way back when I first started to blog (which wasn’t that long ago). I will be basing it off of that pattern, but making it bigger and adding a pocket.

Things you will need:

  • Medium Size Yarn
    • If you want to feel creative, like myself, grab another color and mix it up!
    • I’m using the I Love This Yarn brand for this project.
  • 4.5 mm hook
  • A button
  • Yarn needle
    • As always! Got to make sure to sew in your loose ends!


Mug Cozy Base

20190108_120843.jpg

Chain 10.

Row 1: Find the second chain from your hook (Not counting the chain that is already on your hook). Make a single crochet and a double crochet, in that same chain.

Skip the next chain and in the next chain, make a single crochet and a double crochet. Repeat til you reach the end of the row. Chain 1 and turn.

Row 2: Skip the next stitch. Make a single crochet and a double crochet in the next stitch. Repeat until you reach the end of the row. Chain 1 and turn.

Repeat Row 2, until you reach about 8 inches. If you wish to make it longer, you make do so. Also, keep in mind that the next step, we are making the buttonhole.

I would measure your mug first, and debating on adding more or less rows. Not all mugs are the same! You also don’t want your mug cozy to be too loose, otherwise it will fall off, and you don’t want it too tight either!

Don’t be afraid to ‘frog it’. Rippit, rippit!

Buttonhole

Next Row: In the first two stitches, single crochet together (sc2tog). Single crochet across, until you reach the last two stitches, single crochet together (sc2tog) in those last two stitches. Chain 1 and turn.

Next Row: Half double crochet into each stitch, making sure that you still have 8 stitches. Keep going for another 2 inches, starting where you started your half double crochets. (This is for bases that have the 8 inches crocheted. If you made it bigger, see the * for more info.)

*Depending on how long you made your mug cozy base, measure it, if your mug cozy base is over lapping itself, then you don’t need to keep crochet for another two inches. These will vary for different mugs. Make sure to measure it around your cup, before crocheting!*

Next Row: Now, we are going to make the actual buttonhole. If you haven’t chained one from the last step, do so now and turn your work.

In the first 2 stitches, make a single crochet together (sc2tog). In the next stitch, make a half double crochet. In the next stitch, make a double crochet and a treble crochet, in that same stitch. Chain 3. In the next stitch, make a treble crochet and a double crochet, in that same stitch. In the next stitch, make a half double crochet. In the last 2 stitches, single crochet together (sc2tog).

You can fasten off, or single crochet all around the mug cozy. This is something you don’t have to do, but if you are like me and like stuff to look neat and even, this is something you would want to do!

Making the pocket:

Using the same size hook, that you used for the base of the mug cozy, we are now going to make the pocket.

Chain 11

Row 1:  Find the second chain from the hook and single crochet across. You should have 10 stitches. Chain 1 and turn.

Row 2 – 12: Repeat row 1. Or until it has reached the length you would like. Make sure to leave a long tail, as you will use this to sew it onto the mug cozy itself.

Weave in any ends.

Sew on your button and you are done!

20190108_121100.jpg

I will be posting a video on how to make this mug cozy with pocket on my YouTube channel. I’ll add the video on here, once it is posted.

If you want to see me go live, on making the coffee mug with pocket, make sure you like my Facebook page and keep an eye out on my weekly polls, where you guys get to choose between two items and pick which one you want to see me make live!


Posted in Uncategorized

What’s Going On For My Blog, YouTube Channel, and Facebook Page?

Hey Dearies! It has been awhile since I’ve posted a blog post and I wanted to chat up with you about what has been happening in my life and the future of my blog, YouTube channel, and Facebook page.

I’m NOT done! Making this very clear! I ain’t quitting any time soon!

I’ve had a lot going on in my personal life and we also had a death in the family. I’m doing my best to mourn over our family’s lost, it’s a lot easier said than done. So, if I’m not able to post stuff on here or any of my social media platforms, please be patient with me.

Another thing that is happening is that there is a lot going on in my mind. The holidays can be very difficult for me because of the lost of my son. It can be difficult to do some stuff with my daughter and realize I won’t ever be able to do it with my son.

Image result for changes

Anyway, that’s what has been going on, but let’s talk about what the future is going to be like for the following platforms of mine.

My Facebook Page/Online Business (Katie’s Craft Studio):

I’m very active, when it comes to my Facebook page, so if you are ever looking for an update, check it out! It is where I will mostly post any updates or when blog posts are going to be out.

The online business, I am trying to get some more stuff together, working on a logo and business card. If you want to order anything that I offer, you can send me an e-mail or message me on my Facebook page for the time being.

I am currently working on a online order form for my small business, but it is still in the works. I’ll update the status of that on my Facebook page. I have thought about Etsy, but I want to offer more products, but I need to have the clients to order them first. Again, I’ll be posting an update on it.

My Blog: 

Yes, I will still be doing my blog. I have a couple new ideas, just to make sure that I am active everyday. I am also still working on Unclear 2, which I will explain that in a second.

Starting January 1st, I will be doing the 365 blog posts, it’s like a writing prompt which can help be become a better blogger and writer, so that will be public for your viewing pleasure.

Unclear 2 is in the works, it is out on Wattpad and I have been updating it, very slowly, but I will be doing a ‘short story’ of the month where I have a set theme and I have to write a short story on that theme or topic.

I’ll start doing reviews about anything. From books, TV shows, movies, or products! I’ve always wanted to do this, so for next year, I’m going to try my best to make it happen, at least once a month!

As for Crafty Sassy, I am going to have a plan on what items I would like to show every Tuesday. I can go live on my Facebook page, but I feel it would be better to give you guys an actually video on how to make some of the stuff, but more edited and clear to understand. Which will be posted on my blog and on my YouTube page, but we will get to that.

For wrestling and WWE stuff, I’m going to try and figure something out with that because I still love watching it, but it might just be for the pay-per-views and what I thought about the matches. I have thought about doing just a Superstar of the month and not every week because I feel like I have rushed most of them and I want to take the time to make them better.

The gaming part of my blog will be more active! I have a few ideas and I am actually going to try and live stream for my YouTube channel. I will also record myself showing how to’s- for Minecraft, Sims, etc.

YouTube Channel (KatiePurrPurr):

Nope, I’m also not done for this either. Although, I am working on getting a better camera because the one I have isn’t the best, when it comes to going live. So for now, I’ll try my best to ‘work with it’, but it isn’t going to be the best thing ever. I also need to get some better lighting as well.

The Sims series, I am working on it, right now, I do have a problem with the Sims because I need them to get to the weekend days, so that I can film. I will also have different idea for the series, I’m going to ‘free film’, basically filming without having a script. I’ve never done that before, but it will be new to me!

The second episode is in the works, I just need to film it and then I will go from there.

Image result for patience quotes

So, a few things are changing for my platforms, but I’m not done! I’m not giving up! I just need to get back on track, which I will be on January 1st of 2019. For the time being, I will do my best to post stuff, but it might just be Crafty Sassy stuff.

Thank you for all that have supported me and have stayed with me through this progress!


Posted in Arts and Crafts, Beginner Patterns, Crochet

Crafty Sassy: How To Crochet A Flower Pin (Beginners)

20180928_123311.jpg

Hey dearies! You are probably wondering why you are getting a Crafty Sassy on a Friday, so let me tell you why! Since this coming up week will be the beginning of October, I have decided to go live twice, for the month of October!

So, I wanted to show you guys how to make this flower pin, because it also goes with the headband I showed you guys how to make on Tuesday. So, I will be going live on my Facebook Page. More information on that will be at the bottom of this!

Let’s get started! First thing, let’s talk about what you will need for this project:

  • Medium Yarn
    • Any color of your choice. Since this flower goes with the headband, you can match a color to go with it or whatever color you feel works best!
  • Crochet Hook 4.5 mm
  • Sewing needle
  • 1 Pin back
    • It doesn’t required any fancy pin, a safety pin would work find as well!

Part 1: Making the flower

  • Step 1: Chain 53
  • Step 2: Double crochet in the 3rd chain from the hook. Double crochet in every following chain across.
  • Step 3: Chain 1 and turn your work. *Single crochet in the next space. Make 5 double crochets in the next space* (The stars are to let you know that you have to repeat, until you reach the end or if they say otherwise)
  •  Step 4: Fasten off and make sure you leave a long tail because we will be using it to sew the flower altogether.

Part 2: Sewing the flower together

  • Step 1: Loosely arrange the layers to form a flower.
  • Step 2: Using a threaded yarn/sewing needle, stitch each layer of the flower together, ending on the back side.
  • Step 3: Draw the threaded needle through the pin back. Secure the pin back onto the back of your flower and cut the excess yarn to complete the flower pin. And your done!


Having a pin, on the back of your flower, can make it so you can wear it on hats, scarfs, headbands, necklace, etc. So there’s not just one use for this project.

Anyway, I will be going live tonight on my Facebook Page. If you haven’t like my Facebook Page, here is the link!
https://www.facebook.com/katiesblog96971617/

Let’s talk about the NEW plans for the month of October!

I plan on bring Crafty Sassy to you on Tuesday’s and Thursday, just for this month! Instead of the normal stuff that is for beginners and such, I’ve decided to make this month a ‘holiday special’. I will be doing the same for November and December.

If you have any projects that you want me to show you how to make, leave a comment down below, message my Facebook page, or even e-mail me at katie_farrington@aol.com!


Posted in Arts and Crafts, Beginner Patterns, Crochet

Crafty Sassy: How to Crochet a Basic Headband (Beginners)

20180925_150307.jpg

So, there was a tie on my Facebook page on whether I should make the Rose or the Headband, but since the headband has been in the last few polls, I figured I would show you how to make one.

Now, I haven’t mastered this pattern completely, but it is a very fun pattern to make! Especially, if you are a beginner. The Rose actually goes with this headband, so I figure we can make the headband and I then can show you how to make the rose and show you how to put it on, as well.

As always, let’s talk about the supplies you will need:

  • Medium Yarn (Color of your choice)
    • I decided to used the ‘I Love This Yarn’ multi-color yarn to show you guys what it should look like.
  •  5.0 mm Crochet Hook
  • And of course, a sewing needle!

20180925_150444.jpg

So let’s get started!

Step 1:  Chain 44. Now, found it easier to count out loud, while making the chains, just so I don’t lose track of how many chains I made.

Step 2: Make 2 double crochet’s in the 3rd chain from the hook(NOT counting the chain that the hook is on!). *Skip 2 chains, single crochet in the next chain. Chain 2. Make 2 double crochets in that same stitch.* Repeat until you reach the other end, then make a single crochet in that last chain.

Note: The * represent where you start and end. Basically, you are repeating the same step until you reach the end. I will be putting in * to help you know what you need to do! A lot of crochet books use them and they are very helpful! If you are stuck or need help, let me know down in the comments!

Step 3:  Chain 2 and turn your work. Make 2 double crochets in the next available stitch. *Single crochet in the chain-2 part of the work. Chain 2. Make 2 double crochets in that same space.* Repeat until you reach to the other side and then single crochet the top of the last row.

Step 4: Repeat Step 3. Twice. You should have 4 rows altogether.

Step 5: Chain 30. Then slip stitch to the opposite side of your project. Slip stitch across that small side and then chain 30. Slip stitch to the other side and slip stitch across that side. Once you are done, cut your yarn and pull your crochet hook up and pull that end piece of yarn tight.

Step 6:  Sew in any yarn that is hanging around and then you are done!

Note: If your headband does not fit, you can always 4 chains add or decrease 4 chains, to fit your size head. If you are looking for it to fit a baby or child’s head, this might not be the project for that, but you can try and make it work!

For Example: If the headband was too small, I would chain 48. If the headband was too big, I would chain 40. 

If you have any questions, feel free to ask me! I’ll try my best to help you out!

20180925_150941.jpg

Also, don’t forget to check out my Facebook page, I have a poll up every week on what project I should do next! Since Halloween is just around the corner, be prepared to be Spooked!
https://www.facebook.com/katiesblog96971617/

Posted in Arts and Crafts, Top Projects for Crochet/Knitting

Crafty Sassy: Top 10 Crochet Projects You Can Profit From

Everyone loves hand-made crafts. Not a lot of people invest their time into them, but others, like myself, have more projects on your mind that you just don’t know where to start. Well, since I am a stay-at-home mom, I figure I would list some projects that could make you some extra cash on the side.

  1.  Towel Tops
    Image result for crochet towel toppers
    This is probably one of the most popular items you can make and they can sell pretty fast! You just buy a regular kitchen or hand towel and crochet the top so that you can hang it on your stove hanger.

    My great-grandmother always made these and they would be gone before you know it. They are very simple to make and there are a lot of videos on YouTube that can show you how to make these.

    Best part about making these is that you can use any towel, even for holidays! Which is pretty amazing! You always don’t have to do the same pattern either, there are many patterns out there that you can use. From one button to two, it’s completely up to you!

  2.  Towel Hangers
    Image result for crochet towel holder pattern
    I found this a few days ago and this would probably sell like hotcakes, just like the towel tops. The only difference between these and the towel  toppers is that you can hang whatever towel you would like.

    Instead of crocheting the towel itself, you crochet along a hair tie or an elastic band. These too, are pretty simple to make. Best part about these, is that you can make them any color you want them. Again, you can find a few great tutorials on this on YouTube.

  3.  Blankets
    Image result for crochet blanket
    These will always be on the list, but they do take up a good amount of your time, depending what kind of design you are going for. However, baby blankets might be the easiest thing to make, just because they are the smaller version of a big blanket.

    I know a lot of people will save the bigger blankets for family. Don’t get me wrong, they can make you some cash, you just have to be very detailed on how long it might take and you might have to use all of your spare time to finish it in time.

  4.  Hats
    Image result for crochet hats
    These will always be on the list. Hats are a quick and easy thing to make, especially kid hats. A lot of people would buy these with a gloves, scarf combo. Depending on how good the work is, you could make some serious cash(Not enough to pay rent, though. Unless you can supply the demands.)
  5.  Scarfs
    Image result for crochet scarf
    I loved getting scarfs, my great-grandmother would always make the fuzzy ones and get them to us, in our favorite color, for Christmas. I still  have a few from when I was little. Like I said with the hats, it would be a great combo to do together!
  6.  Place mats
    Image result for crochet placemats
    Not a lot of people have crocheted place mats, but they are something someone could sell. You could also be able to customize them for holidays, with different colors and patterns! A set of four would most-likely sell like hotcakes, too!
  7.  Coasters
    Image result for crochet coasters
    Coaster aren’t something you would see at a craft fair, but they are an amazing idea to make for one! A lot of people don’t have coaster, but they don’t want to spend too much money on them.

    These are very easy to make and they can be crocheted, but some of them can be made by hand!These would go great with place mats.

  8.  Gloves/Mittens/Arm Warmers
    Image result for crochet arm warmers
    Gloves might be a expect level project, but mittens would be a lot easier to make. Same with arm warmers, they might be easier to make as well. Arm warmers could also be part of the combo, you can either replace the gloves, or add it to the combo of hats, scarfs and gloves.
  9.  Pins
    Image result for crochet pin
    Yes, there is such a thing as crocheted pins! Although, you would have to work with smaller and finer yarn, they are very amazing to make. Especially, flower ones!
  10.  Mini Stuffed Animals/Characters
    Image result for crochet stuffed animals
    You probably seen these all over the internet or Facebook. They can be very challenging for a beginner. They have all kinds of different characters or objects that you can crochet into stuffy’s.

    Amazon has a wonderful Disney Princess Crocheting Kit, that I haven’t tried out yet. They have a booklet on how to make every princess, but they only give enough yarn to make two. I highly recommend getting it, just for the booklet!


Are there any projects that you see at craft fairs that I missed? Comment down below and comment of which one you see would be more in an high demand!

*Note*

  • These aren’t a quick way to earn millions of dollars. This would be something you would earn on the side for some quick cash. If you make them with great quality and passion, I’m sure you could make a living doing it.
  • I just wanted to make a note, so that everyone knows this isn’t something you can get rich quick and fast. A lot of people make these as a hobby of theirs and put a lot of effort into their projects.
Posted in Arts and Crafts

Crafty Sassy: How To Make A Latch Hook Pillow/Pillow Case (My Version)

Image result for latch hook pillow

Good Morning all of my dearies! So, I figured I would show you how I make my latch hook pillows. I have already done a tutorial on the latch hook, and how simple and easy it is to do.

Now, I did this all on my own, I didn’t find this online, I came up with the idea because of the fact that some of the latch hooks were too amazing to just have as a rug. So, I figured that I would make a latch hook and turn it into a pillow. Not all of my latch hook pillows are perfect, I haven’t really mastered it, but I try to be better than the last time.

These are great gifts for family or friends, I would say for everyone, but it depending on the size of the latch hook and making the backing, it can be a very long process. The quickest that I was able to do, was about 2 months, but that was a small foot by foot latch hook. If you have kids, expect the project to take longer.

So, first things first, you need to have the following supplies:

  • Latch Hook kit
    • If you are a beginner, I recommend with starting out with a small latch hook, a foot by foot one would be perfect to start on and it won’t take as long as a bigger one.
  • Yarn (Medium)
    • The backing I just basically knitting small squares together or two long parts that I end up sewing together. The color can be any color you want it to be, as long as it is medium thickness and somewhat matches your latch hook.
    • I would try and get two yarn rolls, just to start out, but do keep in mind that you will also need it to sew the pillow together.
    • *Note* Try and avoid black yarn, especially if you are a beginner, black yarn is very hard to work with. Dark colors might be okay, but try and avoid them, if you are just starting out.
  • Metal Thick Needle
    • You’ll need this to sew your pillow together, or pillow case. I recommend using a thicker needle (Not talking about knitting needles!), the reason is because it will make it easier to sew them together. Plus, with the thinner needles, you can tend to break them, believe me, I have broken a few.
  • Scissors
  • Knitting Needles
    • Make sure that you have the knitting needles suggested size, it is on the yarn roll and suggests a size.
  • Rug Binding
    • This you will used around the sides for the latch hook, making sure that it doesn’t fall apart when finished.
  • Fabric Glue
    • I found that it was easier to use fabric glue to keep the rug binding together. You can use an iron, but I have tried and It didn’t work, I’m not sure if I did it right or not.
  • Stuffing (for making a pillow)
    • You can stuff it and then close it, or if you or anyone you are giving the latch hook pillow has any pets, I would take a pillow case and fill it and then put it into the pillow. It’s totally up to you.

Once you have everything, that I have suggested to have, you can finally start! First, before we can begin our pillow, we need to complete the latch hook, first. This might be the longest part that you need to do to make this pillow.

Then, knit the backing, you can either knit a classic square, or make it longer and have different pieces that you end up sewing together. Whatever is easier for you to do, I found that the squares were easier, depending how big your latch hook is, it made it easier to see the progress versus just knitting a long part.

The reason why we should make the latch hook first, is because once we trim it down, it will be easier to measure or know how long or wide you need to go. Some latch hooks don’t have a printed picture on them, some of them are blank and give you a big blank latch hook, just to make sure that you have enough to make the latch hook.

That’s only with the bigger latch hooks, a since foot by foot is usually has a printed design on it, so that you can follow the pattern.

After both parts are completely, just sew them onto the latch hook, making sure that you cover the latch hook grid. If you are making a pillow case, only sew around it, leave the top untouched, so that you are able to place a pillow into the opening.

20180612_175756.jpg

It should, almost look like the picture above, this was a project that I made for my aunt for her birthday. Her favorite Disney princess is Belle, so I made her a small foot by foot pillow.

This latch hook, I got from Hobby Lobby, but I am pretty sure you can find it on Amazon, you might be lucky and find it at Walmart, but I wouldn’t get your hopes up. This latch hook did not have a grid, with the picture, so that you can follow it on key.

The picture was printed on the latch hook and I made the best judgement for each one. The background isn’t green, it’s purple, I changed it to my aunt’s favorite color, instead. Another note, for this latch hook, the yarn is SUPER thick and was a pain in the ass to hook on.

However, the yarn I used for the background was a simple medium yarn, what most latch hooks use, so I was glad that the background wasn’t as difficult to do.

Next Tuesday, I have a surprise! I am going to show you how to make a book mark! Not just any kind of book mark, a crochet-made bookmark!

Posted in Mom Talk

Mom Talk: Is It Possible To Work From Home As A Stay-At-Home Parent?

Image result for work from home mom

Yes, I know it’s been a while since I have done a ‘Mom Talk’, but I wanted to go into detail to see if it is really possible to work from home as a stay-at-home parent. Whether you are trying to make extra cash for spending or looking to create a permit career.

Every since I had my kids, I’ve always wanted to be a stay-at-home mother and also have a career from home as well. There is a lot of scams, but their are a few that are very legit and could even give you benefits for you and your family.

I search everyday for a work at home career or even just a part-time job, but there is always an issue. Either I don’t have the experience, I don’t have a quiet place, or don’t have the sale mind to bug people to buy the products I’m pushing to sell.

So, I looked into doing survey’s for cash. However, there is always a catch. You either can’t cash out until you make, at least, $20-$30 bucks, which takes forever to do. Plus the survey’s were either the same thing, that I would spend 30 minutes to an hour to complete and only got less than .25 cents, or I wouldn’t qualify for most of the survey’s.

Let me tell you something, it IS possible to work from home. You just have to find it at the right opportunity.

Image result for work at home jobs for stay at home moms

I’ve heard so many stories of people that are making enough money for even their spouses don’t have to work, plus still having enough money to buy their dream home, or have that car they always wanted, or even have a big family, like they have always dreamed of having.

I’ve always thought that if the time was right, the opportunity will come to me, I just can’t stop searching. Although, I’ve been trying to get back into the Customer Service pool, but the two things that stop me are: I have a loud, barking at whatever moves or makes a loud sound, dog and not feeling confident enough to do both working and taking care of my daughter.

That’s why I started this blog. I wanted to have a job where I could work whenever, but still have time for my kids. I still haven’t found a way to actually make money off of it, yet, but it’s possible. I just can’t give up.

Maybe one day, I’ll be able to look back on this all and enjoy my life as a stay-at-home mom and a working mom. Like I have always told myself, if it’s meant to be, then its meant to be. If it isn’t, just keep on swimming and don’t give up.

Posted in Arts and Crafts

Crafty Sassy – Intro to Latch Hook Projects

I mentioned that I have worked with a few latch hooks, but I never went in detail on what they really are. Latch Hooks are like rugs that are made up of yarn on a grid. There are many things you can with latch hooks. I personally, like making pillows, but they are a lot of hard work.

Image result for latch hook grid

The picture above is what a latch hook looks before you start or add on anything. Also, that is the tool you use to ‘tie on’ the yarn. Now, if you are intersected in making one of these and you are just a beginner, I recommend buying a latch hook kit. It will come with everything you need: the grid, the cut up yarn, and the hook tool.

Image result for latch hook kit

Not all kits are the same! The picture above shows what you would get in a kit, but be warned, not all kits have their colored yarn organized perfectly like this! Some grid might actually have the print of the picture already on the grid, to help guide you through the process.

Also, if you haven’t noticed, most of the latch hook grids have multiple blue squared on them, that helps with knowing where to start, it you aren’t lucky enough to have a kit with the picture printed on the grid. Most of the squares are 10×10, by counting them, but some grid might be different and be like a 10×9 or 9×10.

Image result for latch hook how to

The process is very simple. I didn’t think so, at first, but it is very easy to do. The picture above with show you a little better than how I explain it.

  1. Take a piece of yarn, whatever color you need and wrap it around your hook, your latch hook tool.
  2. Take the hook, while holding on to the yarn that is wrapped around it, and insert into the grid, just the hook and make sure that the hooks open, as shown above.
  3. Next, take your end pieces of your yarn, remember, you still have it wrapped around you hook, and pull it into your hook, making sure that your latch hook tool flap, we will call it, doesn’t close. You have to make sure that stays open for this step!
  4. Then, take your latch hook and pull it through that square, where you want to place the yarn. The hook tool flap will close to keep the yarn in it’s place when you pull through the square.
  5. Last, but not least, tighten the knot and make sure it is on tight!
  6. Once that is done, you keep repeating until the project is done!

Image result for latch hook how to

Sorry, if I didn’t explain it very well. This picture above does a better job, but I figured I would give it a shot and try.

When you finish your project, you will noticed that you have extra strands of yarn leftover. Some kits will add more than enough to finish, other’s might give you enough to just barely finish the project. If you are like me and keep everything, keep the extra strands, just in case you need them for another project, you never know.

If the kit didn’t give you enough yarn, there is another way to get some more. You can always go to a craft store, or look online, and find the color yarn and cut it yourself, but using the size of what the kit gave you. Or, some craft stores will have the yarn cut up already for you, so if you are making the latch hook for someone, they have it for you to grab and go.

Latch Hooks is great for all ages, plus, if you are just starting to get into crafts and such, this would be the way to start out. You can do so much with latch hooks, they don’t just have to be a rug. They can be pillows, stuff animals, wall hangings, etc. They even have blank grids that you can freestyle.

The only downfall with the latch hooks, is that it can take up a lot of your time, sometimes. It’s nothing that you can pick up and finish all in one sitting, maybe if you are quick and did it all in one night, or had a small one to work with. This type of project is a pick up and finish later type of project.

Anyway, I will had a few pictures below of the latch hooks that I have finished. So far, I have made two pillows and two pillow cases. None of which have been for me, but all the ones I have given away, have loved them. Not because I did a great job, but it was something that I made for them and those are the best kinds of gifts!

20170416_094834.jpg

20161212_185354.jpg20180218_152714.jpg20180612_175756.jpg

If you are very intersected in wanting to make one of these, check out your local craft store. You won’t have much luck at a Walmart or Kmart, but Amazon does have a very wide selection!