Posted in Arts and Crafts, Crochet, Top Projects for Crochet/Knitting

Crafty Sassy – Top 10 Snowman Crochet Projects

Hey Dearies! Since it has been snowing quite a bit in Maine, I figured I would share some patterns for snowmen! Now, snowmen aren’t just for the Christmas season, since you can make them whenever it snows!

Note: These are NOT my own work, as I will be providing the link that goes with each free pattern. All rights go to the creators.

 1. Snowman Potholder

Snowman-Pot-Holder-Crochet-Pattern.jpg

This snowman is so cute! Even though it says it’s for a potholder, but you can definitely make a few of these to add onto a snowflake or even Christmas blanket!

Click here for the free pattern: https://melodys-makings.com/snowman-pot-holder/


2. Snowman Coffee Cup Cozy

DSCF0289.jpg

Again, as you know, I LOVE coffee cup cozies and this one is too cute not to make one for yourself or others! Most of the ones I’ve found didn’t have the cute little hat, but this one did!

Click here for the free pattern: http://hamburke.blogspot.com/2013/12/another-easy-crochet-pattern-share.html


3. Snowman Wall Hanger

Snowman-Wall-Hanging_Large500_ID-1553903.png

Wall hangings are something I usually don’t have, but when I saw this pattern, I thought about making one for my house! As long as you keep this little guy inside, he will stay nice and neat, these are also perfect for those new homeowners!

Click here for the free pattern: https://www.allfreecrochet.com/Christmas-Crochet/Snowman-Wall-Hanging


4. Snowman Hanging Dishcloth

2020-01-07 (1).png

Dishcloths aren’t something I’ve been known to create, but this little guy is too cute! Not only could you use this as a decoration, but it would look pretty cute hanging from the oven handle!

Click here for the free pattern: https://snappy-tots.com/free-pattern-snowman-hanging-dishcloth/


5. Melted Snowman

2020-01-07 (6).png

I’m melting for this project! This is one I have never seen, but once I did, I was even more excited to see that the pattern was FREE! This little guy is not only the perfect decoration for the holiday season but he could even work as a newborn gift idea as a snuggle! As long as the buttons aren’t added!

Click here for the free pattern: https://www.highlandhickorydesigns.com/melted-snowman/


6. C2C Snowman Scarf

2020-01-07.png

Ah, you know me and my love for C2C projects! This snowman will keep you nice and warm until Spring! As the pom-pom adds the perfect touch to make this project an amazing gift for someone, or even yourself!

Click here for the free pattern: https://www.windingroadcrochet.com/c2c-snowman-scarf-free-crochet-pattern/


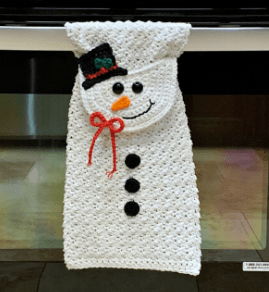
7. Snowman Towel Topper

2020-01-07 (2).png

Towel Toppers I just LOVE! This one really takes my breath away, with so much detail, I didn’t think it was free, but I had to double-check! The creator of this piece of work took such great time and detail to this project for sure, definitely going to put this on my list of stuff to make this year!

Click here for the free pattern: https://www.ravelry.com/patterns/library/snowman-towel-topper


8. Snowman Hat

2020-01-07 (5).png

Hats are always great to make, especially if it is still snowing outside! This pattern is not only free but comes in all sizes so that you can make your entire family snowman hats!

Click here for the free pattern: https://www.repeatcrafterme.com/2016/01/crochet-snowman-hat.html


9. Snowman Hanging Towel

2020-01-07 (4).png

This towel hangs without a button, which is something that I have not quite tried, yet. This one has a lot of detail put into it, but this same pattern can be used to making Santa or a Gingerbread, but if you aren’t ready to start going down the Christmas train, this guy is something you’ll want to make for sure!

Click here for the free pattern: https://www.acrochetedsimplicity.com/snowman-kitchen-towel-free-crochet-towel-pattern/


10. Snowman Stuffie

2020-01-07 (3).png

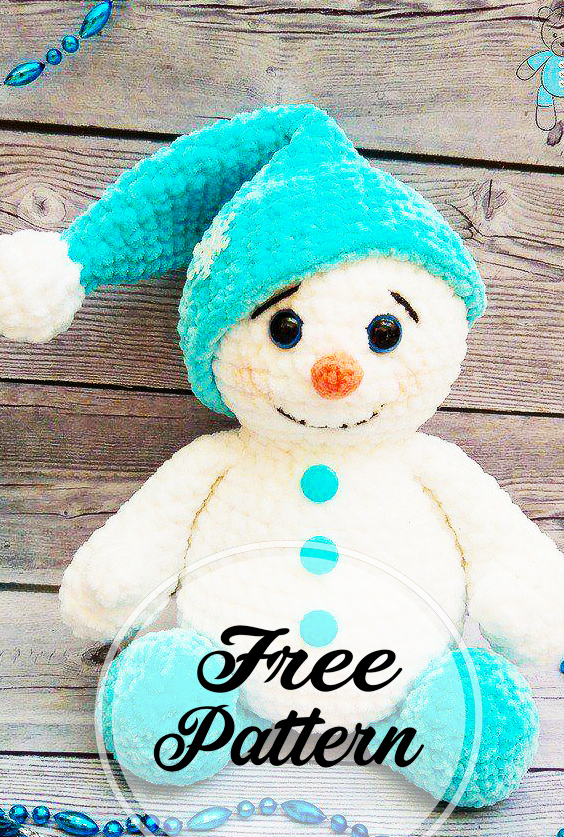
Last, but not least, one of the cutest stuffies I’ve ever seen! There are a few of stuffy snowmen and women, that you can choose to pick from, but this one looks so soft and cuddly, I just had to put him on this list!

Click here for the free pattern: https://www.amigurumiforum.com/free-snowman-amigurumi-crochet-pattern-for-chirstmas/


There you have it! Snowman ideas for the snowy season! Which one did you like the best? Or which one can’t you wait to try out next? Leave a comment down below to let me know!

Posted in Crochet Blanket 2019

Temperature Blanket Update – October 2019

Halloween has come and gone, but I know everyone is interested in what our temperature blanket is starting to look like. Since we are officially in the fall season, the temperature has cooled down quite a bit!

With only two months left of this year, I can’t wait for it to be completely finished! This is one project I can’t wait to see, once it is completed, but as you can see, I might need to fill in the blanks, to complete the blanket, since I didn’t plan this one well.

20191106_133358.jpg

I also wanted to mention that with this year coming to an end, time for another blanket to create for next year, but I will be making another post and giving out some tips for anyone who wanted to create their own temperature blanket themselves!

As well, here is the color list that I’ve been using:

20181222_124142
100 degrees – Fire Red (I Love This Yarn)
90 degrees – Pumpkin (Red Heart Super Saver)
80 degrees – Bright Yellow (Red Heart Super Saver)
70 degrees – Jelly Bean (I Love This Yarn)
60 degrees – Green (Main Stays Basic Yarn)
50 degrees – Turqia (Red Heart Super Saver)
40 degrees – Soft Blue (I Love This Yarn)
30 degrees – Dark Orchid (Red Heart Super Saver) *Changed to the following – Violet (Red Heart With Love)
20 degrees – Orchid (I Love This Yarn) *Changed to the following – Orchid (Red Heart Super Saver)
10 and below – Light Gray (I Love This Yarn)

How do you tell which color to use?

I, personally, go with the overall temperature. So, let’s go by today, for example:

Today in Maine, the overall temperature is 17 degrees. I would choose the light gray.

Let’s say that it was an overall temperature of 22 degrees, I would choose the Orchid color. All my temperatures, for my colored yarn, has to have the same number first number. If that makes any sense, I’m sorry if it doesn’t!

What was the highest temperature for this month?

The highest our temperature has gotten is 60-degrees, but as we go into winter, 60-degree weather is something that we will want to have back!

What was the lowest temperature for this month?

The lowest we hit was actually 40-degrees, so make sure you have oil in your tanks or firewood ready to go if you haven’t already started keeping your house warm. I’m sure we will be seeing more of the colder temps pretty soon!

Do you post daily updates?

Yes, I do. On my Facebook page, I post a picture of the square for each day. I also tried to post every week’s worth, but it was hard to keep track of, so I’ll be posting monthly and daily instead.

If you haven’t liked my Facebook Page, here is the link below! It keeps you posted and updated on my temperature blanket and any updates for my blog and YouTube channel, as well!

https://www.facebook.com/katiesblog96971617/?ref=bookmarks


Posted in Arts and Crafts, Crochet, Top Projects for Crochet/Knitting

Crafty Sassy: Top 10 Free Crochet Costumes for Newborns

Hey Dearies! So, I wanted to make this post last year, but I changed my mind. Even tho my daughter will be turning two at the end of this month, I wanted to share some links to some super amazing patterns for newborns!

I didn’t get into crocheting until after my daughter was born and really missed out on making her one of these costumes to do a photoshoot for her. However, just because I missed out, I still want to keep in mind, just in case I ever get asked to make them in the future.

When it comes to looking for free patterns, for this type of project, it is a little bit of slim picking, but if you don’t mind paying for the pattern itself, you can find more Disney characters. (Which I will be making a post with links to those very soon!)

Even if you don’t know how to make them, always see if your friendly crocheters wouldn’t mind creating them for you. I love to getting sent a project to do, such as this, it gives me a challenge and something new to try out!

Disclaimer: None of the patterns shown are mine, all rights go out to their creators. I have left links to where the free patterns come from. Make sure that if you chose to make these, or have them made, that you give credit where credit is due to the original creator.

  • Baby Turtle

Turtle-Newborn-Photo-Prop-Free-Crochet-Pattern.jpg

Here is the link for this free pattern: https://coolcreativity.com/crochet/crochet-turtle-newborn-photo-prop-with-free-pattern/

  • Baby Cinderella

cinderella-dress-free-crochet-pattern--217x300.jpg

Here is the link for this free pattern: https://lovableloops.com/patterns/free-cinderella-dress-crochet-pattern/

  • Baby Chick

Baby+Chick+Infant+Cocoon+Photo+Prop.jpg

Here is the link for this free pattern: https://www.leftinknots.com/home/baby-chick-infant-hat-and-cocoon-free-crochet-pattern

  • Baby Dino

教程-副本-11.jpg

Here is the link for this free pattern: https://letscrochet.org/crochet/free-patterns/babys-dino-hat-cape-crochet-free-pattern/

  • Hello Kitty

IMG_0556-e1369147994896.jpg

Here is the link for this free pattern: http://dearestdebi.com/crochet-newborn-hello-kitty

  • The Hungry Caterpillar

教程-副本-14.jpg

Here is the link for this free pattern: https://letscrochet.org/clothing/baby-caterpillar-cocoon-crochet-free-pattern/

  • Baby Santa

1-Baby-Santa-Hat-and-Cocoon-Bunting-Free-Crochet-Pattern-1024x600.jpg

Here is the link for this free pattern: https://yourcrochet.com/baby-santa-hat-cocoon-bunting-free-crochet-pattern-video-tutorial/

  • Baby Firefighter 

Fireman Set.png

Here is the link for this free pattern: https://snugglyfoxdesigns.blogspot.com/2019/02/firefighter-overalls-and-hat-free.html

  • Baby Mermaid 

2e59f5756ff6ed7b22fe9f60f087794f.jpg

Here is the link for this free pattern: https://knitting-bordado.com/crochet-mermaid-baby-outfit-pattern-free/

  • Baby Unicorn

free-crochet-pattern-unicorn-hat-and-diaper-cover-225x300.jpg

Here is the link for this free pattern: https://lovableloops.com/patterns/free-unicorn-diaper-cover-crochet-pattern/

There you have it! A big shout out to the creators of these amazing patterns! Especially for beginners who are looking for something different to try out!


Posted in Arts and Crafts, Crochet, Easy Patterns

Crafty Sassy: Crochet Adult Size Dragon Ball Z Goku Hat (Easy)

Hey dearies! Today I am back with a NEW pattern that I had to try and recreate. As you all know, some patterns can be available for a limited time or a price. A lot of creators rather create the items instead of having an option to buy the pattern.

Especially, if you know someone or really want something that they have created. Well, that’s what happened to me. As I was scrolling on Pinterest, I happened to see this hat set:2019-05-21.png

As soon as I saw it, I showed it to my fiance, who is a HUGE Dragon Ball Z fan and loved it! So, I looked into seeing if there was a pattern or someone who sells the pattern itself. Sadly, I didn’t get a pattern or couldn’t purchase a pattern.

When you can’t get a pattern, what do you do?

Recreate it, of course! Now, this was a simple recreate because the beanie is simple and those patterns are free, but I put a little twist to mine. I’m going to show you how to make the orange hat, the green one I am still currently looking for another pattern for the antenna’s, but once I do, I’ll have that pattern up for you all!

Let’s talk about what you will need:

  • Medium Size Yarn (In Orange, Black, and White)
    • I used Red Heart Super Saver Pumpkin, since I still have a huge skein of that left and same with the white.
    • I also used I Love This Yarn for the black, since I didn’t have any Red Heart in black.
  • 5.0mm
    • You can change the hook size to a 5.5mm or 6.0mm because the beanie will be really snug when it’s finished.
  • Sewing Needle
  • Scissors

*Note: This size fits an adult. My fiance’s head size is 21 inches, but I did adjust the pattern so that it wasn’t so tight. If anyone wants me to re-adjust the size if you want me to make one for the kiddos or baby sizes!

Let’s Begin!

-Hat-

Starting with the orange yarn, chain 5 and slip stitch in the first stitch chain to form a loop

Row 1: Chain 2. Make 10 double crochets in the loop. Join at the top of the first double crochet with a slip stitch. (10)

Row 2: Chain 2. Make two double crochets in each stitch. Join as you did before in row 1. (20)

Row 3: Chain 2. *Double crochet in the first stitch, Make 2 double crochets in the next stitch* Repeat * around. Join. (30)

Row 4: Chain 2. *Double crochet in the next 2 stitches, 2 double crochets in the next stitch* Repeat *around. Join. (40)

Row 5: Chain 2. *Double crochet in the next 3 stitches, 2 double crochets in the next stitch* Repeat * around. Join. (50)

Row 6: Chain 2. *Double crochet in the next 4 stitches, 2 double crochets in the next stitch* Repeat * around. Join. (60)

Row 7: Chain 2. * Double crochet in the next 5 stitches, 2 double crochets in the next stitch* Repeat * around. Join. (70)

Row 8: Chain 2. *Double crochet in the next 6 stitches, 2 double crochet in the next stitch* Repeat * around. Join. (80)

Row 9-15: Chain 2. Double crochet in each stitch. Join. (80)

Row 16-19: Switch to the black yarn. Chain 2. Double crochet in each stitch. Join. (80)

Row 20: Chain 1. Single crochet in each stitch. Join. Fasten off. (80)

Now that our hat is done, we need to create the circle part.

-Symbol Base (White circle)-

Grab the white yarn, chain 5 and slip stitch into the first chain to create a loop.

Row 1: Chain 2. Make 10 double crochets in the loop. Join. (10)

Row 2: Chain 2. Make 2 double crochets in every stitch. (20)

Row 3: Chain 2. *Double crochet in the first stitch, 2 double crochets in the next stitch* Repeat * around. Join. (20)

Row 4: Chain 2. *Double crochet in the next 2 stitches, 2 double crochets in the next stitch* Repeat * around. Join. (30)

Row 5: Chain 2. *Double crochet in the next 3 stitches, 2 double crochets in the next stitch* Repeat *around. Join. (40)

Row 6: Chain 1. Single crochet in each stitch. Join

Row 7: Change to black yarn. Chain 1. Single crochet in each stitch. Join. Fasten off.

The next part is totally up to you. My fiance didn’t want the symbol that they had, in the original picture, so he wanted me to do this symbol instead:

2019-05-21 (1).png

I’m sorry that I don’t know the symbols, but this is what he chose. You have to do one of two things to get the symbol on the white piece.

  1. Sew on the symbol.
  2. Puffy Paint it on.

I’ve never used puffy paint, but I wanted to give it a try and still give the ‘3D’ effect. I can sew, but let’s be honest, I got very frustrated on trying to do so. The good thing about sewing is that you can pull it from your project.

Here’s how the puffy paint came out:

20190521_164903.jpg

You don’t have to do either of the symbols, get creative and put whatever you would like!

Once you are done with the symbol, make sure that if you used the puffy paint, let it dry for about 4 hours before touching it or doing this next step.

Take your hat and white symbol circle, grab some black yarn and sew on the circle symbol piece to the hat. And you should be all set to wear it!

I’m going to try my best and create the other hat, but make sure you are following my Facebook page! I usually update when I’m about to create a new pattern or if you want to suggest any ideas that you would like me to recreate!


Posted in Arts and Crafts, Crochet

Crafty Sassy: Crochet Hooks, What Should I Get? (For Beginners)

Hey Dearies! Since I am working on a few projects, I figured I would talk to you about the many crochet hooks that you can come to choose from. Especially if you are a beginner, knowing what hooks to get can is very important!

20190423_090427.jpg

As a beginner myself, I jumped right into buying a set of crochet hooks from Wish and went from there. However, since I got lucky and only paid 3 bucks for a mini set, I wish I would’ve known there was more than just one type of hooks.

Each type of hooks can have a different feel or how they are in general, but before we get into how they feel, let’s talk about the different kinds of hooks you can get:

  • Aluminum Hooks
  • Plastic Hooks
  • Steel Hooks
  • Wooden/Bamboo Hooks
  • Japanese Hooks

I’m going to break each of these down just so you can get a picture of how they are like and if they are for you. The only ones that I don’t have in my possession, are the Japanese Hooks, but I will still explain and have a photo of them just so you know what they look like.

Also, I am going to put a chart of the different sizes of hooks you can get and how they are labeled, as well.

Image result for crochet hooks size chart

As you can see, there are 3 different types of labels for these hooks. USA, English, and Metric. The easiest one to go by is Metric, I found that it was easier to find hook sizes by using their actually metric size.

To me, using letters to determine which size hook, has been confusing and usually if a pattern says a hook size as a letter, I always end up looking up in my crochet books or search in Google, to get the metric size. Hence why my patterns, don’t have the hooks in letter sizes.

If you are a beginner, Metric is the way to go, but you can determine which one you feel most comfortable following. If you are wondering how small these hooks can be, they can get pretty small or really huge.

Now, let’s get down to talking about the actual hooks themselves.


Aluminum Hooks 

WIN_20181220_14_45_00_Pro

There are one of the most common hooks you can get. I prefer them/use them, for almost every project! These hooks were one of the first ones that I bought to get into crocheting. They can come in all different colors and can go as little as 0.60!

However, for the little hook sizes, you have to be VERY careful. I actually have a few of the tiny ones and let me tell you, they can bend very easily. I haven’t even used them once, but they bent trying to get them out of the packaging!

Lucky, I haven’t reached a project where I’m required to use them, yet.

Another thing to look out for is that they can’t get wet! When I mean by that is if you have sweaty palms or hands, they can tend to be more difficult to work. First time I used them, I was so excited and nervous that it made it difficult to want to work with them.

Although, you can get grips or even use tape to place around the handle of the hook, making it easier to grip and easier to handle your work better!

Overall, they are perfect for beginners! Plus, I love the different colors you can get them in. My family usually get me crocheting books, and some of them come with these hooks, so I have already started a collection with my metal hooks!


Plastic Hooks

Image result for crochet plastic hook

These next hooks are another fun-coloring type of crochet hook. Now, I want to let you all know that I haven’t had the pleasure to work with a plastic hook in a ‘normal’ size, meaning the only sizes I have are an 8.0-11.5.

Have I worked with them? Yes, I actually used one of them to make a basket for my mini balls of yarn. I do plan on getting myself a plastic set, just so I can have them for an option, which a lot of crocheters tend to so that.

These hooks work pretty well, I don’t have any complains, although I have seen and heard from a few people, that they are very easy to break, which I figured they would because they are made up of plastic.

However, I haven’t had one break on me, ‘knock on wood’, but I can see the smaller ones breaking a lot quicker than the bigger ones.

Overall, I see more people use the bigger plastic hooks more than I do the smaller ones.


Steel Hooks

20190423_090234.jpg

I know you are probably thinking, ‘What’s the difference between these and the aluminum ones?’. Well, there are a few differences, but let me explain why.

These hooks have a built-in handle, which is perfect for if you have sweaty hands, as I do from time to time. Not only that, having a handle makes it easier for you to grip the hook better, but it makes it easier to control smaller hooks.

Yes, they do make them in smaller hooks. I actually bought myself a set, that also came with a storage bag, because I was looking for something to help me better grip my smaller hooks, especially, since I crochet a lot of towel toppers.

Although, these are one of my ‘go to’s’, the only problem I have with them is the grips. Now, the set that I bought, had rubber grips, but they were starting to slide off and it made it bothers me when they do that. Especially, when you are crocheting.

If you do want to get yourself a set of these hooks, go for the ones that are built onto the hook itself. If you do end up getting a rubber set, take some hot glue or craft glue, and glue the inside of the rubber piece, and slide your hook back on.

Overall, they do have some very cute grip holders and they can come in multiple colors. These are definitely a must, especially, if you are a beginner!


Wooden/Bamboo Hooks

20190423_085900.jpg

These hooks were the first thing that I really wanted, as soon as I got into crocheting! They were handmade and hand-carved, but I really just wanted them as an option and to grow my hook collection.

They are so smooth to the touch and have a point at the top of the hook, which makes going into stitches easier. The size of every hook is hand carved into the hook itself. These were so pretty I didn’t want to use them, but I did have some problems.

The ones I have, they felt weird to use, but when it comes to trying out different hooks, it can take a while to adjust, but it felt weird to use them. It’s not that I didn’t like them, I just the hook itself is very awkward.

I even put on a handle, which I didn’t want to do, but with the handle, it was a little easier.

The smallest size they go, in carving them with would, is a 3.0. Anything smaller is just a metal hook with a wooden grip, which I would like to note, the wooden grip is very strong and I haven’t had any problems with it.

Overall, I like to have a set, just to have it, but I have used them before. It does take some type to get used to, but you also need to be careful because since these are made up of wood/bamboo, they are very easy to break. Hence why they don’t go smaller with size!


Japanese Hooks

Image result for japanese crochet hooks

Now, as I said in the beginning, I’ve never tried these, so I can’t really give a good detailed explanation whether they are good or bad. I do see quite of bit of other crocheters that do use them.

What I have read, from my crocheting books, these hooks are perfect for people who have small hands and it helps with arthritis. From the looks of these hooks, they do look very comfortable.

Overall, you have to try them to get the feel from them. I do plan on getting a set in the near future.


In order to find out what hook works for you, try them all out! Of course, you don’t have to buy the entire set of them, you can always get just one of each and see how they are for you!

I like to have options, especially when crocheting. Have a set of each different hook can give me more options to choose from, no matter what size hook I need!

Leave a comment down below letting me know what kind of hook you prefer to use! I’d love to know!

Don’t forget to follow my Facebook page, I update my temperature blanket daily on there, go live crocheting, and even have free giveaways! Link is down below!


https://www.facebook.com/katiesblog96971617/

Posted in Crochet Blanket 2019

Temperature Blanket Update 2019: February

Hey Dearies! So, if you have been following my daily squares on Facebook, you will know that I was going to do the update yesterday, but I totally forgot about it, so I’m doing it now!

February has come and left us and I wanted to show you guys what the blanket looks now!


20190301_085856.jpg
What my temperature blanket looks now! This is both January and February together!

As you can see, this blanket is going to get pretty big and I didn’t realize it until now. My granny squares are 5 rows, tall and wide, so this blanket is going to get super big! It might actually be too big, but it will definitely warm me up on a cold winters day!

If you haven’t already noticed, there has been a new color in the mix, so let me explain. Due to not being able to get the store to go get the color yarn, I had to end up changing it. Plus, I didn’t want to put the blanket on hold when it came time to crochet the squares together.

This light purple that I switched it to will still represent as a 20 degrees color, it just isn’t as light as the color before it.

Hopefully, this will be the only color change that I will end up doing. I’ve planned it out, so if I start getting really low on a particular color, I am going to grab or order another roll the next time I go to the store.

Anyway, here is the colors and what they will represent:

20181222_124142
100 degrees – Fire Red (I Love This Yarn)
90 degrees – Pumpkin (Red Heart Super Saver)
80 degrees – Bright Yellow (Red Heart Super Saver)
70 degrees – Jelly Bean (I Love This Yarn)
60 degrees – Green (Main Stays Basic Yarn)
50 degrees – Turqia (Red Heart Super Saver)
40 degrees – Soft Blue (I Love This Yarn)
30 degrees – Dark Orchid (Red Heart Super Saver)
20 degrees – Orchid (I Love This Yarn) *Changed to the following – Orchid (Red Heart Super Saver)
10 and below – Light Gray (I Love This Yarn)         *Note: Due to one of the color changes, I won’t be updating this picture, the only one that has changed is the 20 degrees one and there is a note, with the new color I’ll be using.*


How do you tell which color to use?

I, personally, go with the overall temperature. So, let’s go by today, for example.

Today in Maine, the overall temperature is 17 degrees. I would choose the light gray.

Let’s say that it was an overall temperature of 22 degrees, I would choose the Orchid color. All my temperatures, for my colored yarn, has to have the same number first number. If that makes any sense, I’m sorry if it doesn’t!

What was the highest temperature for this month?

We actually reached another 50-degree day, but as usual, it doesn’t last long. Hopefully, in March we will start to see more days starting to warm up!

What was the lowest temperature for this month?

Well, we reach single digits, but the way my temperature blanket is set up, we can’t really tell, other than it would be a light gray square!

Do you post daily updates?

Yes, I do. On my Facebook page, I post a picture of the square for each day. I also tried to post every week’s worth, but it was hard to keep track of, so I’ll be posting monthly and daily instead.

If you haven’t liked my Facebook Page, here is the link below! It keeps you posted and updated on my temperature blanket and any updates for my blog and YouTube channel, as well!

https://www.facebook.com/katiesblog96971617/?ref=bookmarks


Posted in Arts and Crafts, Crochet, Easy Patterns

Crafty Sassy: Crochet Stuffed Easter Egg (Easy)

Good Morning Dearies! So, I am going to shake it up a bit and we are doing something for Easter! I know it is a little early, but with my crocheted Easter Baskets up for orders, I wanted to show everyone how to make these cute little eggs, just in time for Easter!

20190226_112506.jpg

These are great for babies for their first Easter or for toddlers if you want them to find something other than jelly beans and candy! These eggs don’t take long to make, but they add the perfect touch to a crocheted Easter Basket!

So, before I begin, I want to talk to you about this pattern. I’ve made about 3 of these eggs, 4 if you include the tutorial I’ll be doing for you all. I’ve used a different brand type of yarn, just to see if there is a difference, and I believe it was my tension, but I’m still unsure.

20190226_112352.jpg

The pattern recommends Red Heart Yarn, so I would just use Red Heart, you can try it with different brands and if you do, and they turn out great, feel free to let me know in the comments!

Anyway, let’s talk about all that you will need:

  • 5.0 mm hook
  • Red Heart Yarn
    • I will be using the color aqua. I’m just guessing because I lost the yarn label for it, but I know it’s Red Heart.
  • Stitch Marker
  • Stuffing of your choice
    • I’m using the stuffing that you get from Walmart in the craft section. Basic stuffing for stuffed animals.
  • Sewing Needle
  • Row Counter (optional)
    • I wrote down the numbers of rows and crossed them off as I go. You don’t need a row counter, but if you are a beginner, I highly recommend that you use one.

Let’s begin!

Round 1: Chain 2. Make 6 single crochets in the second chain from your hook. Don’t connect. (6 stitches)

20190226_100235.jpg

Round 2: Make a single crochet in the next stitch and place a stitch marker(You’ll be moving this stitch marker for every row), then make another single crochet in that same stitch. In the next stitches, make 2 single crochets in each until you reach the stitch marker. (12 stitches)

Round 3: Single crochet in each stitch.

Round 4: Make *2 single crochet in the next stitch, single crochet in the next.* Repeat (18 stitches)

Note: The * are for repeating an amount of different stitches for a round or row.

Round 5: Rep Rnd 3.

Round 6: Work *2 single crochets in the next stitch, single crochet in the next 2 stitches.* Repeat. (24 stitches)

Round 7: Rep Rnd 3.

Round 8: Work *2 single crochets in the next stitch, single crochet in the next 3 stitches.* Repeat. (30 stitches)

Round 9-11: Rep Rnd 3.

Round 12: *Single crochet decrease in the next stitch, single crochet in the next 3 stitches.* Repeat. (24 stitches)

Round 13: Repeat Rnd 3.

Round 14: Single crochet decrease 12 times. (12 stitches)

Round 15: Rep Rnd 3. Stuff the egg. (I used the other side of my crochet hook to help stuff the egg because the hole is really small.)

Round 16: Single crochet decrease 6 times. (6 stitches)

Finish off, leaving a long tail to weave through the remaining 6 stitches. Pull tight and secure the end and make sure to weave it in, as well.

20190226_112520.jpg

There you have it! Perfect pretty Easter eggs for the kiddos!

Posted in Arts and Crafts

Crafty Sassy: What Are C2C?

When you first get into crocheting, the first thing you do, before you even get into it, is figuring out what you want to learn how to make. For me, other than my great-grandmother’s crocheted towel toppers, was the C2C. C2C is a ‘corner to corner’ type of stitch that you would find in blankets.

A corner to corner is something that you would usually see for a blanket, but I have seen many for scarfs and rugs as well. They are perfect for testing the limits to see what you can do with your crocheting skills. Here are a few examples that other’s have made:

Image result for c2c crochet

Image result for c2c crochet

You can get really creative with these types of projects! I will say, these are a lot easier to understand than graphgans. If this is something that you have saved in your Pinterest folder, or you are waiting for all your projects are done before starting something new, sit back and relax! I’m going to answer a few questions and give some tips, I have picked up, on C2C!

What will you need?

Depending on the pattern or idea you have in mind, you will need to start out on graph paper. If you are going for the basic C2C, having a graph will help you keep track of where you are, but graphs are used for more characters or lettering. For example, I am going to use this pixel picture:

Related image

Since we are going to be using this heart, as an example, we need to figure out how many bobbins and colors we will need. I also want to note that you can always change the colors for any of these types of projects. It won’t change how you make the C2C, only the colors.

For this project we need 4 different colors:

  • White
  • Black
  • Dark Red
  • Red

Now, let’s talk about bobbins, if you don’t know what they are, here is a picture of what they look like, you will need these, unless, you are using multiple skiens, which I don’t recommend because you have to turn the project back and forth, when you are done with a row.

Image result for crochet bobbins
These ones aren’t exactly for ‘crocheting’, but the reason why I like these, is because you can clip them onto your work as you are working.

From looking back at the graph, I see that we will need about 9 bobbins, but like i said, every project will be different and you will have to determined what you will need for each project.

How do you start one?

After you have figured out what you need, you can then start. A lot of people start by chaining 6, but I prefer chaining 5. The reason for this is because I am one of those picky people that doesn’t like giant gaps or holes in my projects and I like to keep it that way.

Chaining 6, is what people normally do, but it doesn’t change the C2C. The only other difference is that, when you connect the squares together, they won’t be the same. For now, here is the video I followed:

*Note: This is not my video, this is to show what type of C2C I am currently using. All credit goes to Heart Hook Home.*

Is it easy?

Once you get the hang of it, it isn’t that hard to do! The only parts that I struggle with is changing color, but there are so many videos on YouTube that have helped me out with that!

What videos do you recommend?

I can recommend a few, but you’ll have to find someone that you can follow. Everyone is different, especially, when it comes to crocheting. I am also one of those people that likes to get right down to the point, especially, when it comes to tutorials.

Keep in mind, that some people can give you way too much information, to the point where you aren’t sure what you are doing. Heart Hook Home, did an awesome job explaining a C2C, I highly recommend you watching her tutorial.

If you want to learn, almost everything that is to know about a C2C, then the Crochet Crowd is your best option, although, I personally, don’t recommend him to anyone who is a beginner. I honestly found his video, on C2C, very confusing and especially as a beginner.


This was just a little more information, not a lot, but enough, to possibly get you going in the right direction of C2C. Once you learn how to do it, you won’t want to stop!

If you haven’t liked my Facebook page, I will be going live, tonight, with a surprise, that I am making for this month of January! Make sure to like my page and check it out!


Posted in Arts and Crafts, Crochet Blanket 2019

Crafty Sassy: Temperature Blanket 2019

Hey dearies! 2019 is just around the corner and as I have mentioned, I want to make a temperature blanket for 2019. I wanted to talk more into what a temperature blanket is and what you need for it.

So, for my temperature blanket, I will updating you on what it looks like at the end of every month, rather than posting every square a day, I figured it would be easier to post on what it looks like at the even of every month. However, I will be posting a square a day on my Facebook Page.

Let’s talk about some questions I have gotten on my Facebook page about the temperature blanket is.

What is a Temperature Blanket?

A temperature blanket is a blanket in which you crochet a square a day, in a color, based on the temperature of what it was that day. The picture below is an example that someone used as their ‘guide’, for their temperature blanket:

Image result for temperature blankets

This is just a simple chart, but there is a color that represents every temperature. You don’t have to crochet a square a day, you can do whatever you want to do! I’ll be crocheting a solid granny square a day, but you can crochet a row a day, or crochet a different design a day, whatever you would like to try!

You can even do it with one color, but start from the darkest color, and work your way down to the lightest or whitest color. Here is another example:

Image result for temperature blankets with one color

As you see here, this person used a ‘purple’ as their base color for this project, which you could do for any and all types of colors. The rainbow theme, for a temperature blanket, is more common because when it all get’s put together, it’s amazing to see what they look like.

Best part about seeing these blankets, is that the temperature isn’t the same everywhere you are from. I’m from Maine, and it doesn’t stay in the same temperature all year long. So, we will see a little bit of every color, that I have planned.

Do you have to use the same yarn?

Not at all! Most people use their leftover yarn that is just sitting in their closet. Or, if you are like me, I go out and buy whatever colors I don’t have and go from there.

There also isn’t a brand that you have to stick with either. Whatever yarn you have hanging around, that follows the key, will work! Even if they aren’t all from the same brand.

I’ll be using mostly I Love This Yarn, because it’s one of my favorite brands to use, but their yarn can be rather pricey! I do have a few other types of yarn that aren’t the same brand. Usually, I stick with a brand, when it comes to a project, but this being my first time making it, I’ll be using what I have from my yarn stash.

What colors are you doing for this blanket?

I know a lot of people are wondering what colors I will be using for this blanket. Since this is my very first temperature blanket, I will be doing the ‘rainbow’ color key for this project. So, here is the colors I will be using:

20181222_124142

  • 100 degrees – Fire Red
    • I Love This Yarn
  • 90 degrees – Pumpkin
    • Red Heart Super Saver
  • 80 degrees – Bright Yellow
    • Red Heart Super Saver
  • 70 degrees – Jelly Bean
    • I Love This Yarn
  • 60 degrees – Green
    • Main Stays Basic Yarn
  • 50 degrees – Turqia
    • Red Hear Super Saver
  • 40 degrees – Soft Blue
    • I Love This Yarn
  • 30 degrees – Dark Orchid
    • Red Heart Super Saver
  • 20 degrees – Orchid
    • I Love This Yarn
  • 10 and below – Light Gray
    • I Love This Yarn

This is the line up of what colors I will be using for my temperature blanket for 2019! I included the brand, just in case any of you would like to follow me in making this blanket as well!

Do you have to wait until the beginning of the year to start?

Nope! You can start one when ever you would like! A lot of people I know like to start from the beginning of the year to the end of the year, just to see what it would look like, too!

Another option you can do, is if you are a faster crocheter and want to blanket from, let’s say 2015, you can always use Google to search for what temperatures it was during that year from where you live. It might be a little hard to find, but it would be amazing to see what each year turned out to me.

If you are looking for a later year, Google might not have the information for later years, but if you are a newspaper collector, you might have more luck!

How are you joining your squares?

So, I have learned and watched quite a bit of videos on how to sew together squares and I have two in mind:

  1. Single crochet the squares together
    1. Now, this wouldn’t require a sewing needle at all! Basically, you would put your squares back to back and single crochet the seems together. It’s simple for beginners and you would have sort of have two blankets in one.
    2. Here is the video, if you are interested: https://www.youtube.com/watch?v=NUGb9pIcsXE
  2. Mattress Stitch
    1. This is a stitch that I LOVE to use because of the fact it hides how you stitched it together. I’ve used it multiple times and it is one of my favorites!
    2. Here is the video, if you are interested: https://www.youtube.com/watch?v=Elshk_5XuuM&t=600s

Not sure which one I am going to use, but I will show you how to do one of them, when I go live on my Facebook Page.

Do you have to make squares?

Not at all! You can do squares, hexagons, circles, rectangles, rows, and etc. Be creative and try to do a temperature that you think would be amazing.

If you are a beginner, I would start out with squares. You don’t have to do a solid granny square, like I am going to do. A lot of people use a granny square for this type of project, but I like my squares completely squared.

What do they look like?

Well, here are some examples! If you wish to make one of these, for your own collection, keep a look out on my Facebook Page for more details for how to follow along!

Image result for temperature blanket crochet
This isn’t exactly a temperature blanket, but I wanted to show an example that you can make them in just simple long rows. 
Image result for temperature blanket crochet
This is a square temperature blanket, but it is a different design from the original granny square. 
Related image
This one was made with hexagons. Like I said, you can make them using pretty much any time of shape.
Image result for temperature blanket crochet
Another great design, this one looks like they did two types of temperatures, one in the morning and one at night.

I will be doing monthly updates, as well, on my blog to show the progress of each month, but I’ll be doing a weekly and daily update for my blanket on my Facebook page!


Posted in Arts and Crafts

Basic Stitches & Terms Should Know For Crocheting

I was a beginner to crocheting, in the beginning of the year, but I got hooked into it the moment I first learned how to crochet. I thought it was going to be very difficult to pick up, unlike knitting, which my grandmother taught me to do.

If you are interested in learning how to crochet, please keep reading! There were a lot to learn and a lot of different terms. I do consider myself still a ‘beginner’, but I do know most of the stitches and terms, which I have learned over time.

First thing is first, if you are a true beginner, I suggest getting a set of crochet hooks. The first set I ever bought was on Wish, but if you don’t want to wait weeks on end for stuff, you can find a set on Amazon for about $10-$15. Some sets will even come with markers, tape measures, plastic needles, scissors, and some other stuff as well!

Image result for crochet hooks

If you don’t have the extra money to buy a set, you can always go to your local craft store or Walmart, and get the following:

  • Crochet Hook
    • Start with a 5.0mm hook. Most projects require this size and it is also the size I am going to use to show you each stitch.
  • Yarn Size 4 (Medium)
    • If you are unsure what size the yarn is, you can always check on the back of the yarn label, and it will tell you what size it is. It also tells you what hook it ‘recommends’ to use, but most crocheting projects use this type of yarn.
    • Image result for yarn size
    • Image result for yarn size on the yarn label
  • Markers
    • Markers aren’t really needed, but are very helpful for marking when your stitches begin and end.
    • You don’t necessary need the actually crocheting stitch markers, you can use a paper clip, bobby pin, or anything that is small enough for you to use for crocheting. You can check out the picture and see what I mean.
    • Image result for crochet markers
  • Sewing Needle
    • You will always need a sewing needle for every project you do. When a project is finished, you use them to sew in the ‘unwanted’ strands from the beginning, middle and end of your project.
    • Doesn’t matter what size you use for a yarn needle, a basic size works for most projects and you can also find a pack of needles that has different sizes on Amazon or your local craft store.
  • Scissors
    • You will also always need scissors, for all your projects, to cut off any loose ends. I suggest getting embroidery scissors because they are small and easy to travel with.
    • Image result for embroidery scissors
    • Normal pair of scissors works fine as well.

Now that you have an idea of what you are going to need, let’s talk about some stitch and abbreviation terms, before starting to crochet. I have created a mini ‘cheat sheet’, for you beginners, which will also be posted on all of my social medias. If you were to look at the entire list of crochet abbreviations, your head might spin, so that is why I’m breaking it down for the new comers. Crochet Beginner Cheat Sheet.jpg

The reason why we use ‘abbreviations’ for crocheting, is that some of the terms, that are used, are very long and it would make the pattern, we are reading, very difficult to understand. Most crochet books have a page or two, on what the abbreviations mean and how to do that particular type of stitch.

There are other terms that aren’t listed in crochet books. If you join a crochet group on Facebook, some of them, in the group, will use different terms that aren’t really in the crochet books, or the ones that I have.

Here are a list of ‘slang’ crochet terms, that some people might use, that aren’t necessary in the crochet books:

  • Ami – Short for Amingurumi.
    • Amingurumi are the stuffed animals that you can crochet and make, they just aren’t called ‘stuffed animals’.
  • BiStitchtual – Someone who crochets and knits.
    • I’ve never heard this term before, I don’t think anyone has really used this term, but then again, I haven’t come across someone saying it or calling themselves it.
  • C2C – Corner to Corner.
    • C2C are blankets that you make, using a grid or graph.
  • CAL – Crochet Along,
  • De-stash – Selling or giving away yarn you stash.
    • Most people who do this are ones that might have a lot of yarn just sitting around. Since some brands of yarn are very pricey, you might get them cheaper from someone else who isn’t using them.
  • FO – Finished object.
  • FOTH – Fresh off the hook.
  • Freehand – Making a project without following a pattern.
    • Lots of experience people make these, while writing the pattern as they go. When you become more advance, this is something a lot of people do to make money from crocheting, by selling their patterns.
  • Frogging – Ripping out rows or rounds of crochet (Ribbit, Ribbit)
    • I have done this so many times. Especially if I find I missed a stitch or it doesn’t look ‘neat’ and ‘pretty’. You’ll be doing it too!
  • HOTH – Hot off the hook.
  • Hooker – A proud and happy crocheter.
  • HSPY – Haven’t started project yet.
  • ISO – In search of.
    • If you are in search of a pattern, particular yarn brand, stitch, or any supplies that have to do with crocheting, most groups on Facebook, can be helpful to help you find what you are looking for.
  • JOTH – Just off the hook.
  • LYS – Local or little yarn store.
  • MAM – Mile a minute afghan.
  • MGBTC – Must get back to crocheting.
  • OCD – Obsessive crocheting disorder.
    • Once you get the hang of it, you’ll want to keep going and try different patterns and projects.
  • PABLE – Pattern accumulation beyond life expectancy.
  • PHD – Projects half done.
  • PIGS – Projects in grocery sacks.
  • PTP – Permission to post.
    • Some use these word for posting on social media or sharing it on their personal social media, or blogging sites.
    • This is VERY important to know because if you buy a pattern, most creators do NOT want you to post it on another website or share it with anyone, unless they bought it.
  • SABLE – Stash accumulation beyond life expectancy.
  • STASH – Special treasures all secretly hidden meant to be discovered unexpectedly.
  • TALC – Take along crochet.
  • TIA – Thank you in advance.
  • TOAD – Trashed object abandoned in disgust.
  • UFO – Unfinished object.
  • USO – Unstarted object.
  • Yarn Cakes – The small skeins of yarn that result from using a yarn winder.
  • WIM – Work in mind.
  • WIP – Work in progress.
    • A lot of crocheters will use this term.
  • WIVSP – Work in very slow progress.
  • YAP – Yet another project.
  • Yarn Barf – The tangled mess of yarn from the center of a skein.
    • This happens to me, because I usually use the center string for when I crochet. I love using it because I know have to unravel yarn, but it can be a pain in the ass to unravel, when you use the middle string.
  • Yarn Bomb – A decorative piece of crocheted or knitted art that is strung up in a public place.
  • YART – Yarn acquisition road trip.

Make sure to follow my blog for more beginner posts on crocheting! I will be breaking down everything in little parts and I will also have videos for you to view, if you find it easier to understand and learn!

I also go live on my Facebook page on Tuesdays! Check it out and don’t forget to like it, so you can stay in the loop for whenever I post a blog post or go live!
https://www.facebook.com/katiesblog96971617/


Posted in Arts and Crafts

Crafty Sassy: How To Make Bigger Coaster Sizes

Since I have explored more on Pinterest, I can upon this beautiful peppermint coaster. The Purple Poncho was nice enough to make this pattern free for us to use, here is the original link to the coaster here:

https://www.thepurpleponcho.com/peppermint-coasters-free-crochet-pattern/

So, with that in mind, all credit goes to her and a big thanks goes out to her for making this pattern completely free to use!

However, as lovely as this pattern is, I had one problem with it. It wasn’t big enough for my ‘standards’, which is why I am going to tell you how to make the coaster bigger. If you are like me and have giant coffee mugs, the original pattern is too small. The pattern, in my view, is more for wine glasses or just for decoration.

This also might work for some other coaster patterns as well, as long as it has the same ‘basic beanie circle’ idea, then it should work, as long as you use the correct stitch for the project.

I’ll be using the peppermint coaster pattern as an example. After you have checked out the pattern and read through the rounds, after round 4, you start making that beautiful ‘peppermint’ design. Before you start with that design, let’s make it bigger.

This is called ‘increasing stitches’, which you can or do for most projects that require it, or you choose to do so. It’s very simple to do, but can be confusing.

Round 5: Ch 2, make 1 half double crochet (hdc) in the first stitch, then 2 half double crochet (hdc) in the next 2 stitches. Make 2 half double crochet (hdc) in the next stitch (meaning you make 2 half double crochet’s in the same stitch. Repeat.

Just keep adding a single half double crochet stitch (or the type of stitch that you are working on.) to each new row, until you feel like it is where you want the size to be. Then follow the next step in the peppermint boarder.

Does this work with all coaster patterns?

No, it does work for this pattern because this started out like we were going to make a simple basic beanie. Every coaster is different, but depending what it is, you can always figure it out or as the creator if they know how to fix it to be smaller or larger to what you are looking for.

I did go live on showing you how to make the peppermint coaster, if you would like to check that out, visit my Facebook page and don’t forget to like my page, so that you can know when I next go live or for any of my free giveaways. It is also the best place to find updates for my blog.

https://www.facebook.com/katiesblog96971617/

Posted in Arts and Crafts, Crochet, Easy Patterns

Crafty Sassy: Crochet Towel Topper (Easy)

44664318_1911676305807353_5391009887280955392_n

Hey dearies! I wanted to give you guys an updated pattern on the towel topper! I finally mastered it to my liking and I wanted to share it with you guys. If you didn’t know, my great-grandmother has been making these towels since I was really little and I’ve always wanted to know how.

Now that I have more knowledge on how to make them, I created a pattern that is, to me, perfect. Not too much yarn, but just enough to complete the towel itself. As you can see in the picture above, one of them is very long, that was one of my trial ones that I practiced on.

We are going to be making these ones:

20181024_121320.jpg

What you will need:

  • Medium Yarn
    • Find a color that you would think, would go good with the towel.
  • 2 different sizes of crochet hooks. You don’t have to use just one size, you can use whatever size you would like, these are what I prefer to use.
    • 5.0mm – This one, we will use to crochet the actual towel.
    • 3.0mm – This one, we will use to start off the towel.
  • Towel
  • A button, color of your choice
    • The size can be whatever size you would like, but nothing smaller than an inch.
  • Sewing needle
  • Ruler (Optional)
  • Black Marker (Optional)

Let’s begin!

Part 1: Starting the towel –

The first thing we need to do it cut the towel in half, like this:43592885_483374518835072_2761795955673006080_n

As you can see, mine, isn’t completely even, which in normal because of the brand of towel I am using. It doesn’t have to be perfect!

Take one of the sides, of the towel, that you want to work with and lay it flat in front of you. If this is your very first time making this towel, I suggest grabbing a fine point black marker, it will make this next part easier.

Starting from the right side, take a ruler and measure 1/4 of an inch, place a dot with your marker and do that all across the towel. Make sure you are also 1/4 of an inch away from the top of your towel.

Untitled.png
If you aren’t good with measurements, here is 1/4 of an inch on a ruler.

Once you are done making the dots, you can begin! Take the smaller crochet hook (3.0mm) and some yarn. Poke your crochet hook in the very first dot, where you started on the right, pull some yarn threw that first hole and slip stitch (sl st) to lock in the yarn.

You are going to do this all across the towel, until you reach the end. Be careful that you don’t snag any of the towel strings, it can happen for some towel, especially for thin ones.

20181024_130853.jpg
This is what it should look like after you finish the first part.

When you reach the end, turn your work and switch the crochet hook to a bigger hook (5.0mm), and chain 1.

Part 2: Crocheting the towel –

Row 1 – Single crochet (sc) in between each stitch. Chain (ch) 1.

*Note – I am considering this as the first row because this is when we are actually starting to crochet.

Row 2 – Double crochet together (dc2tog) for the entire row. If you end up with an extra stitch that you can’t double crochet together, just do a simple double crochet (dc). Turn your work and chain (ch) 1.

Row 3 – Double crochet (dc) across. Turn your work and chain (ch) 1.

Row 4 – Single crochet (sc) across. Turn your work and chain (ch) 1.

Row 5 – Double crochet together (dc2tog) across. Turn your work and chain (ch) 1.

Row 6 – Single crochet (sc) across. Turn your work and chain (ch) 1.

Row 7 – Double crochet together (dc2tog) across. Turn your work and chain (ch) 1.

Row 8 – Single crochet (ch) across. You should end up with 8 stitches. This is needed for the button hole!

  • If you have 1 extra: Make a single crochet together (sc2tog) in the last two stitches.
  • If you are missing a stitch: Add another single crochet (sc) in that last stitch.

Turn your work and chain (ch) 1.

Row 9-13 – Double crochet (dc) across. Make sure that each row still ends with 8 stitches. Turn your work and chain (ch) 1.

Row 14 – For the last row, I’m going to break it down:

  • Single crochet together (sc2tog) in the first 2 stitches.
  • Half double crochet (hdc) in the next stitch.
  • Double crochet (dc) in the next stitch.
  • In the same stitch you just made the double crochet (dc), treble crochet (tr) in that same stitch. Chain (ch) 3.
  • In the next stitch, make a treble crochet (tr) and in that same stitch, make a double crochet (dc).
  • Half double crochet (hdc) in the next.
  • Single crochet together (sc2tog) in the last 2 stitches.

Fasten off and weave in any extra strands.

Part 3 – Button

Sew on the button in between the middle of the 8th row. Make sure that it is in the middle.

And you are finished!

These are a perfect gift to make for anyone! Especially, for craft fairs and such. Enjoy this pattern and if you make one of these towels using my pattern, please feel free to tag me on Instagram by using the hash tag #KatiePurrPurr.

*I created this pattern to my own liking, I do own it and you are more than welcome to use it or share it, but please do not take this pattern to sell as your own. When sharing this pattern, please make sure that you link it back to my blog. Any questions on the pattern, feel free to contact me*

Posted in Arts and Crafts, Crochet, Intermediate Patterns

Crafty Sassy: Halloween Jar Cozies (Intermediate)

Hey dearies! So, the Halloween Jar Cozies won for me to make on tonight’s live on my Facebook page! If you would like more information about that, scroll all the way to the end.

This is probably going to be on the the most challenging projects that I have tried, so bare with me! I want to shout out to Red Heart for this free pattern! Here is the link of the actually pattern:

Click to access LW4910.pdf

*Note: I don’t own this pattern, all rights go to the owner of the pattern. I make the pattern easier to understand, in my own words, but I DO NOT own this pattern!*

Here’s what you will need:

  • Medium Yarn
    • Red Heart Pumpkin, is what I’ll be using when I go live.
  • Crochet hook sizes 5.0mm and 3.75mm.
    • The smaller crochet hook is used to make some of the faces, you don’t have to do that.
  • Black Fabric
    • This is an option if you are a beginner.
  • Stitch marker
  • Sewing Needle
  • Row Counter
    • You can use a piece of paper, but I recommend using a counter, whether you use one on your phone or have a digital one like myself.

Let’s begin!

Grab your 5.0mm crochet hook and some yarn. Make a magic circle or an adjustable ring.

Round 1: Make 6 single crochets in the magic circle. Make sure that you don’t join this round! Place a stitch marker at the beginning of the round.

*Note: As we keep working up, move the marker up after the end of every round. It will make it easier to keep track of where we are at for each round. 

Round 2: Make 2 single crochets in each of the stitches, until you reach where the marker is.

Round 3: Single crochet in each of the next 2 stitches. Make 2 single crochets in the next stitch. Repeat until your reach the marker.

Round 4: Single crochet in each of the next 2 stitches. Make 2 single crochet in the next stitch. Repeat until you reach the maker.

Round 5: Single crochet in each of the next 3 stitches. Make 2 single crochet in the next stitch. Repeat until you reach the maker.

Round 6: Single crochet in each of the next 4 stitches. Make 2 single crochet in the next stitch. Repeat until you reach the maker.

Round 7: Single crochet in each of the next 5 stitches. Make 2 single crochet in the next stitch. Repeat until you reach the maker.

Round 8: Single crochet in each of the next 6 stitches. Make 2 single crochet in the next stitch. Repeat until you reach the maker.

Round 9: Single crochet in each of the next 11 stitches. Make 2 single crochet in the next stitch. Repeat until you reach the maker.

Round 10: Single crochet in the back loop only, of each stitch around.

*Note: If you don’t know how to single crochet from the back loop only, here is a link to a video that will show you how:
https://www.youtube.com/watch?v=phf7Nj0_LJg

Round 11-15: Single crochet in each stitches around.

Round 16: Single crochet together over the next 2 stitches. Single crochet in each of the next 24 stitches. Repeat once more.

Round 17-33: Single crochet in each stitch around.

Fasten off and you can remove the marker!

Now that we have completed the base, you can leave it how it is or take some black fabric and shape it to look like a pumpkin.

Best part about this pattern is that you can use whatever color you want and it would be the perfect cover for gifts, especially if you can! If you are looking to make it for a larger jar, check the pattern and look at the gauge.

I will be going live on my Facebook page tonight, showing you how to make this! If you are intersected in watching me make this, check out my Facebook page and make sure that you like my page, so that you can keep up to date on when I go live or make sure you don’t miss the polls!

Posted in Arts and Crafts, Beginner Patterns, Crochet

Crafty Sassy: How To Crochet A Flower Pin (Beginners)

20180928_123311.jpg

Hey dearies! You are probably wondering why you are getting a Crafty Sassy on a Friday, so let me tell you why! Since this coming up week will be the beginning of October, I have decided to go live twice, for the month of October!

So, I wanted to show you guys how to make this flower pin, because it also goes with the headband I showed you guys how to make on Tuesday. So, I will be going live on my Facebook Page. More information on that will be at the bottom of this!

Let’s get started! First thing, let’s talk about what you will need for this project:

  • Medium Yarn
    • Any color of your choice. Since this flower goes with the headband, you can match a color to go with it or whatever color you feel works best!
  • Crochet Hook 4.5 mm
  • Sewing needle
  • 1 Pin back
    • It doesn’t required any fancy pin, a safety pin would work find as well!

Part 1: Making the flower

  • Step 1: Chain 53
  • Step 2: Double crochet in the 3rd chain from the hook. Double crochet in every following chain across.
  • Step 3: Chain 1 and turn your work. *Single crochet in the next space. Make 5 double crochets in the next space* (The stars are to let you know that you have to repeat, until you reach the end or if they say otherwise)
  •  Step 4: Fasten off and make sure you leave a long tail because we will be using it to sew the flower altogether.

Part 2: Sewing the flower together

  • Step 1: Loosely arrange the layers to form a flower.
  • Step 2: Using a threaded yarn/sewing needle, stitch each layer of the flower together, ending on the back side.
  • Step 3: Draw the threaded needle through the pin back. Secure the pin back onto the back of your flower and cut the excess yarn to complete the flower pin. And your done!


Having a pin, on the back of your flower, can make it so you can wear it on hats, scarfs, headbands, necklace, etc. So there’s not just one use for this project.

Anyway, I will be going live tonight on my Facebook Page. If you haven’t like my Facebook Page, here is the link!
https://www.facebook.com/katiesblog96971617/

Let’s talk about the NEW plans for the month of October!

I plan on bring Crafty Sassy to you on Tuesday’s and Thursday, just for this month! Instead of the normal stuff that is for beginners and such, I’ve decided to make this month a ‘holiday special’. I will be doing the same for November and December.

If you have any projects that you want me to show you how to make, leave a comment down below, message my Facebook page, or even e-mail me at katie_farrington@aol.com!


Posted in Arts and Crafts, Beginner Patterns, Crochet

Crafty Sassy: How to Crochet a Basic Headband (Beginners)

20180925_150307.jpg

So, there was a tie on my Facebook page on whether I should make the Rose or the Headband, but since the headband has been in the last few polls, I figured I would show you how to make one.

Now, I haven’t mastered this pattern completely, but it is a very fun pattern to make! Especially, if you are a beginner. The Rose actually goes with this headband, so I figure we can make the headband and I then can show you how to make the rose and show you how to put it on, as well.

As always, let’s talk about the supplies you will need:

  • Medium Yarn (Color of your choice)
    • I decided to used the ‘I Love This Yarn’ multi-color yarn to show you guys what it should look like.
  •  5.0 mm Crochet Hook
  • And of course, a sewing needle!

20180925_150444.jpg

So let’s get started!

Step 1:  Chain 44. Now, found it easier to count out loud, while making the chains, just so I don’t lose track of how many chains I made.

Step 2: Make 2 double crochet’s in the 3rd chain from the hook(NOT counting the chain that the hook is on!). *Skip 2 chains, single crochet in the next chain. Chain 2. Make 2 double crochets in that same stitch.* Repeat until you reach the other end, then make a single crochet in that last chain.

Note: The * represent where you start and end. Basically, you are repeating the same step until you reach the end. I will be putting in * to help you know what you need to do! A lot of crochet books use them and they are very helpful! If you are stuck or need help, let me know down in the comments!

Step 3:  Chain 2 and turn your work. Make 2 double crochets in the next available stitch. *Single crochet in the chain-2 part of the work. Chain 2. Make 2 double crochets in that same space.* Repeat until you reach to the other side and then single crochet the top of the last row.

Step 4: Repeat Step 3. Twice. You should have 4 rows altogether.

Step 5: Chain 30. Then slip stitch to the opposite side of your project. Slip stitch across that small side and then chain 30. Slip stitch to the other side and slip stitch across that side. Once you are done, cut your yarn and pull your crochet hook up and pull that end piece of yarn tight.

Step 6:  Sew in any yarn that is hanging around and then you are done!

Note: If your headband does not fit, you can always 4 chains add or decrease 4 chains, to fit your size head. If you are looking for it to fit a baby or child’s head, this might not be the project for that, but you can try and make it work!

For Example: If the headband was too small, I would chain 48. If the headband was too big, I would chain 40. 

If you have any questions, feel free to ask me! I’ll try my best to help you out!

20180925_150941.jpg

Also, don’t forget to check out my Facebook page, I have a poll up every week on what project I should do next! Since Halloween is just around the corner, be prepared to be Spooked!
https://www.facebook.com/katiesblog96971617/

Posted in Arts and Crafts, Beginner Patterns, Crochet

Crafty Sassy: How To Crochet Mug Cozies (Beginners)

Hey dearies! So, today I am going to tell you how to make these super cute mug cozies! Since summer is slowly starting to change into fall, I figured I would show you how to make these cozies, which are perfect for giving away, with mugs, as a gift for the holidays!

This was also the winner for me to make on this weeks Facebook Live! If you don’t know anything about that, scroll all the way down for more information about it!

Image result for mug cozy

As always, before we begin a project, let’s talk about the stuff you’ll need:

  • Medium Yarn (a color of your choice)
  • Crochet Hook 4.5mm or a 7 in U.S
  • A button of your choice
  • As always, a sewing needle

Let’s begin!

Step 1: Make a slip knot onto your crochet hook and chain 8.

Step 2: Single crochet and double crochet in the 2nd chain from the hook. Remember, we are NOT counting the chain that is on the hook itself.

Step 3: Skip the next chain and then single crochet and double crochet in the same chain. Repeat this til you are at the end of row 1. Chain 1 and turn your work.

Step 4: Skip the next stitch and do a single crochet and a double crochet in the next stitch. Repeat til the end of the row. Chain 1 and turn your work. Repeat this step until your work measures 8 in., from the beginning of your work.

Step 5: Skip the first stitch and slip stitch in the next 2 stitches. Then do 1 half double crochet in the next 4 stitches. Chain 1 and turn your work.

Step 6: Now, we are going to work on the buttonhole strip for the next 4 stitches. Do 1 half double crochet in each stitch. Chain 1 and turn your work. Repeat this step until your buttonhole strip measures 2 in. long.

You can always put a marker, if this helps with keeping track from where the buttonhole strip starts, you don’t need to do this, but it can help with making sure it’s measured correctly.

Step 7: Do 1 half double crochet in the first stitch. Chain 2. Skip the next 2 stitches. Make 1 half double crochet in the last stitch.

Step 8: This step, is for making a boarder around the project. Work a single crochet stitch evenly around. Working 3 single crochets in the corners and 2 single crochets in the chain 2 buttonhole space. Join them all with a slip stitch in the first single crochet from where you started.

Step 9: Fasten off the extra strands into your project and sew on your button! Then you are done!

*Tip* – For attaching the button, wrap your cozy around your mug so you can see where you want to put the button. Mark it with a pin, thread your needle and sew on the button, making sure to remove the pin. You don’t have to do this, but it was very helpful for me!

I will be going LIVE on my Facebook page, showing you how to do this. If you haven’t already liked my Facebook page, please do! I give updates on my blog and YouTube channel.

I also post polls on what I should make next on my Facebook page, and which ever one wins, I go live and show you how to make them!

Check out the link!
https://www.facebook.com/katiesblog96971617/


Posted in Arts and Crafts, Beginner Patterns, Crochet

Crafty Sassy: How To Crochet A Granny Square (Beginner)

Today, we are going to talk about the most basic and easier square you can crochet. Granny square can be used to make mini squares, or one giant square! We are going to make a small, simple one.

I am going to point out that everyone has their way of crocheting the granny square. So, if you don’t think it looks right or you don’t like that pattern, then you can always search and find a pattern that works for you!

So, one of my kinda BIG crocheting projects, was the giant rasta color granny square, that I am making for my fiance. Its’ basically a giant granny square. It’s not done, but the bigger it gets, the more difficult it can be on your wrists.

Let’s talk about what you will need:

  • Medium Yarn (If you want, you can choice multiple colors, but I will be using just one solid color, to make it easier for you.)
    • Remember: If you are a beginner, try to stay away from dark colors.
  • Crochet Hook: 5.5mm
    • For the hook, it doesn’t have to be that size, but I found it was easier to work with in the video I watched.
  • Sewing Needle


Now that we having everything we need, we can get this project started!

Step 1: We are going to create a slip knot and pull tightly onto our hook. We are then going to chain 6. Then slip stitch the other end of the chain.

Step 2: Now that we have our circle, we are going to start by chaining 3 (Remember: This counts as 1 double crochet.) Then we are going to double crochet 2 times into the circle. I left a picture done below, just in case you need a refresher.

Image result for double crochet stitch

Step 3: Now, we are going to crochet 3 double crochets in the ring and then chain 3. Do that 2 more times. You should have something like this.

Image result for granny square first step

Slip stitch in the top of the chain to fasten off the base of the granny square.

Step 4: Now we are going to create the second row of the granny square. You can add on another color, if you would like, I’ll leave a picture down below showing how you can do that.

Image result for changing color stitch

Chain 3. (Remember: This will count as our first double crochet!) I always turn my work, but because this is a granny square, you don’t have to turn your work. We are going to now working in the open space with the following:
-Work 2 double crochets. Chain 3. Work 3 double crochets. Chain 1.

Step 5: 3 double crochet, chain 3, 3 double crochet, chain 1, into each space. Slit stitch to finish the second row.

Depending on how big you want your square to be, you are basically repeating steps 2-5.

I will be going live on my Facebook page, if you want to see it done. Make sure to like my page and follow me for more updates on when I post any posts on my blog or for when I go live! Here is the link:
https://www.facebook.com/katiesblog96971617/

I will be working on a video tutorial and create another blog post for those who aren’t beginners and just want the simple pattern.

I’m going to leave this link down below, if you would like to see a slowed down version of the granny square that helped me when I first started to learn how to make one. The Nervous Knitter is amazing and you should check out her other videos:


Posted in Arts and Crafts, Beginner Patterns, Crochet

Crafty Sassy: How To Make A Crochet Hanging Towel Holder (Beginner)


So, the winner to my Facebook page’s poll was the Hanging Towel Holder! Today, I am going to show you how to make these awesome hangers. I will also be going LIVE, on my Facebook page, showing you how to make these hangers. If you are intersected, I will leave the link to my page, don’t forget to like my page, so you don’t miss out on any of my lives!

Link to my Facebook page:
https://www.facebook.com/katiesblog96971617/

Things you will need:

  • Medium Yarn(Any color of your choice, try to avoid using black or dark colors)
  • 1 or 2 Thin Bracelets or Thick Hair Ties(The Goody Ouchless Super Thick Hair Ties are preferred,
  • Size 4.0mm Crochet Hook
  • Button (Bigger than an inch)
  • Sewing Needle (To sew any unwanted strands.)

Before I get started, I want to say thank you to Naztazia, she is the one who made the pattern available to use for free and also created a YouTube video on how to make this towel holder!

Her website:
http://naztazia.com

Her YouTube Channel:
https://www.youtube.com/user/naztazia

Here is the link for the free pattern itself:
https://www.ravelry.com/patterns/library/830272


*So, because this is a pattern from someone else, I am going to explain in my way how to make these. I just want to put out there that this is NOT my pattern and I wanted to give FULL credit to the creator. With that being said, all rights go to the creators, not me.*

Step 1: Decide on whether you are going to use 1 or 2 thin bracelets or the super thick hair ties. Then, make a slip knot on to your crochet hook. When I got live, on my Facebook page, I will be using the thin bracelets.

Step 2: Take your crochet hook and put it into the circle and yarn over, bringing the yarn back in the circle. Pull it through all loops, making sure you only have one loop on your hook, making a slip stitch. Chain 3.

Step 3: Once you have chained 3, take your crochet hook and put it back through the bracelet, yarn over, just like you did for creating the slip stitch, but instead of making another slip stitch, we are going to double crochet. Here is a picture on how to double crochet, just in case you forgot.

Image result for double crochet stitch

Step 4: You are going to double crochet 50 stitches, add more or less depending on the size of the bracelet or hair tie. When you get to the last one, slip stitch to close the ring.

*Remember: The chain 3 counts as 1 double crochet!*

Step 5: Chain 1. Then, make 8 single crochet stitches across. Here is a picture down below, just in case you forgot.

Image result for Single crochet stitch

Step 6: Chain 1 and turn your work.

Step 7: Keep making single crochets across for 17 rows. Make sure you chain 1 and turn your work after finishing each row. You can use a row counter if that helps you remember how many rows you have left to do.

Step 8: Once you are done row 17, chain one and turn your work. This next part can be tricky, so I’m going to break it down, so you don’t get confused.

  1. You are going to single crochet in the first one, but instead of yarning over, you are going to go into the next stitch and single crochet, you should have 3 loops on your hook. This is called a single crochet decreased. Yarn over and pull the yarn through all hoops.
  2. Next, half double crochet in the next stitch. Here is a picture, just in case you forgot, but it is basically doing a double crochet, instead of pulling through 2 twice, you pull through all of the loops. Image result for half double crochet stitch
  3. Double crochet in the next stitch.
  4. In the same stitch, that you did the double crochet, crochet 2 trebles. Here is a picture down below, just in case you forgot. Image result for treble crochet stitch
  5. Chain 1.
  6. In the next stitch, do 2 treble crochet.
  7. Double crochet, in the same stitch you did your trebles.
  8. Half double crochet in the next stitch.
  9. Single crochet the next stitch, but we are going to do another single crochet decrease, just like we did for the start of this row.
  10. End the project, but cutting the working yarn and pulling your hook up. Sew in the tail into the project.

Step 9: Sew the button onto the project, make the button in the middle, just above the ring. In between the ring and the first or second row. Sew and cut any wondering strands of yarn. You’re done!

Don’t forget to check out my Facebook page, where I will be going LIVE, showing you guys how to make this.

I also want to give you guys an update that because I now have a better camera to show you guys how to make these amazing things, make sure you check out my YouTube channel because I am going to try my best to add more content, like this, to it!


Posted in Arts and Crafts, Beginner Patterns, Crochet

Crafty Sassy: How To Make A Towel Topper (For Beginners)

20180828_080830.jpg

Today, I’m going to try to teach you guys how to make these simple towel toppers. My great-grandmother has been making these for years and we always had a few of these hanging around the house. To this day, she still makes them, but not as much as she used to.

I am basing this pattern off of what I have seen on YouTube, other free patterns that they have on the internet, and going by one of her towels. I have NOT perfected this pattern. My great-grandmother never really wrote down her pattern or anything like that, she is one of those ‘make it as you go’ type of crocheters.

I will make a better blog post on the towel topper, but for now, I’m gonna show you how I managed to make my first one.

So, first thing first, lets list off the supplies you will need for this project:

  • Kitchen Towel
    • Any type of towel you can use, but use one with more of a thickness, it makes it easier to work with, in my opinion.
  • Medium or Size 4 Yarn
    • Chose a color that would match with your towel design, if it has any. Try not to chose black, it is harder to work with, same with darker colors.
  • Button
    • I chose to get a pack of white big (not giant) buttons. White matches with mostly anything, and for this being my first towel, I figured it would be easier to work with. You can chose whatever color buttons that you think would fit for your towel, as long as they aren’t the small buttons.
  • Sewing Needle
    • Normal sewing needle, nothing really special. It can help with poking holes through the towel.
  • Crochet hooks: 2.25mm and a 4.5mm
    • These are the hooks I used, I might change the sizes, but the reason why you need two is the smaller one will be for bring the yarn through the towel itself, while the other one will be for the actual crochet part of the towel.

Now that you know what you need, let’s begin!

Step 1: Take the towel, you have chosen to use and fold it in half, hamburger fold, if that makes it easier to visualize. Cut the towel in half.

The reason for this is that if you have a long kitchen towel with the same design, on each side, you’ll be able to make two different towels.

Image result for kitchen towels

Step 2: This next step is going to be a little tricky. You can use the sewing needle to help poke holes in the top of the towel, I found that easier than taking the small crochet hook (2.25mm) and poking it through.

Once you poke your crochet hook through and pull through you yarn. Then, you are going to yarn over and pull through both loops, basically doing a slip stitch.

You repeat this step until you reach the other side of the towel.

*Remember to try not make your holes too close or too far apart. A few of the videos that I watched recommend being a quarter of an inch away from the top of the towel and from your last stitch, or hole you made. It doesn’t have to be exact, but whatever works for you.*

Step 3: Turn your work over. Now, we are going to switch our crochet hook, switch to the 4.5mm. Chain 1.

We are going to double crochet in between each of the stitches of the towel. You are going to keep doing that until you reach the other side of the towel.

*How to double crochet*

For this project, you are going to yarn over, go through or in between the stitches and then yarn over again, go through the first two loops, yarn over and go through the last two loops.

Image result for double crochet stitch

Step 4: You are going to repeat Step 3, for this next row. Instead of going in between the stitches, you are going to go in between each double crochet that we made in the first row of double crochets.

Once you reach to the other side, turn your work over and chain 1.

Step 5: For this next row, we are going to still double crochet, but we are going to skip every other one. For your first double crochet, you are going to double crochet in the first spot, but skip the one next to it.

You keep going until you reach the other side. Make sure to turn your working and chain 1.

Step 6: Repeat Step 5, making sure to skip every other one. Once you reach to the other end of the towel, turn your work and chain 1.

Step 7: As you can see, the towel topper is now starting to become smaller, which is what we want it to do. Now, we are going to repeat Step 3, making sure we double crochet into each one. When you get to the other side, turn your work and chain 1.

Step 8: Repeat Step 3. Turn work over and chain 1.

You are going to repeat Step 3, and making sure you turn your work when done that row and chaining 1. For the next 5 rows.

Step 9: Once you are done double crocheting those last 5 rows, it is now time to finish off the project and make the opening for the button to go through.

Now, everyone does this differently, but I am going to do it differently from what my great-grandmother does.

After you turned your work and chained one, you are going to do 2 double crochets. Chain 2. Skip the next 2 stitches. Then do 3 double crochets.

Step 10: This is the last row we are going to crochet. So, make sure you turn your work and chain 1. We are basically going to double crochet, for the last row.

When you get to the open space, you are going to double crochet twice in that opening.

We you get to the end, bind off by cutting the yarn you were working on and pull your crochet out, don’t remove the crochet hook from the loop, pull it up, so that the yarn is bind off.

Step 11:  The last step is simple, all you have to do is sew the button into the middle of the project, just like shown in the picture above. Then it is complete!

Like I said in the beginning, I will have a better post, when I have mastered a pattern and will update you guys on it. These towels have been a gift for any event or celebration. I love having these because you can hook in on your stove handle, especially if you have one made for the theme for your kitchen.

If you are intersected in learning how to do this, I will be going LIVE on my Facebook page, tonight! Like my Facebook page, because I do post all my blog posts on their, as well as my twitter. Click the link below:
https://facebook.com/katiesblog96971617/


Posted in Arts and Crafts, Top Projects for Crochet/Knitting

Crafty Sassy: 5 Easy To Do Beginner Projects For Crocheting

Looking at crocheting project, just looking at them makes you want to learn how to do it, if you are like me, you like to save the page you see them on and come back to it whenever you have time.

Some projects can be very tricky or confusing, so then you forget all about it and never look back until you see it again. This has happened to me so many times, that now that I know how to crochet, I try to go back and find them and see if I am ready to attempt them.

So, if you are truly wanted to enter into this fun and amazing hobby, sit back and check out these easy to do projects, if you are a beginner! Lets begin!

  1. Granny Square Blanket

20180724_070620.jpg

This is the current project that I am working on for my fiance. This is perfect for beginners! If you want to just make a simple blanket, this is perfect to do! Whenever I looked at a granny square blanket, I didn’t think I could make one.

If you don’t know, but I am a visual learner and need everything broken down step by step. YouTube was the first place I looked to find a video that would slow it down, and I finally found one, The Nervous Knitter.

She broke the granny square steps as slow as you can go, but it was easy to understand and learn. I always watch the videos first, before trying them, so I picked up on the steps very quickly. Once you learn how to do it once, it is like riding a bike, something you can’t forget.

If you want to check out her video, here is the link!


2. Scarf

Image result for crocheted scarves

Scarves will always be something that is easy to do. The only difficult thing about them is the patterns you choose. I didn’t understand why my grand-grandmother makes scarfs so much, but after realizing how quit they are to make, I understood why kept making them.

3. Bookmarks

Image result for crocheted bookmarks

You are probably thinking to yourself, bookmarks?? Yes, almost anything you can think of, you can crochet. Now, not all bookmarks are easy and I will be posting a how-to on how to do these ones.

These ones are as simple as granny squares, plus they are cute and pretty quick to make. Why have a plain boring paper or plastic bookmark when you can have a bright and colorful one instead!

4. Beanie Hat

Image result for crochet beanie

Just like the scarves, this is another quick and easy thing to learn how to do. So, if you are a beginner and don’t have any gifts in mind for a birthday or Christmas, you can always crochet a hat and scarf.

I haven’t had a chance to learn how to crochet, but really can’t wait!

5. Granny Square Patchwork Blanket (Mini Granny Squares)

Image result for crochet granny square blanket

I know that I already have the giant granny square blanket on here, but here is the other version that your grandmother might have around her house. The difference between this blanket and the other one I mention is that this is just smaller squares you sew together.

While the other one is just a giant granny square, this one you can get creative and mess around with different colors and see what works and what doesn’t.


Which one would you like to try out? Or which one should I show you how to make? Or which ones have you already made? Leave a comment down below!


Posted in Arts and Crafts

Crafty Sassy: Crocheting VS Knitting

Happy Tuesday! I have another Crafty Sassy coming to you! I am going to talk about the difference between Crocheting versus Knitting and how they are different from each other. Let’s jump right in!

So, the major difference between the two is that you don’t use the same tools. For crocheting, you use a hook and for knitting, you use long needles. The better thing about crocheting is that you can see more progress than you can knitting, depending on what you are knitting.

Image result for knitting vs crocheting

Crochet

Now, I’m not an pro at crocheting, but I have managed to crochet a granny square and I am working on a granny square blanket for my fiance. To me, at first, crocheting looked very difficult. Even when I tried to practice a single crochet square, I always seemed to mess up, somehow.

Image result for crocheting projects

After trying for a while, I gave up. More so, I took a long break and headed to YouTube. I am one of those people that can’t just read the book and look at pictures to do something, I have to physically see them doing, what I am trying to learn.

I figured I would start simple and look for a video to make a granny square. I found the best tutorial by the Nervous Knitter. Link for the video – https://www.youtube.com/watch?v=vDdXrZB1FOE

Since crocheting can be very fast, she slowed it down every step and it was much easier to follow. I watched the entire thing, twice, just to make sure I did it right and know, I know it almost by heart.

Image result for crocheting projects

With crocheting, once you get the pattern down, it’s like riding a bike, you don’t forget it very easily. Crocheting, you can do so much, the best part is that you can see your progress, so working on a granny square blanket, I see the progress, which makes me excited to keep on going!

Once I am finished on my fiances blanket, I will post a picture on here and show you how to do a granny square tutorial, as well!

Knitting

Knitting was the first thing that I ever did, or tried out. I knitted my son’s first blanket. It was very simple to do and, at that time, I preferred to knit versus crochet. The only problem with knitting, it felt like my project was never going to be finished.

Image result for knitting projects

Don’t get me wrong, knitting was very basic and was easier to start out, but once your project gets bigger, you don’t have very much, to me, encouragement to keep going. Plus, I also seemed to lose a stitch or two and my project would come out all uneven, and with me trying to make things perfect, I would restart multiple times.

But there is also another way to knit, without using the needles. You can loom knit as well. I just got a giant set of different looming sizes and shapes. (Next Tuesday, I will be going a tutorial on how to loom knit a scarf!)

Image result for loom knitting

Knitting was something that I did for my latch hook pillows, the backings of them. I knitted them like I was making a blanket, but the needles can only hold on so much, unless you have the needles with the wires, which I don’t currently have.

Image result for knitting needles

Although, knitting was a easier way to have my projects looking a little neater, not perfectly neat, but neat as a way, there was not unwanted holes, just a solid pattern. Knitting, to me, is more for making a really great scarf or, if you have the knitting needles with the wire, a hat or even a blanket.

Which one would be better for beginners?

I would trying out knitting first, just because the concept is more simple and easier to follow versus crocheting. Try something simple, such as knitting a scarf or a square, just to get some practice.

Image result for knitting needles

Once you feel like you know the basics for knitting a simple scarf, try challenging yourself and try to crochet a granny square. If you are like me and need to physical see what is going on, I am going to try my best and make little tutorial videos to help you guys out.

If you get really frustrated with any of it, take a break. Taking a break from your work is okay to do! Especially, if you have children and they are making it difficult to work on anything. Your work will still be there when you want to go back to it.

Another tip that really helped me out, before jumping in on crocheting or knitting, or any project, take a step back and just watch videos of people doing those things. Watch how they do their work and whatever tips or things they do, that you feel or know that would help you out, use them!

Watching other people crochet and knit, I’ll pick up the little things that they do, so that I can used to my advantage or help better myself into crocheting or knitting different things.

Also, if you aren’t sure what kind of knitting needles or hooks you should get, try some out. I prefer metal ones, just because it’s easier, although, I haven’t tried out the wooden or ones with handles. I literally, just bought a set off of wish and have stuck with them ever since, although, because they don’t have a handle, my hands can get sweaty and it makes it harder to work the yarn.

I do recommend trying them out and seeing with ones you think, for yourself, make it easier to crochet or knit.

Image result for knitting needles

One thing that I highly recommend, is to work with bigger yarn! I know a lot of people say not to because it will make it harder to work with the less thicker yarn, but it will let you be able to look, up closely, how it is done. So that if you feel you made a mistake, with the less thicker yarn, with the bigger yarn, you will be able to see clearly what you did to mess up.

So, next Tuesday, I will be doing a step-by-step on how to loom knit and simple figure 8 scarf.