Posted in Arts and Crafts, Crochet, Top Projects for Crochet/Knitting

Crafty Sassy: Top 10 Free Beach/Summer Crochet Patterns

Hi Dearies! I’m back! I’ve had a lot on my plate and have been crocheting constantly lately! So, since we are finally in the summer season, I figure this would be the perfect time to find some patterns that are perfect for the beach or for summer in general!

Since I LOVE going to the beach, I figured this would be the best time to look for some patterns that would be perfect for going! Some of the patterns that I’ve found are not just for us adults, but for kids as well! 

Note: These patterns are not mine and all credit goes out to their original creators. I have left links for each of the patterns. 


1. Beach Cover-up Shorts

2020-06-16

That’s right! Crocheted shorts do exist! I was shocked when I was a beginner and saw this! These aren’t for your normal closet, but if you are headed to the beach, these are perfect, especially if you don’t have a sundress or want to wear jeans to cover your bathing suit bottoms. Also, the yarn is very breathable, which is a plus!

Link to the pattern: https://furlscrochet.com/blogs/crochet-tutorials/crochet-shorts-beach-cover-up


2. Stuffed Beach Ball

crochet-beach-ball-6

Don’t have your own beach ball to play with? Or have a beach theme going on in your house, then this is a very fun project to make! This stuffie is also perfect for the little ones and the best part is, you don’t have to worry about blowing it up or any holes that those plastic ones usually get. Not to mention, you can mix around the colors and make something similar to this one or get creative and make it into a rainbow theme!

Link to the pattern: https://persialou.com/crochet-beach-ball-pattern/


3. Beach Hat

raffia-sun-hat

Can’t go wrong with a beach hat, that’s for sure! The good thing about this is that it’s very simple to make, not to mention very breathable, although you might have to work with a different type of yarn, it’s worth the try! I also love the ribbon that they placed around it for the finishing touch!

Link to the pattern: https://www.craftpassion.com/beach-hat-crochet-pattern/


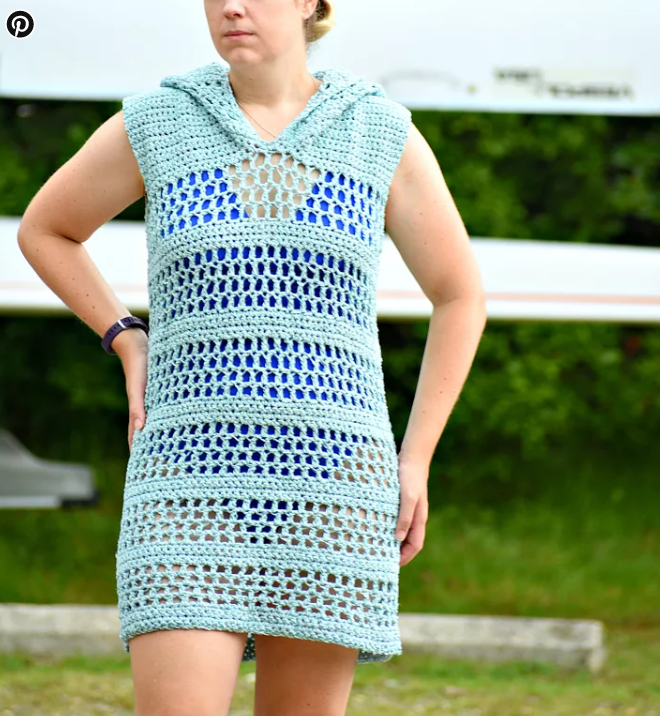
4. Sun-Kissed Crop Top

2020-06-16 (3)

These are cover-ups that don’t necessarily have to be for your bikini, but you can use for tank tops or dresses, like in the picture. I also want to say that this person, who created the pattern, I actually follow her and her blog, she has a lot of free patterns, so check it out when you can!

Link to the pattern: https://yarnutopia.com/2016/06/18/sun-kissed-crop-top/


5. Sea Shells By The Shore Market Bag

Sea-Shells-by-the-Shore-Market-Bag-free-crochet-pattern-by-Nanas-Crafty-Home-for-Underground-Crafter-600x721

I love how this bag looks! Especially how they look like little shells that were embedded into the bag itself. Not to mention the colors they chose were amazing and what really caught my eyes. Now, market bags aren’t just for the market, but these bags are perfect for the beach just because there are lots of open spaces for sand to fall out!

Link to the pattern: https://undergroundcrafter.com/2019/06/05/crochet-market-bag-tutorial-pattern-sea-shells-by-shore-market-bag-by-nanas-crafty-home/
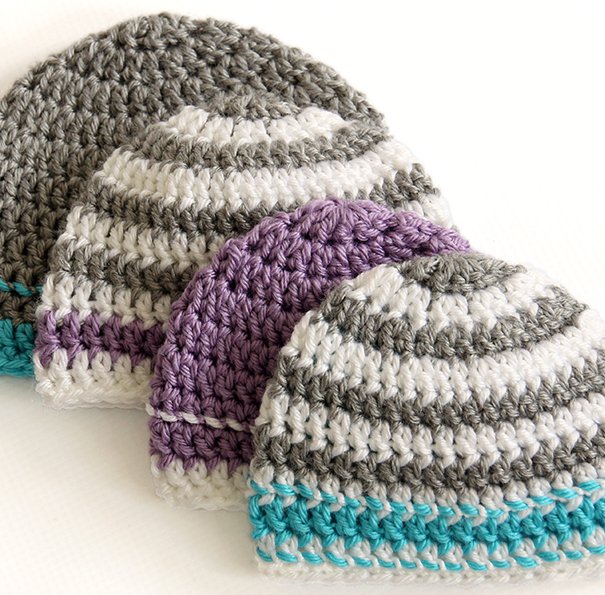

6. Beach Ball Hat

P1100088-1024x880

This pattern is for the kiddos, but so cute and for both boys and girls! This pattern is also a fun one to switch out the colors with, especially if you are making this for someone who is having a baby around the summertime! I love how creative this pattern!

Link to the pattern: https://traversebaycrochet.com/2019/06/04/beach-ball-crochet-sunhat/


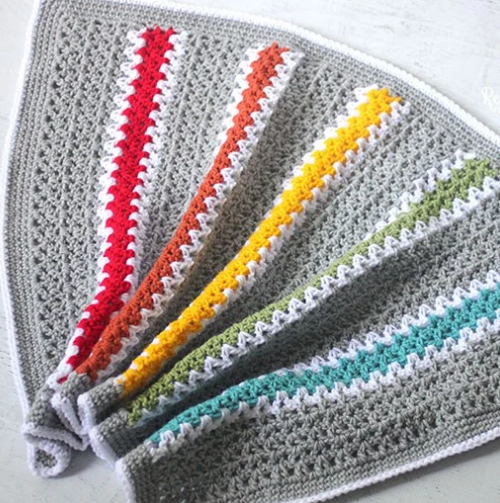
7. Beach Day Louge Towel

2020-06-16 (1)

I’ll be looking into making one of these for myself for sure! Now, this isn’t a towel you dry yourself with, you could, but this makes for a wonderful towel-blanket to use to tan or sit in the sand, without the sand sticking to your legs. Not to mention, I love the colors they chose! Simply amazing!

Link to the pattern: https://snappy-tots.com/pattern-beach-day-lounge-towel/


8. Sand Dollar Beach Bag

20190212_072007_medium

Are you one of those that just loves to go on the hunt to find sand dollars? Then this bag is perfect for that, not to mention, it small enough to carry around and soft enough to prevent the sand dollars or shells from breaking! Perfect to make for the kiddos, when they go out to search for them! Or it could be used for picking up rocks, like my 2 1/2 year old does!

Link to the pattern: https://www.ravelry.com/patterns/library/sand-dollar-beach-bag


9. Breezy Swim Cover

Crochet+Pattern+for+the+Easy+Breezy+Swim+Cover+-+Megmade+with+Love

Cover-ups aren’t something I’ve worn or felt comfortable enough to wear in public, but the design for this cover-up is simply beautiful! I think I might actually add this to my list of stuff to make for myself! I also love the soft pink shade that they used, very pretty!

Link to the pattern: https://megmadewithlove.com/blog-2/2018/5/19/free-crochet-pattern-for-the-easy-breezy-swim-cover


10. Sandy Shore Cover Up

2020-06-16 (2)

I had to look for another cover-up because you never know what people’s tastes might me, but this one is super cute and very simple to make. Not to mention, there is a hood attached to it, which is perfect for keeping your hair being blown everywhere on a windy beach day! This type of style isn’t something I would wear, but the color really caught my eye for sure!

Link to the pattern: https://www.croydencrochet.com/sandy-shore-crochet-cover-up/


There you have it! Some ideas for you to make for the summer! Not to mention, you got to know that there is more stuff, such as clothes, to make for us adults! Let me know in the comments down below if you have attempted to make any of these or are you thinking about making one of these, I’ve got a few that I’ve added onto my list!

Posted in Arts and Crafts, Beginner Patterns, Crochet

Crafty Sassy – Single Crochet Square (Beginner)

Hey Dearies! Here is another pattern that is perfect for beginners! Single crochet is one of the most basic stitches20200526_085325.jpg that is commonly used in most, if not all patterns, especially for beginners.


What I like most about the single crochet is that is it very simple and easy to do, although I don’t really recommend using the stitch to create a blanket with unless you are using double strands.

We are only working with one strand, so don’t get too nervous!

Single crochet is the stitch that makes your work look ‘tighter’ just like the half double crochet, but we will talk about that one later!

So, what do you need to make the single crochet square? The answer is the same for the solid granny square and regular granny square, any yarn or hook size you want to use or need to use for a project or just to practice it with different yarn sizes and hook sizes.

Let’s start!


What I used:

  • 5.0 mm
    • For most beginner projects, a 5.0 mm hook is the ‘normal’ hook size, especially when it comes to crocheting for the first time!
  • Medium Size yarn
    • This is the normal size yarn that you will use for most projects.
    • Today, I am using Mainstays Basic Yarn in the color Soft Gray Heather
  • Sewing needle
    • You’ll always need this, there is no if and or buts about it, you need to sew in your ends!

Note: For single crochet, you can chain however long you would like to like, but once you have reached your desired length, chain 1 extra, this extra chain isn’t going to be crocheted in. 

Make a slip knot and chain 26. (As I said before, you can chain whatever size you want, but make sure to have 1 extra chain. Example: I want 25 stitches, but I added an extra chain, making it 26 chains I do.)

Row 1: Single crochet into the second chain from your hook. (Not counting what is already around your hook.) Single crochet in the next stitches across. (25)

Row 2: Chain 1. Single crochet in the next stitch and across. (25)

Repeat Row 2 until you reach your desired length or however long you want to practice it.

I kept going till about 30 rows, you can stop whenever, but once you are done, it makes a great washcloth, if you are using cotton. The more rows you do, it’s more practice for you!

20200526_085305.jpg

Now, if you noticed, it will tend to roll or fold on you, when you try to flatten it out, with is normal. Most people will block them, which is when you get your project wet and peg it to a block for it to dry, and they usually don’t fold after that!

But this project is so simple and fun to do, that you could easily make a bunch of these squares into a blanket or make a bunch of them into washcloths, towels, and even blankets! The possibilities are endless!


Posted in Arts and Crafts, Crochet, Top Projects for Crochet/Knitting

Crafty Sassy: Top 10 Crochet Bookmarks (Free Patterns)

Hey Dearies! Since most of us are stuck home, some of us, like me, are taking the time to get some reading done. Or you are a bookworm, like me, then these patterns are perfect for you!

Not only are these bookmarks super cute and fun to make, but they are also free patterns! Now, I had to do some real digging to find these! These are perfect for a beginner project and these gifts can be perfect for those kiddos that are trying to learn how to read!

These projects are also very quick to make and don’t require a lot of yarn either, which is perfect for another item to sell at a craft fair or online to your friends!

Note: These aren’t my patterns, all rights go to those creators. The link for each of these patterns will be provided.


1. Bow Bookmark

crochet-mini-bow-bookmark-pattern-768x1024.png

Theses bows are not only super cute, but you can crochet these very quickly! Not to mention, if you are a teacher, these are perfect to make for your students to have! These would also make a perfect addition to a craft fair or a gift!

Link for the pattern: https://justbcrafty.com/2014/06/mini-bow-bookmark-free-crochet-pattern_25.html


2. Leaf Bookmark

2020-04-07.png

Since spring is just around the corner, I had to include these cute leaf bookmarks! These are perfect for those bookworms who also have a love for gardening! Not to mention, these are also perfect for the classroom or giving them away as gifts! If you wanted to be a little more creative, you can always add a flower with the leaves as well!

Link for the pattern: https://www.tyinganend.com/budding-leaf-bookmark/


3. Daisy Bookmark

13108126825_b2080e1b97_z.jpg


Another spring theme bookmark, I just love these! I love this pattern because you can get creative with what kind of button to use for the center of the flower. Not to mention, you can always use just the flower part as a pin, or adding design for any hats or clothes!

Link for the pattern: https://daisycottagedesigns.net/free-crochet-pattern-dainty-daisy/


4. Cat Bookmark

3081091480_ea58314c50_z_small2.jpg

For those of you, who love cats just as much as I do, these bookmarks are perfect for you! This pattern is another simple easy one to create and would make an amazing addition to any book fair or craft fair.

Link for the pattern: https://www.ravelry.com/patterns/library/city-cat-bookmarker


5. Overlapping Hearts Bookmark

post-11825-135897399974_thumb.jpg

This pattern has more of a longer tale, which I don’t mind and if you are like me, you don’t want your bookmarks getting too thick, especially for those of us that have lots of paperbacks, this are perfect for those!

Link for the pattern: https://forum.crochetville.com/topic/88245-overlapping-hearts-bookmark-pattern/#entry1494542


6. Little Angel Bookmark

Angel Bookmark

I know this one is more of a ‘Christmas’ theme, but if you are looking to try something different, here is another pattern you can try! You can also start crocheting these for Christmas presents now! It’s never too early for that!

Link for the pattern: https://suzies-yarnie-stuff.blogspot.com/2009/12/suzies-little-angel-bookmark.html


7. Little Boxes Bookmark

little-boxes-bookmark

This bookmark is more of a traditional one, but has a lot of detail that’s put into it, which I love! Also, as you can see in the background, this bookmark is being used for a recipe book, which works! I just can’t get over the detail!

Link for the pattern: https://crochetncreate.com/little-boxes-crochet-bookmark/


8. Webster the Elephant

Webster-the-Elephant-768x1920

As you know, I LOVE to find anything with elephants in it and when I saw this pattern, I just had to share it! I also LOVE Heart Hook Home, she does an amazing job with her patterns and I was so excited to find out she made a bookmark! These are perfect for the kiddos that are learning how to read! Not to mention, this is more of a 3D bookmark, which is always fun!

Link for the pattern: https://hearthookhome.com/webster-the-elephant-bookmark-amigurumi-crochet-pattern/


9. Easter Chick Bookmark

624b-2.jpg

Here is another 3D bookmark pattern and this one is a little bit more towards the spring or Easter theme! Especially if you can’t see those family on Easter, you can always send them a bookmark for Easter! Not to mention, you can always not add the bow on the top and take a ribbon and tie it to the neck for the boys!

Link for the pattern: https://www.garnstudio.com/pattern.php?id=4552&cid=17


10. Rainbow Bookmark

2020-04-07 (1).png

Rainbows are another favorite for the kids and these are fun to make as well! Not to mention, the cheeks have a little bit of blush, under their eyes, which makes this pattern even more perfect! Details, as such, are what make these projects just so amazing to make!

Link for the pattern: https://www.ravelry.com/patterns/library/rainbow-bookmark-2


What do you think about these patterns? Any of them look super cute enough for you to want to make them for yourself or others? Which one was your favorite? Let me know down in the comments!

Also, make sure you are following my Facebook page to get the latest updates of what’s going on with my blog!

Posted in Arts and Crafts, Crochet, Top Projects for Crochet/Knitting

Crafty Sassy: Top 10 Easter Free Crochet Patterns

Hey Dearies! Easter is right around the corner and if you are at a loss of what to make for this year or want to make gifts isn’t just buying chocolate for the kids, then look no further! I have found 10 FREE patterns for you to check out!

There is a mix of patterns that aren’t just for kids, but for babies as well, especially if this is their first Easter!

Note: These are NOT my patterns, I will leave a link to where I found the original pattern. All rights go to the original creators. The only pattern that is mine is the last one. 


1. Chocolate Easter Bunny

Crochet-Easter-Bunny-Pattern.jpg

This little guy is perfect for the kids, especially for the younger ones that aren’t ready to have chocolate, but they don’t have to be left out in not getting a ‘chocolate’ bunny, except this one, they can cuddle with.

Link to pattern: https://crochet-news.com/crochet-easter-bunny-pattern/#_a5y_p=6626917


2. Marshmallow Bunny Baby Booties

BABY-BOOTIES-2-1170x1170.jpg

This one is for the babies! Especially, if you are unsure what to get them, these booties are super cute and perfect for Easter! The best part about these is that they aren’t just for the bunnies, but they come in 3 different styles.

Link to pattern: https://www.passionatecrafter.com/marshmallow-baby-boots/


3. Easter Bunny Mug Cozy

IMG_8708_text-1.jpg

Of course, knowing me I would have to have a mug cozy on here, this one really fits for the Easter season! This pattern is also super easy to create, not to mention, look at his little fluffy butt! I can’t get over this pattern, it’s just too cute! These look like they would be killer sellers for any craft fair!

Link to pattern: https://haakmaarraak.nl/free-crochet-pattern-easter-bunny-mug-cozy/


4. Belle The Bunny

2.jpg

I had to have another stuffie on this list, but the funniest part about this little guy, is that it has the same name as my daughter, Bella, but instead of an ‘a’ at the end, its an ‘e’. This one is perfect for those younger kiddos to have for a gift!

Link to pattern: https://yarnsociety.com/patterns/belle-the-bunny/


5. Carrot Treat Pouch

2020-03-31.png

These aren’t just for the bigger kids, but for the younger ones too, just instead of jelly beans, you can fill these up with the Gerber puffs or yogurt melts! You can even make these for the older kids to have a little ‘jiggle’ from Easter.

Link to pattern: https://pattern-paradise.com/2019/03/18/free-crochet-pattern-carrot-treat-pouches/


6. Easter Wreath

easter-wrap-700x350.jpg

Another item that I just had to find, but I just had to! Plus you just have to have a wreath for every season. This one might take some time to do, especially when it comes to making the bunny, but once it’s complete, it would look so cute on your door. However, like I’ve said before, I would keep these wreaths away from rain or snowy, just because it can ruin them.

Link to pattern: https://www.dailycrochet.com/fabulous-crochet-easter-wreath-pattern-to-make-now/


7. Bunny Ears Headband

BunnyHeadband-min.jpg

I think this one is for those little girls that actually keep headbands in their hair. The best part about this pattern is that you can try out different colors for the roses to either match what they are wearing for Easter or have them pick out the colors and just have fun with it!

Link to pattern: https://www.graceandyarn.com/2018/03/crochet-bunny-headband-free-pattern.html?utm_medium=social&utm_source=pinterest&utm_campaign=tailwind_tribes&utm_content=tribes&utm_term=586785218_20891078_493480


8. Marshmallow Bunny Peeps

Peeps1.jpg

Okay, so ‘Peeps’ are a hit or miss type of item that comes out EVERY Easter, whether you are a fan or not, these ones are too cute to make for the babies. I’m not a big fan of the actually marshmallow ‘Peeps’, but I LOVE the shapes that they have for the chicks and bunnies, which in the end, makes it more fun to create these little guys instead of eatting them.

Link to pattern: http://whiskersandwool.blogspot.com/2011/04/easter-marshmallow-bunnies-free-pattern.html


9. Mini Easter Basket

crochet-basket-800x1148.jpg

I have to include a type of basket, especially when the you need one for holding the eggs that the Easter bunny left behind for the kiddos. However, this one is more for decoration to hold those mini chocolate eggs or jellybeans for anyone one to take. Or you can get a little creative and put in ‘nips’ for the adults.

Link to pattern: https://www.skiptomylou.org/crochet-basket-pattern/


10. Stuffed Easter Egg

20190226_112407.jpg

This pattern is the one I posted last year, that went with the actual baskets I was selling for Easter. However, I still think these are an awesome idea to make for the babies to have for Easter. Not to mention, they would look super cute in a photoshoot for Easter!

Link to pattern: https://katiesblog96971617.com/2019/02/26/crafty-sassy-crochet-stuffed-easter-egg-easy/


Which ones are your favorites? Any of them catch your eye for you to want to make this year for Easter? Let me know in the comments down below!

Make sure to like my Facebook page to find out when my next blog post or updates on my blog!

Posted in Arts and Crafts, Crochet, Top Projects for Crochet/Knitting

Crafty Sassy: Top 10 Crochet St. Patrick’s Day Free Patterns

Hey Dearies! I know this post is a little late, but since my midterms are literally around the corner, it’s been hard to push out these blog posts, but once the madness of midterms is over, I should be back on track, or that’s the plan.

Anyway, because St. Patrick’s Day is just around the corner, I figure I would share some of the free patterns that are available to give you some ideas. I know St. Patrick’s Day isn’t a very celebrated holiday, but if you are me and love to theme your house with those decorations, even if it’s for a short time.

Note: All these patterns are NOT my own, all rights go out to the creators. I will be leaving a link for each of the patterns.

So, let’s get started!


1. St. Patrick’s Day Leprechaun Gonk

2020-03-07 (9).png

This cute guy, ‘Gonk’, is perfect for St. Patrick’s Day. The perfect decoration for the holiday! Not to mention, he’s a perfect gift for those kiddos who were born in the month of March.

Link for the pattern: https://hookedonpatterns.com/a-gonks-journey/gonk-free-crochet-patterns/st-patricks-day-leprechaun


2. Pot-Of-Gold Hat

2020-03-07.png

This is a very decorated hat, that is perfect for the kids who love to get excited for each holiday, not to mention, they are perfect to still wear for the month of March if you are like me and it’s still chilly out, you might need a hat still!

Also, when you click on the link for the pattern, the hat pattern is on another link, so make sure you check out that link, it will be in green saying ‘Link Here’, that’s for the hat.

Link for the pattern: https://pattern-paradise.com/2014/03/02/free-crochet-pattern-pot-o-gold/


3. St. Patrick’s Day Scarf

2020-03-07 (1).png

Scarfs are always my favorite to create and like I said with the hats, it’s still a little chilly in March, so we can still wear scarves. These ones can be a little tricky, just because of the detail, when it comes to crocheting the shamrock. I think it would definitely be fun to make.

Link for the pattern: https://www.repeatcrafterme.com/2016/02/crochet-shamrock-scarf.html


4. Classy Leprechaun Boot Cuffs

2020-03-07 (2).png

I love boot cuffs and when I saw these, I got excited! This pattern is not only perfect for St. Patrick’s Day, but it is more simple and can work with your outfit easily. It doesn’t have those really bright greens, but more of the settled greens that make this boot cuff more desirable to make.

Link for the pattern: https://www.mamainastitch.com/st-pattys-easy-crochet-boot-cuffs-with-poms/


5. Shamrock and 4 Leaf Clover

2020-03-07 (3).png

You can’t have St. Patrick’s Day without seeing or creating a few of these shamrocks and 4-leaf clovers. These are perfect for adding them to blankets, hats, scarves, or anything else you can think of. The cutest part about these is that they are shaped in tiny hearts.

Link for the pattern: https://www.goldenlucycrafts.com/2017/02/22/crochet-st-patricks-day-shamrock/


6. St. Patrick’s Day Wreath

2020-03-07 (4).png

You probably knew I was going to have more than just one type of decoration and the St. Patrick’s Day Wreath is perfect! I love how much detail the creator put into this and it makes me want to create one for myself to hang on my door, although, it would have to be on the back of the door since these aren’t water proof.

Link for the pattern: https://www.highlandhickorydesigns.com/st-patricks-day-wreath/


7. Leprechaun Hat Beer Cozy

2020-03-07 (5).png

If you have been following my blog for a while, I asked on a poll to make one of these life and since this didn’t get picked, I decided to make sure I at least have a free link for making these super cool beer cozies! These are perfect for the men in your life, or for yourself!

Link for the pattern: https://www.youshouldcraft.com/leprechaun-hat-beer-cozy/2/


8. St. Patrick’s Day Leprechaun Hat

2020-03-07 (6).png

I had to find a leprechaun hat, not only is it super cute for St. Patrick’s Day, but if anyone in your family wants to dress up as Lucky, from Lucky Charms Cereal, this hat is perfect for that!

Link for the pattern: https://spotconnie.blogspot.com/2017/02/free-crochet-st-patricks-day-hat.html


9. St. Patrick’s Day Mickey Mouse 

2020-03-07 (7).png

Here is a tribute to all of those Disney fans out there, but more importantly, those Mickey Mouse lovers. My daughter is in that stage where Mickey Mouse is her favorite stuffy to sleep with, so I figured I had to find something “Mickey” related, not to mention my mom is a HUGE fan of it too!

These can be used for decorations, I’ve seen a few people add pin clips to the back of these to wear as a pin or attaching them to a headband. You could even add these to a blanket, the possibilities are endless!

Link for the pattern: https://www.olyat.com/st-patricks-day-mickey-head-crochet-pattern/


10. St. Patrick’s Day Shamrock Baby Booties

2020-03-07 (8).png

Now, last, but not least, are some super adorable baby booties. So, if you know someone who just had a baby or is due in March, these are a perfect gift to create for them!

Link for the pattern: http://www.hopefulhoney.com/2016/02/st-patricks-day-shamrock-baby-booties.html


There we have it! I hope this gave you all some ideas on what to make for St. Patrick’s Day! There are a few that I have on my list and I really can’t wait to make a few of these.

Make sure you follow me on Facebook, for upcoming stuff and updates!

Posted in Arts and Crafts, Crochet

Crafty Sassy: What Types Of Different Crochet Towel Toppers Are There?

Hey Dearies! So, ever since I’ve started crocheting, my goal was to learn how to make my great-grandmother’s famous towel toppers. If you have been following me since day one, you will know that I’ve posted 2 kinds of towel toppers patterns.

The first one was my ‘trial and error’, but because I was new to crocheting, there was a lot of frogging and trying new things. Also, I want to know that I was going off of an already crocheted towel topper that my great-grandmother made, which did help me a lot!

Then when I perfected it, I wanted to rewrite the first one, but with a more straight forward pattern. At this time, I also found out that my great grandmother didn’t just make all her towels the same, but each of them had a different pattern.

So, to keep from repeating the same old pattern 50 times, she came up with different ones whenever she felt like it, which kept the towel topper making not as boring. Which is why I loved how unique and talented she was.

Because of this, and that I’ve been looking back at her old towel toppers, it got me thinking to how many different types of toppers could you do?

The possibilities are, of course, endless, but I wanted to find some patterns that are different from what you normally see, but just as unique, as my great grandmother has done in the past.

Note: These are not any of my patterns! All rights go to the creators themselves, I will be including the link to these patterns. 


-Pineapple Towel Topper

TangerinePineappleTT_small2.jpg

When I first was looking into the towel toppers, this pattern has popped up on my search many times and I just love how much detail is into it. Although I’m not a fan of where the button is placed, this would be a design to definitively try out for sure! I see this being an awesome item to sell at craft fairs since this pattern is very eye-popping.

Link for the pattern: https://www.ravelry.com/patterns/library/pineapple-towel-topper


-Hanging Kitchen Towel Topper

crochet-classic-kitchen-towel-topper-678x381.jpg

So, if you are looking to make your towel toppers, without having to cut the towel in half, Naztazia does an amazing job with this tutorial, not to mention, these are sewed on first, and then you crochet, which can be tricky to do, but can make it so much easier, especially if you are just starting out in crocheting. I have actually made a few of these, but if you are looking to cut your towels in half, the mattress stitch, I’ve found, didn’t really work for me when I tried it out.

Link for the pattern: https://naztazia.com/hanging-kitchen-towel/


-Dress Towel Topper

Crochet-Dress-Towel-Topper-Pattern-1-2-550x407.jpg

When I found this pattern, I was jumping for joy because of the fact that this was a type of design that my great-grandmother had free-handed it many times before. This changes up the towel topper game to a new level because not only are these different from normal towel toppers, but they are perfect for balancing the colors with the towel, instead of using one solid color. This one would be another eye-popping item at a craft fair that would really catch the eyes of buyers!

Link for the pattern: https://thewhoot.com/crochet/crochet-dress-towel-topper-pattern-video


-Dish Towel Toppers

IMG_8955-001.jpg

As I said before, with the previous towel topper, helping to balance the colors among each other, can be difficult to do when you are working with just a solid color, but this pattern takes it to the next step. Not only does this pattern aloud for more colors, but the finished border really gives its complete finish. Also, this has nothing to do with the towel toppers, but those buttons are super cute and now on my shopping list to get!

Link for the pattern: https://poshpoochdesignsdogclothes.blogspot.com/2018/09/dish-towel-toppers-crochet-pattern-posh.html


-Bounding Towel Topper

Bounding-Towel-Topper-Free-Crochet-Pattern.jpg

This one is another eye-popping towel topper because there aren’t many out there that have a lot of open space, especially because more people like their towel toppers to be more ‘filled in’ or ‘not as open’ as other patterns do. Don’t get me wrong, it’s a beautiful pattern, but for my liking, I would’ve altered between a solid row and the opened space.

Link for the pattern: https://stitch11.com/bounding-towel-topper-free-crochet-pattern/


-Summer Sundress Towel Topper

2020-02-18.png

So this one is like the dress towel topper, but more for the summer vibes. However, this pattern is more for those who are skilled with a hook, but this would be perfect for summer for sure! I also want to say that the little accessories that they added are too cute and would make amazing mini magnets for the fridge!

Link for the pattern: https://www.crochetmemories.com/blog/summer-sundress-towel-topper-set-cal/#more-5153


-Chicken Towel Topper

aHR0cHMlM0ElMkYlMkY0LmJwLmJsb2dzcG90LmNvbSUyRi1OdC1xazlLc0kwbyUyRlhNVjZ4YXc3MlJJJTJGQUFBQUFBQUFLU2clMkZWbWRrWEhCM0dta2gxNTNpaFhrb0pQdnlaLXRFSk50WFFDTGNCR0FzJTJGczE2MDAlMkZDaGlja2VuVG93ZWxUb3BwZXIuanBn.jpg

The last type of towel toppers, that I find so adorable, are the character ones, such as this chicken one. There are LOTS of these ones, I’ve seen from hearts to Santa’s, for towel toppers. This one steals the cake for sure because if you got a rooster theme going on, this is the perfect item to complete your theme or a wonderful present for that friend who is like in love with chickens!

Link for the pattern: https://www.bloglovin.com/blogs/beautiful-skills-crochet-knitting-quilting-18832375/chicken-towel-topper-free-pattern-6905101995


There we have it! So, out of all the designs, which ones were your favorites? Or are you like me and keep your towel toppers sweet and simple? Let me know in the comments down below!

Make sure to also follow my Facebook page, there is a link on my main page, I post all my updates on there, especially if it has anything to do with the blog or if a blog post is going to be out late.

Posted in Arts and Crafts, Crochet, Top Projects for Crochet/Knitting

Crafty Sassy – Top 10 Crochet Valentine’s Day Projects

Hey Dearies! With Valentine’s Day just around the corner, I figured I would find some free patterns for this lovely holiday! Even if you don’t do anything, these ideas are perfect to make for the kiddos of your family!

Note: These aren’t my patterns, but free patterns that I have found and will have the website link for that pattern. All rights go to the creators of these patterns!

1. Valentine’s Day Cat

2020-02-04 (2).png

If you are a cat lover, then you should definitely add this to your do-to list! The cutest thing about this cat is that it’s shaped in a heart! Not to mention, you don’t have to sew on the whiskers, another option would use some puffy paint, but it can be challenging to do.

Valentine’s Day Cat crochet pattern


2. Valentine Heart Flap Hat

2020-02-04 (1).png

Super cute hat and since February can still be a little nippy out, these are a perfect gift to gift the kiddos for Valentine’s Day! The best part about these is that you can wear them for all the winter season.

https://classycrochet.wordpress.com/2014/01/21/free-pattern-crochet-valentine-heart-earflap-hat/


3. Crochet Rose Wreath

heart-flower-wreath-1-1.jpg

I’ve actually made a wreath, something like this, but it was so difficult to do and if you have been following me for a while, you’ll know that wreath, such as these, take a very long time to do, but once they are finished they are so worth all the hard work!

Crochet Rose Pattern: Learn How to Crochet a Rose Wreath!


4. C2C Heart Table Runner

ValentineC2C-728x991.jpg

As you know, I love to include kitchen sets, especially when it comes to holiday stuff like this! These are a super cute idea to have for the month of February! This also gives you more on practicing the C2C stitch and how to change colors.

Crochet C2C Valentine’s Heart Table Runner


5. Valentine’s Day Bag

DSC01413.jpg

This is another cute idea to make for the kiddos, especially perfect for putting in some chocolate kisses! This type of pattern is something that you can also use to practice changing colors, as well as switching colors!

https://www.littledoolally.com/2014/02/valentines-day-gift-bag.html


6. Valentine’s Day Mini Gift Bags

VdayGiftBag2wm-1024x711.jpg

When I saw these, all I could think of was what a great idea these would be for teachers! These are small but super easy to make and to make many of these! I’ve always wanted to be a teacher and if  I prepared myself, I would have these for my students!

Valentine’s Day Mini Treat Bags


7. Heart Butterfly

Crochet-butterfly-applique-free-pattern-1.jpg

These are more for decoration when it comes to placemats, blankets, clothing, and even bibs. However, they are also perfect for making them into magnets! Not to mention, these are perfect practice for those that learning to sew pieces of their projects together!

Crochet Butterfly Applique


8. Valentine Bear

2020-02-04.png

I know, this bear is too cute! The best part about this pattern is that there is a FREE PDF print out! Which makes them perfect to add to your binder of patterns! These bears are super soft and perfect for those babies that were born or will be born around Valentine’s Day!

https://www.yarnspirations.com/bernat-velvet-valentine-crochet-bear/BRC0334-012696M.html?utm_source=pinterest&utm_medium=social&utm_campaign=2019_02_Curated_Valentines&utm_content=BernatVelvetValentineCrochetBear


9. Light Heart Valentine Dishcloth

crochet-light-heart-dishcloth-naztazia_small2.jpg

From one of my favorite crochet YouTubers, Naztazia has created this amazing pattern that is perfect for Valentine’s Day or for people who have a theme of Hearts for their kitchen! The best part, there is a video to show you how to create this amazing dishcloth!

https://www.ravelry.com/patterns/library/893330


10. Heart-Shaped Bookmark

20180821_123805.jpg

Doesn’t this one look familiar? It should because this was the first pattern that I have EVER created and posted on my website! If you have been following me since day one, this was when I was first starting out or getting into crocheting! This is perfect for beginners!

https://katiesblog96971617.com/2018/08/21/crafty-sassy-how-to-make-a-heart-shape-bookmark-for-beginners/


Which ones were your favorites? Which one would you love to create for yourself? Let me know in the comments!

Make sure you like my Facebook page! I post updates on my blog, Youtube channel, and anything else on there!

https://www.facebook.com/katiesblog96971617/

Posted in Arts and Crafts, Beginner Patterns, Crochet

Crafty Sassy – Crochet C2C Baby Doll Sleeping Bag (Beginner)

Hey Dearies! I know this is a day late, but here is it! So, this idea was also based on my daughter and her love of baby dolls, this project is a sleeping bag or pouch to put her babies in.

20200129_182731.jpg

This again is another C2C design, which is also great practice if you are wanting to get better at the stitch!

Another note I wanted to add that I did not add a pillow to attach to it, but here is my pattern from last week if you want to add a pillow to this project. Here is the link for that pillow:

https://katiesblog96971617.com/2020/01/21/crafty-sassy-crochet-c2c-baby-doll-pillow-beginner/

Let’s talk about what you will need!

  • Medium Size Yarn
    • I am using a Red Heart Yarn Pink.
  • 4.5mm hook
    • If you want to make the pouch bigger or small, all you have to do is adjust your hook.
    • This size is more like a small/medium size for a baby doll
  • Sewing

Now, if you aren’t familiar with the ‘C2C’ stitch, here is a wonderful video that Heart Hook Home has, that not only helped me understand how to do the stitch but also shows how to increase and decrease. Here is the video:


This pattern is great for learning and getting familiar with the ‘c2c stitch before moving on to bigger and more complicated projects.

The sleeping bag size is 25×41 squares, you can, of course, add or decrease squares to fit a small or large size baby doll.

Let’s Begin!

Sleeping Bag

Chain 5.

Row 1: Double crochet into the 3 chains from the hook and in the next 2 stitches.

Row 2: Chain 5. Repeat from row one. (This is how we increase.) Then flip your ‘square’, like you are going connect it. Slip stitch in the chain three, from the last square. Chain 2. Make 3 double crochets in that same space.

Repeat until you have 25 squares across. Once you do, after making your last square, slip stitch on the top of the square. (This is how you decrease). Chain 2 and make 3 double crochets in that chain 3 space.

Keep going until the other side has reached 41 squares and on that finally square, slip stitch on the top of the square. Chain 2 and make 3 double crochets in the chain 3 space. As you continue to go back and forth, you’ll notice the rows start to get smaller.

Chain 1 and single crochet about the piece and fasten off.

In the next part, you can either hand sew together or single crochet the two sides together.

Assembly:

Fold your project, the long way, or the ‘hotdog fold’. Taking your crochet hook (or needle) crochet or sew one of the longer sides. Once you reach the shorter side, fasten off. Then repeat on the other side.

Then you are done! Fasten off and weave in any loose ends.


20200129_182731.jpg

There it is! A very simple sleeping bag for the baby dolls! Remember, you can always add a pillow as well! I just didn’t have time to do so.

Make sure you like my Facebook page and follow me on Instagram. I’m more active on my Facebook page than I am on Instagram.

Posted in Beginner Patterns, Crochet

Crafty Sassy: Crochet C2C Baby Doll Pillow (Beginner)

Hey Dearies! So, last week I posted a pattern on a baby doll blanket, but I wanted to take a further step and make a pillow to go with it. This pattern is simple too, working with that C2C stitch, again.

I also wanted to make sure that it matched the blanket as well. The only thing I didn’t get a chance to do for the blanket was adding a white border around it, like I did for the pillow.

20200121_075352.jpg

If you haven’t seen or want to make the complete set, check out my C2C Baby Doll Blanket pattern that goes with this pattern:

https://katiesblog96971617.com/2020/01/14/crafty-sassy-crochet-c2c-baby-doll-blanket-beginner/


Now, let’s talk about what you will need:

  • Medium Size Yarn
    • I used I Love This Yarn in the color Green, Turquoise & Red Print.
    • You’ll only need 1 skein.
    • If you would like to add another color for the border, you can, but you don’t have to.
  • 4.0 mm hook
  • Any type of stuffing
    • I used cotton stuffing.
  • Sewing needle

Now, if you aren’t familiar with the ‘C2C’ stitch, here is a wonderful video that Heart Hook Home has, that not only helped me understand how to do the stitch but also shows how to increase and decrease. Here is the video:

This pattern is great for learning and getting familiar with the ‘c2c stitch before moving on to bigger and more complicated projects.

The blanket size is a 7×9 square project, you can, of course, add or decrease squares to fit a small or large size baby doll.

Let’s Begin!

Chain 5.

Row 1: Double crochet into the 3 chains from the hook and in the next 2 stitches.

Row 2: Chain 5. Repeat from row one. (This is how we increase.) Then flip your ‘square’, like you are going connect it. Slip stitch in the chain three, from the last square. Chain 2. Make 3 double crochets in that same space.

Repeat until you have 7 squares across. Once you do, after making your last square, slip stitch on the top of the square. (This is how you decrease). Chain 2 and make 3 double crochets in that chain 3 space.

Keep going until the other side has reached 9 squares and on that finally square, slip stitch on the top of the square. Chain 2 and make 3 double crochets in the chain 3 space. As you continue to go back and forth, you’ll notice the rows start to get smaller.

Once you are at your final stitch, slip stitch the top of that last square and fasten off.

Sew in any loose ends in and then repeat this again to create another square.

Border:

Once you have created two of the same size squares, it’s time to put them together!

Place them together, on top of each other, making sure the corners match to each side. Then, taking either a white or colored yarn of your choice, make a slip knot onto your 4.0 mm hook.

Into the first corner, it doesn’t matter which corner you start in, enter your hook in BOTH pieces through the square and pull up a loop and slip stitch.

Then chain 1 and single crochet in that same spot you entered in. Single crochet around and when you reach a corner, make 3 single crochets in that same corner.

When you have single crocheted 3 of the sides, start to stuff your pillow, don’t stuff too much because it can make it very difficult to close. Once your pillow is stuffed, continued single crocheting around until you reach the last corner.

Make 2 single crochet in that same stitch. Then slip stitch into the next stitch.

Cut the yarn and then fasten off your work.

20200121_075352.jpg

There you have it! A simple baby doll set that you can make for anyone!

Make sure you like my Facebook page and follow me on Instagram. I’m more active on my Facebook page than I am on Instagram.


Posted in Beginner Patterns, Crochet

Crafty Sassy – Crochet C2C Baby Doll Blanket (Beginner)

Hey Dearies! So, for our first pattern of the year, I decided to create something that’s a little different. For Christmas, my daughter got quite a bit of baby dolls. It got me thinking and searching on Pinterest, what ideas they had for baby dolls.

What really got me to create this idea is when my 2-year-old came up to me and said, “Mommy, baby is cold.” I could’ve given her one of her old receiving blankets that I still had, but what fun would that be? While she was napping, I crocheted her baby doll a blanket.

20200114_141649.jpg

Let’s talk about what you’ll need for this project:

  • Medium Yarn
    • I used I Love This Yarn in the color Green, Turquoise & Red Print.
    • You’ll need only 1 skein.
  • 4.0 mm hook
  • Sewing needle.

Now, if you aren’t familiar with the ‘C2C’ stitch, here is a wonderful video that Heart Hook Home has, that not only helped me understand how to do the stitch but also shows how to increase and decrease. Here is the video:

This pattern is great for learning and getting familiar with the ‘c2c stitch before moving on to bigger and more complicated projects.

The blanket size is a 22×25 square project, you can, of course, add or decrease squares to fit a small or large size baby doll.

Let’s Begin!

Chain 5.

Row 1: Double crochet into the 3 chains from the hook and in the next 2 stitches.

Row 2: Chain 5. Repeat from row one. (This is how we increase.) Then flip your ‘square’, like you are going connect it. Slip stitch in the chain three, from the last square. Chain 2. Make 3 double crochets in that same space.

Repeat until you have 22 squares across. Once you do, after making your last square, slip stitch on the top of the square. (This is how you decrease). Chain 2 and make 3 double crochets in that chain 3 space.

Keep going until the other side has reached 25 squares and on that finally square, slip stitch on the top of the square. Chain 2 and make 3 double crochets in the chain 3 space. As you continue to go back and forth, you’ll notice the rows start to get smaller.

Once you are at your final stitch, slip stitch the top of that last square and fasten off.

Sew in any loose ends and you’re done!

20200114_141617.jpg

There you have it! A perfect mini blanket for those baby dolls! Make sure you check back in next Tuesday, I’ll have a crocheted pillow that goes with this baby doll blanket set!

Make sure you like my Facebook page and follow me on Instagram. I’m more active on my Facebook page than I am on Instagram.

Posted in Arts and Crafts, Crochet, Top Projects for Crochet/Knitting

Crafty Sassy – Top 10 Snowman Crochet Projects

Hey Dearies! Since it has been snowing quite a bit in Maine, I figured I would share some patterns for snowmen! Now, snowmen aren’t just for the Christmas season, since you can make them whenever it snows!

Note: These are NOT my own work, as I will be providing the link that goes with each free pattern. All rights go to the creators.

 1. Snowman Potholder

Snowman-Pot-Holder-Crochet-Pattern.jpg

This snowman is so cute! Even though it says it’s for a potholder, but you can definitely make a few of these to add onto a snowflake or even Christmas blanket!

Click here for the free pattern: https://melodys-makings.com/snowman-pot-holder/


2. Snowman Coffee Cup Cozy

DSCF0289.jpg

Again, as you know, I LOVE coffee cup cozies and this one is too cute not to make one for yourself or others! Most of the ones I’ve found didn’t have the cute little hat, but this one did!

Click here for the free pattern: http://hamburke.blogspot.com/2013/12/another-easy-crochet-pattern-share.html


3. Snowman Wall Hanger

Snowman-Wall-Hanging_Large500_ID-1553903.png

Wall hangings are something I usually don’t have, but when I saw this pattern, I thought about making one for my house! As long as you keep this little guy inside, he will stay nice and neat, these are also perfect for those new homeowners!

Click here for the free pattern: https://www.allfreecrochet.com/Christmas-Crochet/Snowman-Wall-Hanging


4. Snowman Hanging Dishcloth

2020-01-07 (1).png

Dishcloths aren’t something I’ve been known to create, but this little guy is too cute! Not only could you use this as a decoration, but it would look pretty cute hanging from the oven handle!

Click here for the free pattern: https://snappy-tots.com/free-pattern-snowman-hanging-dishcloth/


5. Melted Snowman

2020-01-07 (6).png

I’m melting for this project! This is one I have never seen, but once I did, I was even more excited to see that the pattern was FREE! This little guy is not only the perfect decoration for the holiday season but he could even work as a newborn gift idea as a snuggle! As long as the buttons aren’t added!

Click here for the free pattern: https://www.highlandhickorydesigns.com/melted-snowman/


6. C2C Snowman Scarf

2020-01-07.png

Ah, you know me and my love for C2C projects! This snowman will keep you nice and warm until Spring! As the pom-pom adds the perfect touch to make this project an amazing gift for someone, or even yourself!

Click here for the free pattern: https://www.windingroadcrochet.com/c2c-snowman-scarf-free-crochet-pattern/


7. Snowman Towel Topper

2020-01-07 (2).png

Towel Toppers I just LOVE! This one really takes my breath away, with so much detail, I didn’t think it was free, but I had to double-check! The creator of this piece of work took such great time and detail to this project for sure, definitely going to put this on my list of stuff to make this year!

Click here for the free pattern: https://www.ravelry.com/patterns/library/snowman-towel-topper


8. Snowman Hat

2020-01-07 (5).png

Hats are always great to make, especially if it is still snowing outside! This pattern is not only free but comes in all sizes so that you can make your entire family snowman hats!

Click here for the free pattern: https://www.repeatcrafterme.com/2016/01/crochet-snowman-hat.html


9. Snowman Hanging Towel

2020-01-07 (4).png

This towel hangs without a button, which is something that I have not quite tried, yet. This one has a lot of detail put into it, but this same pattern can be used to making Santa or a Gingerbread, but if you aren’t ready to start going down the Christmas train, this guy is something you’ll want to make for sure!

Click here for the free pattern: https://www.acrochetedsimplicity.com/snowman-kitchen-towel-free-crochet-towel-pattern/


10. Snowman Stuffie

2020-01-07 (3).png

Last, but not least, one of the cutest stuffies I’ve ever seen! There are a few of stuffy snowmen and women, that you can choose to pick from, but this one looks so soft and cuddly, I just had to put him on this list!

Click here for the free pattern: https://www.amigurumiforum.com/free-snowman-amigurumi-crochet-pattern-for-chirstmas/


There you have it! Snowman ideas for the snowy season! Which one did you like the best? Or which one can’t you wait to try out next? Leave a comment down below to let me know!

Posted in Crochet Blanket 2019

Temperature Blanket Update – December 2019 (Finished)

Hey Dearies! I am finally finished with our 2019 temperature blanket! The reason it has taken me a few days to post, because I did have a gap where some more squares could’ve gone, so I crocheted some white ones to fill in the blanket.

The only thing I want to do next adds a simple single crochet border and crochet the numbers to make 2019 and add them to the blanket as well! However, I will try my best to post the update of the blanket on my Facebook Page and Instagram, so make sure you are following me on there to check it out!

December came and went as soon as it did! Lower temperature, lead to more blues and purples when it came to squares. I’m just so grateful that this project is now done and finished!

Makine a temperature blanket isn’t as easy, as I thought it was going to be, but I managed to create one! As this being my first blanket to ever work on, I’m really proud how it came out!

Here is the list of colors I used for the blanket:

20181222_124142
100 degrees – Fire Red (I Love This Yarn)
90 degrees – Pumpkin (Red Heart Super Saver)
80 degrees – Bright Yellow (Red Heart Super Saver)
70 degrees – Jelly Bean (I Love This Yarn)
60 degrees – Green (Main Stays Basic Yarn)
50 degrees – Turqia (Red Heart Super Saver)
40 degrees – Soft Blue (I Love This Yarn)
30 degrees – Dark Orchid (Red Heart Super Saver) *Changed to the following – Violet (Red Heart With Love)
20 degrees – Orchid (I Love This Yarn) *Changed to the following – Orchid (Red Heart Super Saver)
10 and below – Light Gray (I Love This Yarn)

How do you tell which color to use?

I, personally, go with the overall temperature. So, let’s go by today, for example:

Today in Maine, the overall temperature is 17 degrees. I would choose the light gray.

Let’s say that it was an overall temperature of 22 degrees, I would choose the Orchid color. All my temperatures, for my colored yarn, has to have the same number first number. If that makes any sense, I’m sorry if it doesn’t!

What was the highest temperature for this month?

Sadly, we didn’t get a 60-degree days, but have had quite of bit of 50 degree days, which isn’t bad, but I prefer my 60 degree days any day!

What was the lowest temperature for this month?

We did hit below 10 degrees, which isn’t fun, but now, I’ll be able to snuggle in this blanket to keep me nice and warm.

Do you post daily updates?

Yes, I do. On my Facebook page, I post a picture of the square for each day. I also tried to post every week’s worth, but it was hard to keep track of, so I’ll be posting monthly and daily instead.

If you haven’t liked my Facebook Page, here is the link below! It keeps you posted and updated on my temperature blanket and any updates for my blog and YouTube channel, as well!

https://www.facebook.com/katiesblog96971617/?ref=bookmarks

Thank you all for watching how this blanket turned out to be! I’m so glad that it’s finally done and the amount of support and motivation that I had was so helpful, so thank you to all that have watched this blanket go from just a few squares to a giant masterpiece!

Here is a slideshow of the progress of the blanket from month to month:

This slideshow requires JavaScript.

Note: The month of February, I forgot to take a photo of, but other than that they are all there!

Posted in Arts and Crafts, Crochet

Crochet Temperature Blanket: Tips and Tricks for Starting One

Hey Dearies! As you all know, I’ve been working on a temperature blanket all year long! If you are a follower and like my Facebook page, you will know that I have been posting updates and squares, as I go along, but because this was my first ever temperature blanket, I’ve picked up on some tips and tricks to help out anyone who wants to create one.

Now, I want to explain that a temperature blanket isn’t a bunch of granny squares that you sew together as you go. You can choose to use any type of blanket for this, although, if you want to do a C2C blanket, you’ll have to work on a lot of planning to make one of those. Here are a few examples:

This slideshow requires JavaScript.

Any blanket pattern you can think of, you can pretty much make it into a temperature blanket! If you are still confused about what a temperature blanket is, let me explain a little better:

A temperature blanket is when someone who knits or crochets the temperature of each day for a year. Using different colors to represent all of the temps.

That’s just a quick explanation of what it is. Let’s talk about what you are gonna need to do, in order to actually start this blanket. I really wished I did some more digging on what colors and how big or small I needed to make my squares.


Making a color chart

This is one of the most important things you need to think about before even starting the temperature blanket! I looked on Pinterest, just to get an idea on what others have done for their temperature blankets, but here’s mine:

20181222_124142
100 degrees – Fire Red (I Love This Yarn)
90 degrees – Pumpkin (Red Heart Super Saver)
80 degrees – Bright Yellow (Red Heart Super Saver)
70 degrees – Jelly Bean (I Love This Yarn)
60 degrees – Green (Main Stays Basic Yarn)
50 degrees – Turqia (Red Heart Super Saver)
40 degrees – Soft Blue (I Love This Yarn)
30 degrees – Dark Orchid (Red Heart Super Saver) *Changed to the following – Violet (Red Heart With Love)
20 degrees – Orchid (I Love This Yarn) *Changed to the following – Orchid (Red Heart Super Saver)
10 and below – Light Gray (I Love This Yarn)

See anything wrong with it? I had to scratch out the original colors, for a few of the temperatures, due to me not having enough yarn for a few of the temperatures. Not to mention, the way I planned this out, wasn’t the best idea. Let’s look at a few other peoples temperatures charts:

7a545-Untitled

I based my chart off of this person temperature chart, which isn’t a bad idea, but if you are going to do it this way, make sure you have a few skeins stocked for each color, which I did not, hence why I wouldn’t update on time because I ran out of color.

This slideshow requires JavaScript.

These two examples are what I wished I went with because there are more colors for all the temperatures. When I mean by that, more colors means more yarn, but less likely of a chance of running out very quickly.

Not to mention, more colors, the more you’ll be able to have a rainbow blanket.

If you aren’t a big fan of rainbow colors, it doesn’t mean you have to do them. I’ve seen people do different shades of one color, with the added greys, browns, or whites added in.

image1_small.jpg

The best part of these, you can switch out the ‘purple’ color for any color you wish! Not only are these are a little different than the normal temperature blanket, but these would make a great gift to crochet the temperature of their baby’s first year!

With whatever you decide to do, making a chart by scratch or following someone else temperature chart, make sure you have the extra yarn for each temperature, just in case so you have back up!


-Picking out the supplies

This is another step that determines, not only how much yarn you’ll go through, but also how thick or thin your blanket will me. I used a size 5.0mm hook, which is the normal size that most projects require, I consider this to be the normal hook that most people and beginners, work with a lot.

Of course, you can change the hook to be bigger or smaller, depending on what you are going for.

Remember, the small the hook, the thinner or smaller your stitches will me.  The bigger the hook, the thicker or bigger your stitches will be.

Either way, whatever hook size you chose to use, should be decided on the type of yarn you use. Not all yarns are the same. For my temperature blanket, most of my yarn was a mix of ‘I Love This Yarn’ and ‘Red Heart Super Saver’.

20181222_122613.jpg

I do recommend using the SAME brand when it comes to your temperature blanket. If you want it to look good, I would use the same brand, but if you are going through your stash of yarn, that’s okay too.

If this is your first time creating a temperature blanket, using your stash or straps isn’t a bad idea, but will give you a chance to make trial and errors, when starting this project.


-How to start working at it?

Once you have the temperature color chart ready and what type of supplies you need, its time to make time for this project. Since you are crocheting a color according to the temperature, doing it every day can be a challenge or you may not have the time.

Writing the temperatures is never a bad idea, but I also found it very helpful, especially when I get behind or run out of yarn, you can always look back and have the temperature written down and ready to go when you need it so.

I want to say that I used to crochet a square a day, which wasn’t a bad idea, but sometimes I would forget to do so. That’s why I started writing down the days and what their temperatures were so that I could catch up during the weekend.

This system not only made it easier but also gave me more time to spend with the project itself. Whatever works for your schedule.


-Don’t forget to have fun!

Temperature blankets always sound fun to make in the beginning, but don’t just work on that project, have a few mini-projects to work on along with your temperature blanket. Sometimes only working on a temperature blanket can become boring, especially if you have been doing the same stitch.

If you are like me, and only thought of having one project at a time, versus working on 5 to 6 unfinished projects. I didn’t think I could be someone that got bored, but I understood that once you start a big project, it can get bored or old faster if that’s the only one you are currently working on.

I’ve learned that having a few or more projects unfinished is okay to have, but it keeps the balance of making sure that you are always doing something different versus repeating the same stitch over and over again.

da9b6-1


That’s all the tips and tricks I have for you this year! I’m not sure if I’m going to be making a temperature blanket for 2020, but if I do, I’ll let you all know all the details when I do.

Are you working on a temperature blanket? If so, what design are you going for? Let me know in the comments!

Make sure to follow me on my Facebook page, Twitter, and Instagram, to keep up with what my final result will be when I finish my 2019’s temperature blanket. Not to mention, I’m usually active on Facebook, especially when it comes to my blog.

And also, have a Happy New Year!

Posted in Crochet

Crafty Sassy 2019 Pattern Recap

Hey Dearies! Sadly, 2019 is coming to the end and I posted my final pattern for this year, but I wanted to do a recap on all the patterns that I have shared with you for the year of 2019!

I will be doing a mini description of them and adding the link, just in case you would like to check out that post or you missed it.

Crochet Mug/Coffee Cozy w/ Pocket

20190108_121100.jpg

This one was super fun to make! I wanted to have a mug cozy that worked for both mugs and regular coffee cups, not to mention, having a pocket for holding sugar or a tea packet, especially if you are on the go!


Crochet Coin/Gift Card Purse

20190205_210348.jpg

I came up with this idea for my daughter since she was only a year old, this purse fit her size. Not to mention, I wanted to make sure it would fit the size for a gift card because I didn’t find any patterns that looked this cute!


Crochet Stuffed Easter Egg

20190226_112352.jpg

This one I thought about selling these with a basket that I made during Easter, but they were a pain in the butt to make, so I decided to have the pattern free for all of you! They look perfect for baby’s first Easter!


Crochet Tablet Cover 

20190312_090346.jpg

I made this for my kindle, since the case it came in was very broken, not to mention, I wanted to try this pattern out for it. However, I made it too small, as to why I choose to work around it with a different color. But in the end, I came out really cute!


Crochet Completely Solid Granny Square

20190416_084708.jpg

I wasn’t going to post this pattern, but at the time, I was working on a project and was looking everywhere for a pattern of a completely solid granny square. I figured there was someone else that was looking for the same thing. These are perfect for creating a pixel blanket, however, it will take forever to sew them together.


Crochet Adult Size Dragon Ball Z Hat

20190521_164846.jpg

My fiance requested this one, saw it on Pinterest and I had to make him one. Sadly, the owner of the original hat didn’t sell the pattern, but the hats themselves, so I decided to create it but looking at the picture, which is harder than it looks, but not impossible.


Crochet Ice Pop Cozy

20190611_101847.jpg

These were pretty simple to make and when I first got into crocheting, ice pop cozies are one of the basic projects that every beginner should make because they not only give you some practice working in rounds but are really easy and quick to make quickly for a craft fair.


Crochet Striped Washcloth

20190709_123421.jpg

Usually, washcloths are the first thing beginners make, when they first start to get into crocheting, but I didn’t make one until a customer asked me. Don’t get me wrong, making washcloths were on my list to make, but I wanted to do something that was a challenge for myself.


Crochet Circle Coaster 

20190716_095621.jpg

Coasters are another fun and cool idea to make, if you have been following for a while, you know that I love to crochet coasters! The only downfall with some of these coasters that they have out there, they don’t make them big enough for a normal size mug, I make sure to make my coasters to be as big, if not bigger, for all mug sizes.


Crochet C2C Phone Case

20190723_094737.jpg

Ever since I learned the C2C stitch, I love working with it! It’s just so much fun to create and so many ideas I can’t wait to make in the future with it! Once you know how to work with the C2C stitch, the ideas of making pixel designs are endless!


Crochet C2C Wrist Pocket

20190730_085129.jpg

Again, this year I was trying out new patterns that had to do with the C2C stitch. I figured this idea would be useful for holding cash, when out and about. Or for kids who lose their teeth. Another idea would be to use this to hold your buttons or stitch markers as you crochet or knit!


Crochet Can Cozies

20190806_162214.jpg

Cozies are also one of my favorite things to make, as well! Whether they are for cans, mugs, or coffee cups, I love to decorate my drinks, cold or hot! Don’t be surprised to see some more of them coming up in 2020.


Crochet Basic Square Coaster

20190813_083031.jpg

As I have said, I love making coasters! You’ll be most likely seeing more of them in the new year, but I want to make it more creative and festive for all the seasons and holidays.


Crochet Travel Bag

20190816_160820.jpg

Crocheted bags and purses are always something that I loved to see made, they aren’t always the easiest bags to make, but seeing how creative some of the bags come out is so amazing! Made this one for my niece, she loved it!


Crochet Halloween Coaster

20191001_160937.jpg

These coasters aren’t just for Halloween, but if you try out different colors, you can make them for any time of year! This one goes with a placemat, which I love the placemat sets that have coasters!


Crochet Halloween Placemat

20191009_130822.jpg

Placemats are another pattern that I hope you will see this new year! These aren’t the ones you see all the time, but placemats are something that I think brings out a kitchen or dining room nicely.


Crochet C2C Scarf

20191213_205336.jpg

Scarfs are a first for me to make this year and I hope to come up with more fun and bright ideas as well! This idea came from the C2C Grinch scarf but made it like a candy cane or peppermint stick.


Crochet Child Size Mittens

20191213_205605.jpg

Are these super cute? Yes, but they were a real pain in the butt to make, especially when it came to the thumb part of the mitten. Not to mention, I wanted to make my nieces and nephews all a set, but because of how I don’t like working in small circles, I ended up making something else instead.


Crochet Child Size Hat w/ Pom Pom

20191213_205419.jpg

Last, but not least, the hats! These are based on how the Dragon Ball Z hat, but sized to fit a child. When it comes to hats, go bigger than the actual size. Going bigger isn’t a bad idea because, knowing how fast kids grow, they can just grow into them.


There they are! All the patterns from 2019! I know I haven’t been as active as I wanted to, but with starting college and being a stay at home mom with a 2-year-old, it’s been really busy!

However, I am planning out how I want to be more active for 2020. If you have any ideas or have something you would like me to create or come up with, feel free to let me know!

And as always, make sure to follow me on my Facebook page, Instagram, and Twitter. I’m more active on my Facebook, so make sure you are following!

I hope you all have a wonderful rest of the year and we will see you all back in 2020 for new patterns, crafts, stories, and so much more!

Posted in Crochet, Easy Patterns

Crafty Sassy: Crochet Child Size Hat w/ Pom Pom (Easy)

Merry Christmas! This will be the last pattern I will be posting for 2019! This one is also another gift that I made for my nieces and nephews, this actually goes along with the mittens I posted a few days ago.

20191213_205502.jpg
The pattern for the mittens will be at the bottom of the post!

When it comes to crocheting hats, I’ve learned to go big versus going by the actual size the pattern is intended for, especially when it comes to babies and child sizes. For the adults, it’s easier to pick a size that fits all. Having the hat be bigger also gives them that extra growing space, so if now they don’t fit in it just right, they’ll grow into it.

Here’s what you will need:

  • Medium Size Yarn
    • I chose a light and dark pink, that matches the mittens, but you can change it whatever color or colors you prefer.
  • Size 6 mm hook
    • You can use whatever size hook, change the size to make it bigger or smaller.
  • Sewing needle

-Hat

Make a magic ring, slip stitch to lock it in place.

Round 1: Make 11 double crochets in the magic ring. Join with a slip stitch in the first double crochet. Chain 2.

Round 2: Make 2 double crochets in each stitch around. Join. Chain 2. (22 dc)

Round 3: *2 double crochets in the first stitch, double crochet in the next. * Repeat around. Join. Chain 2. (33 dc)

Round 4: *2 double crochets in the first stitch, 2 double crochet in the next. * Repeat around. Join. Chain 2. (44 dc)

Round 5: *2 double crochets in the first stitch, 10 double crochet in the next. * Repeat around. Join. Chain 2. (48 dc)

Round 6: *2 double crochets in the first stitch, 11 double crochet in the next. * Repeat around. Join. Chain 2. (52 dc)

Round 7: *2 double crochets in the first stitch, 12 double crochet in the next. * Repeat around. Join. Chain 2. (56 dc)

Round 8: *2 double crochets in the first stitch, 13 double crochet in the next. * Repeat around. Join. Chain 2. (60 dc)

Round 9: *2 double crochets in the first stitch, 14 double crochet in the next. * Repeat around. Join. Chain 2. (64 dc)

Round 10: *2 double crochets in the first stitch, 15 double crochet in the next. * Repeat around. Join. Chain 2. (68 dc)

Round 11-15: Double crochet around. Join. Chain 2.

Note: If you wish to add the stripe, as seen in hats above, switch color at Round 14, going around at Round 15. Change it back to the main color before round 16.

Round 16-17: Single crochet around. Join. Chain 1.

Fasten off and sew in loose ends.

-Pom Pom

If you don’t know how to make a pom-pom, here is a video showing you how to. You don’t have to have one, this part is optional.


There you have it! Last pattern of 2019!

Also, here is the link for the pattern that goes for the mittens:

https://katiesblog96971617.com/2019/12/20/crafty-sassy-crochet-child-size-mittens-easy/

Don’t forget to follow my Facebook Page! That’s where I am the most active on, I’m also on Instagram and Twitter, so don’t forget to follow me on those!

Posted in Crochet, Easy Patterns

Crafty Sassy: Crochet Child Size Mittens (Easy)

Hey Dearies! I have a few patterns that I want to get out to you guys before Christmas! I didn’t know how these would come out, but I’m hoping that they fit my niece!

If you are like me and are rushing to finish last-minute projects in time for Christmas, well, you aren’t alone! I know tons of people who are working to get their hand-made gifts done in time.

So, this is actually part of a set and I’m gonna get the hat pattern out as soon as I can.

20191213_205502.jpg

Here’s what you will need:

  • Medium Size Yarn
    • I am using Red Heart, you can choose one color or two!
  • 4.25mm hook
    • This is supposed to be a ‘child’ size, but if it doesn’t look big enough for a child or the size you are looking for, you can always go up a hook size or use 2 strands of yarn instead of just one.
  • Sewing Needle
  • Stitch Marker
    • This is needed! If you don’t have a stitch marker, you can always use a paper clip, safety pin, or even a bobby pin.
  • Measuring tape or ruler

Let’s begin!

Mitten

Chain 2.

Round 1: In the second chain from the hook, make 6 single crochets. DO NOT JOIN! Place your stitch marker in the last single crochet you made. You’ll be moving this stitch marker to each round and in the last stitch. 

Round 2: Make 2 single crochets in each stitch. (12 sc)

Round 3: *Single crochet in the next stitch, make 2 single crochets in the next stitch* Repeat 6 times. (18 sc)

Round 4: *Single crochet in the next 2 stitches, make 2 single crochets in the next stitch* Repeat 6 times. (24 sc)

Round 5: *Single crochet in the next 3 stitches, make 2 single crochets in the next stitch* Repeat 6 times. (30 sc)

Round 6: Single crochet in each stitch until the piece measures the length of your fingers or the length you need them at. Make sure to keep moving the stitch marker to the end of each row. Don’t fasten off!

Creating the Thumb Opening

Round 1: Single crochet in the first 15 stitches, chain 10 (this is for the thumb opening), single crochet in the last 15 single crochet.

Round 2: Single crochet in each stitch and chain around. (40 sc)

Round 3: Single crochet in each stitch around.

Round 4: *Single crochet in the next 7 stitches, skip the next single crochet* Repeat 5 times. (35 sc)

Round 5: Single crochet in each stitch around.

Round 6: *Single crochet in the next 6 stitches, skip next single crochet* Repeat 5 times. (30 sc)

Round 7: Single crochet in each stitch around.

Round 8: *Single crochet in the next 5 stitches, skip next single crochet* Repeat 5 times. (25 sc)

Round 9-11: Single crochet in each stitch around. If you want to, switch to a different color for the cuff part of the mitten. Don’t fasten off.

Cuff

Note about creating the cuff, when we are creating the cuff, we are working back and for creating the ‘ribbing’ effect. At the end of every other row, make sure to slip stitch to attach it to the mitten. 

Row 1: Slip stitch in the next stitch, chain 9, single crochet in the 2nd chain from the hook (In the back loops only) and in each of the remaining chains across, slip stitch in the next 2 stitches of the last round of the mitten. (8 sc)

Row 2: Skip the slip stitches, working in the back loops only, single crochet in each stitch across. Turn.

Row 3: Chain 1, working in the back loops only, single crochet in each stitch across, slip stitch in the next 2 stitches of the last round of the mitten.

Repeat rows 2 and 3 until the ribbing has been made around the last row of the mitten. Fasten off, leaving a long end for sewing the ribbed cuff together.

Thumb

You can use the same color as your mitten is, or mix it up and do what I did and have the cuff match the thumb part of the mitten! Or try a different color to go with the mix!

Round 1: Join the yarn with a slip stitch anywhere in the thumb opening. Work 10 single crochets evenly around the thumb opening. DO NOT JOIN! Place your stitch marker at the end of every stitch and move it as you go! (11 sc)

Round 2: Single crochet in the 5 stitches, skip the next stitch, single crochet in the last 5 stitches. (10 sc)

Round 3: Single crochet in each stitch around. Repeat until you have reached your desired length from the base of the thumb to the tip of the thumb.

Remainer Round: *Single crochet in the next stitch, skip the next stitch* Repeat 5 times. (5 sc)

Fasten off, leaving a long end to sew the ends through the stitches of the last round and pull tight to close the top of the thumb.

Note about the thumb: This part might be the hardest to do, but if you are feeling brave, you can always crochet the thumb part and then sew it to the mitten, but if you are just starting out, it might be even trickier than this part. Whatever you are comfortable with! 

20191213_205605.jpg

There you have it! A perfect pair of mittens for anyone!

And if you want to add the long string, that is optional, I added it so that you can keep the mittens in the jacket just so you don’t lose them, but you don’t have to add them if you don’t want to.

Make sure you keep an eye out for the hat pattern that I’ll be posting sometime soon, that goes with this pair of gloves.

Don’t forget to follow my Facebook Page! That’s where I am the most active on, I’m also on Instagram and Twitter, so don’t forget to follow me on those!


Posted in Crochet, Easy Patterns

Crafty Sassy: Crochet C2C Scarf (Easy)

Hey Dearies! I’m officially on break from school and wanted to show you guys what I’ve been working on! As most of you know the Christmas season is here and as most of us crocheters start working on last-minute Christmas presents.

So, for the past year or so I’ve been making hand-made items, such as these, for my family, mainly my nieces and nephews. I’m always on the lookout for new things to try, but at the same time, I have to do what I know I can get done before Christmas.

I actually got the idea from the Grinch C2C crochet scarf that I found on Pinterest and alter the pattern to work out for my nephew.

Here’s what you will need:

  • Medium Yarn (Size 4)
    • I’m using, as always, Red Heart Brand.
    • You don’t have to use just two colors, you can switch it up and use as many or just one color, whatever you like!
  • 5.0 mm hook
  • Sewing needle

If you don’t know how to do the C2C and find it easier to see what it looks like, here is a video from Heart Hook Home that I found very useful. Not to mention, if you like your C2C stitches to look nice and neat, her way works amazing and it’s the same way that I’ll be using for this pattern.

Let’s Begin!

Chain 5.

Row 1: Double crochet into the 3 chains from the hook and in the next 2 stitches.

Row 2: Chain 5. Repeat from row one. (This is how we increase.) Then flip your ‘square’, like you are going connect it. Slip stitch in the chain three, from the last square. Chain 2. Make 3 double crochets in that same space.

Repeat until you have 9 squares across. Once you do, after making your last square, slip stitch on the top of the square. (This is how you decrease). Chain 2 and make 3 double crochets in that chain 3 space.

Keep repeating until you have 140 squares. (In order to make it longer, add more squares if needed.) Then end it, as you did for the other side and then fasten off.

Tips for changing color: 

  • I worked with the same color for 5 squares, and then switched to another color.
  • Try out different colors, have fun with it!


20191213_205336.jpg

There you have it! A simple scarf that is quick and easy to make, especially if you don’t know what to make for anyone!

Make sure you like my Facebook page and follow me on Instagram. I’m more active on my Facebook page than I am on Instagram.

Posted in Arts and Crafts, Crochet, Top Projects for Crochet/Knitting

Crafty Sassy: Top 5 Free Crochet Wine Bottle Cozy Patterns

Hey Dearies! Happy Thanksgiving! I figured since we are getting closer to Christmas, as crazy as it seems that its almost here! I would find some wine bottle patterns that would be perfect to make for those of you who have wine lovers in the family!

Not only are they simple to make, but they make a great way to bring a bottle of wine over for dinner. These are also reusable and I’ve added a pattern or two that is simple, no holiday theme, just in case you want to give a neutral wine cozy!

Before I begin, I just want to note that these aren’t my patterns, so all credit goes to the original owners! I will be adding the link to their websites so that you are able to create these amazing creations!

  1. Football Wine Cozy

Football-Wine-Cozy-Pin-2.jpg

These are perfect for the football fans that also love to drink wine! You could also change the wine bottle for a 24oz of beer, as an idea. Never a bad idea to drink wine and watch the famous football games they always have on Thanksgiving!

Football Wine Cozy


2. Striped Wine Cozy

2019-11-26.png

Here is one of those simple patterns that you can create if you don’t want it to have a holiday theme. This also has a different type of stitch that you are working with as well, then it just being plain double crochet all around. You can also just use one main color as well!

Free Crochet Pattern Wine Bottle Cozy


3. Pumpkin Wine Cozy

Pumpkin-Wine-Cozy-pin.jpg

I know what you are probably thinking, Halloween is over, but pumpkins tie into Thanksgiving. Especially if you want some pumpkin pie with a glass of wine! You could even switch the orange color for red and make an apple wine cozy instead.

Pumpkin Wine Cozy


4. Poinsettia Wine Cozy

Pin-for-Poinsettia.jpg

This one is perfect for Christmas time, especially with the famous flower you see during the holiday season! The flower can be a challenge to create, but it is definitely worth a try! Also, if you don’t like the green that they used, you can always switch it out for a darker green or white, as well!

Poinsettia Wine Cozy


5. Snowman Wine Cozy

Snowman-wine-cozy-pin-683x1024.jpg

I had to save this one for last! This little guy is too cute! Plus he has a lot of detail put into him, which is simply incredible! If you were making a few of these, I can see you switching out the red for green, blue, purple, or any other color you can think of.

Crochet Snowman Wine Cozy


There you have it! Some new ideas for what to give out for Christmas!

With that being said, I wanted to let you know that I have new pattern ideas coming soon, but with Christmas around the corner, this is the time that I am working on towel toppers and gifts for my family before the big day.

I’ll be trying my best to be active and I’m going to be making another post on what we are going to be doing next year for the blog, and how I’m going to try my best to be as active as I can!

Happy Thanksgiving! Make sure you eat some turkey and crochet!

Posted in Arts and Crafts, Crochet, Top Projects for Crochet/Knitting

Crafty Sassy: Top 10 Free Thanksgiving Crochet Patterns

Hey Dearies! So, to start out this wonderful month out, I figured I could do some searching to find some super cute and amazing decorations for Thanksgiving since it’s almost here!

Note: I don’t own any of these patterns, all rights go to their original creators. I will be proving the link to the original patterns. Make sure that if you create any of these, please don’t claim the patterns as your own, these creators work hard to create these patterns!

I wanted to get a variety of Thanksgiving stuff, so it won’t just be placemats or potholders. Its a little bit of everything. Without further ado, here are some free patterns just in time for Thanksgiving!

1.Pumpkin Pie Pot Holder

IMG_20181129_115124_small2.jpg

This pie looks so good enough to eat! Just kidding, but it makes a very festive potholder for Thanksgiving Dinner or for those who just LOVE the famous pumpkin pie!

https://www.ravelry.com/patterns/library/pumpkin-pie-pot-holder

2.Fall Maple Leaves

2019-11-12.png

These are perfect for adding more of a ‘3D’ effect to blankets, hats, or anything! Of course, you could use them as coasters, if you make them big enough!

Fall Maple Leaves Free Crochet Pattern

3. Thanksgiving Wreath

2019-11-12 (1).png

Ain’t this the most cutest thing ever?! If you are looking for something to hang on your door for Thanksgiving, this would be perfect! Not to mention, you could even hang this on your wall, as well.

Thanksgiving Wreath

4. Autumn Placemat

Autumn-Placemats-Free-Crochet-Pattern-6.jpg

Now, if you are looking for a simple, yet festive for a placemat, these are for you! Very simple to make, but also are perfect for the big turkey day! Not to mention the color pattern that they chose for the yarn is beautiful!

Crochet Autumn Placemats

5. Pumpkin Pie Cuddler

2019-11-12 (2)

If you are a big pumpkin pie fan, then you definitely need to make this cuddler for yourself! Not to mention, these creators have a lot to offer, especially when it comes to free patterns, but this pie is too cute!

Pumpkin Pie Kawaii Cuddler™ – Free Crochet Pattern

6. Falling Leaves Afghan

EYJIDW~1

Now that it’s getting colder, time to make some blankets! This one is perfect for the fall, especially if you love to cuddle up in a blanket on the colder days!

https://www.favecrafts.com/Crochet-Afghans/Falling-Leaves-Afghan-Crochet-Pattern-from-Red-Heart

7. Turkey Coasters

2019-11-12 (3).png

These turkey coasters are by far the cutest I’ve ever seen! The creator put a lot of detail into these and I think they are just too cute! These can be perfect for coasters for the kids for Thanksgiving!

Turkey Coasters Crochet Pattern

8. Thanksgiving Turkey Stuffie

2019-11-12 (5).png

Looking for something cute to make for a shelf for Thanksgiving, this little guy is just too adorable to not want to make! I love how his feathers came out!

Thanksgiving Turkey Crochet Pattern

9. Chestnut Leaf Table Runner & Placemat

1329.jpg

I just LOVE this design! Even if it isn’t for Thanksgiving, having these places mats up during the fall would be too cute to have! Not to mention, you crochet three of the placemats to get the runner!

https://www.abc-knitting-patterns.com/1329.html

10. Pumpkin Placemat Set

Pumpkin_Set-296x278.jpg

Are you one of those people who just LOVES pumpkins? Then you need to make yourself a table set of these! Even if you don’t like the pumpkins, this would make a wonderful placemat come Thanksgiving time or just in general for your everyday use!

https://www.momsloveofcrochet.com/PumpkinSet.html


There you have it! New free patterns for you to try out, even if it isn’t Thanksgiving, these are still a fun idea to try out in time for the holidays. They would also make great gifts for new newlyweds or new homeowners as well!

Which ones were your favorites? Which one would you love to create for yourself? Let me know in the comments!

Make sure you like my Facebook page! I post updates on my blog, Youtube channel, and anything else on there!

https://www.facebook.com/katiesblog96971617/

Posted in Arts and Crafts, Crochet, Top Projects for Crochet/Knitting

Crafty Sassy: Top 10 Free Crochet Halloween Stuffies

Hey Dearies! Since we are in the last week of October and Halloween is just days away, I figured I would share some of these super cute stuffies that you can make for this spooky holiday!

Note: I don’t own any of these patterns, all rights go to their original creators. I will be proving the link to the original patterns. Make sure that if you create any of these, please don’t claim the patterns as your own, these creators work hard to create these patterns!

Now, some of these patterns might be a little hard for beginners, but we love to challenge our skills! These are also perfect gifts to that person who are big fans of the Halloween season.

1. Cute Baby Ghost
https://www.windingroadcrochet.com/pretty-little-ghost-free-crochet-pattern/

2019-10-29 (2).png

This is super cute! I also love the little spider that they added on the side for the ghost! If you are wondering how their cheeks get pink, any lite blush or eyeshadow can create that effect.

2. Little Bat
https://coolcreativity.com/crochet/amigurumi-little-bat-free-crochet-pattern/

Amigurumi-Little-Bat-Free-Crochet-Pattern-.jpg

This is another adorable pattern, I just love these cute baby bats!

3. Little Pumpkins
https://stringydingding.com/pumpkin-amigurumi-free-crochet-pattern/

2019-10-29.png

Last year, I made a bigger version of these mini pumpkins, although, I didn’t have enough time to make it more adorable. I’m tempted to make a mini one!

4. Sharlotte The Spider
https://woolpatterns.com/cute-halloween-amigurumi-free-crochet-patterns/

2019-10-29 (1).png

If you don’t like real spiders, I think you’ll be on board with Sharlotte! This reminds me of Charlotte’s Web book I read back in elementary school.

5. Frankenstein
https://spinayarncrochet.com/frankensteins-monster-free-crochet-pattern/

2019-10-29 (3).png

This little guy is freaking cute! These are perfect for the little ones to cuddle with at night. This creator has a few of these little guys and the next one is on this list!

6. Classic Vampire
https://spinayarncrochet.com/vampire-amigurumi-free-crochet-pattern/

2019-10-29 (4).png

I’m a big vampire fan and the reason why I said this was a ‘classic vampire’, because, well, it is. That and it doesn’t sparkle in the sunlight, that’s for sure. However, putting a little bit of highlight on it could make this little monster shine in the daylight.

7. Candy Corn Cuddler
https://3amgracedesigns.com/candy-corn-kawaii-cuddler/

2019-10-29 (5).png

This is something I would definitely create and put on my couch, however, my two-year-old would most likely take it whenever I wanted to cuddle with it. I can’t blame her either, that cuddler is too cute!

8. Zombie Bear
https://www.ravelry.com/patterns/library/zombie-bear-2

zombie1_small.png

This bear is cute and spooky, just look at him. Now, this stuffy is one of those fun one that you can use your scrap yarn for. If you are a big Halloween fan, this might be something that you want to make for your spooky collection.

9. Oogie Boogie
https://www.ravelry.com/patterns/library/oogie-boogie

2019-10-29 (6).png

If you already know who this guy is, then you must either have seen The Nightmare Before Christmas or are a HUGE fan of the movie. I couldn’t forget this guy, that’s for sure, but the best part, he’s a free pattern. And if you check out the creator, you’ll also find that they have created Zero and Jack, as well.

10. Hocus Pocus Witches
http://thecrochetqueendesigns.com/free-pattern-red-haired-witch/

2019-10-29 (7).png

Well, I had to save the best for last! Hocus Pocus is one of those movies that you have to see every year for Halloween and when I saw this on Pinterest, I was so excited! More excited that the pattern was free!

Which ones were your favorites? Which one would you love to create for yourself? Let me know in the comments!

Make sure you like my Facebook page! I post updates on my blog, Youtube channel, and anything else on there!

https://www.facebook.com/katiesblog96971617/


Posted in Arts and Crafts, Crochet, Top Projects for Crochet/Knitting

Crafty Sassy: Top 10 Free Crochet Costumes for Newborns

Hey Dearies! So, I wanted to make this post last year, but I changed my mind. Even tho my daughter will be turning two at the end of this month, I wanted to share some links to some super amazing patterns for newborns!

I didn’t get into crocheting until after my daughter was born and really missed out on making her one of these costumes to do a photoshoot for her. However, just because I missed out, I still want to keep in mind, just in case I ever get asked to make them in the future.

When it comes to looking for free patterns, for this type of project, it is a little bit of slim picking, but if you don’t mind paying for the pattern itself, you can find more Disney characters. (Which I will be making a post with links to those very soon!)

Even if you don’t know how to make them, always see if your friendly crocheters wouldn’t mind creating them for you. I love to getting sent a project to do, such as this, it gives me a challenge and something new to try out!

Disclaimer: None of the patterns shown are mine, all rights go out to their creators. I have left links to where the free patterns come from. Make sure that if you chose to make these, or have them made, that you give credit where credit is due to the original creator.

  • Baby Turtle

Turtle-Newborn-Photo-Prop-Free-Crochet-Pattern.jpg

Here is the link for this free pattern: https://coolcreativity.com/crochet/crochet-turtle-newborn-photo-prop-with-free-pattern/

  • Baby Cinderella

cinderella-dress-free-crochet-pattern--217x300.jpg

Here is the link for this free pattern: https://lovableloops.com/patterns/free-cinderella-dress-crochet-pattern/

  • Baby Chick

Baby+Chick+Infant+Cocoon+Photo+Prop.jpg

Here is the link for this free pattern: https://www.leftinknots.com/home/baby-chick-infant-hat-and-cocoon-free-crochet-pattern

  • Baby Dino

教程-副本-11.jpg

Here is the link for this free pattern: https://letscrochet.org/crochet/free-patterns/babys-dino-hat-cape-crochet-free-pattern/

  • Hello Kitty

IMG_0556-e1369147994896.jpg

Here is the link for this free pattern: http://dearestdebi.com/crochet-newborn-hello-kitty

  • The Hungry Caterpillar

教程-副本-14.jpg

Here is the link for this free pattern: https://letscrochet.org/clothing/baby-caterpillar-cocoon-crochet-free-pattern/

  • Baby Santa

1-Baby-Santa-Hat-and-Cocoon-Bunting-Free-Crochet-Pattern-1024x600.jpg

Here is the link for this free pattern: https://yourcrochet.com/baby-santa-hat-cocoon-bunting-free-crochet-pattern-video-tutorial/

  • Baby Firefighter 

Fireman Set.png

Here is the link for this free pattern: https://snugglyfoxdesigns.blogspot.com/2019/02/firefighter-overalls-and-hat-free.html

  • Baby Mermaid 

2e59f5756ff6ed7b22fe9f60f087794f.jpg

Here is the link for this free pattern: https://knitting-bordado.com/crochet-mermaid-baby-outfit-pattern-free/

  • Baby Unicorn

free-crochet-pattern-unicorn-hat-and-diaper-cover-225x300.jpg

Here is the link for this free pattern: https://lovableloops.com/patterns/free-unicorn-diaper-cover-crochet-pattern/

There you have it! A big shout out to the creators of these amazing patterns! Especially for beginners who are looking for something different to try out!


Posted in Crochet, Easy Patterns

Crafty Sassy: Crochet Halloween Placemat (Easy)

Hey Dearies! Sorry, this is a day late, but with my college midterms coming up, it’s been pretty busy, but without further ado, here is the pattern for this super cute placemat!

20191009_130841.jpg

If you want to create the placemat with the coaster, here is the link for the coaster that I posted last week: https://katiesblog96971617.com/2019/10/01/crafty-sassy-crochet-halloween-coaster-easy/

Note: It has been brought to my attention that I need to clarify the yarn, especially with placemat, potholders, or oven mitts. This pattern, with the yarn chosen, is for DECORATION and shouldn’t have anything hot on top of it.

Acritic yarn MELTS! If you want to use this as an everyday placemat, make sure you use cotton! It doesn’t have to be the same brand that I use, as long as it is the same size.

Let’s talk about what you will need:

  • 5.5mm hook
  • Medium Yarn (In black and orange)
    • I am using Red Heart Super Saver in Pumpkin and I Love This Yarn in Black.
    • Please make sure you see my note if you are making this placemat for everyday use!
  • Sewing needle

Placemat

With orange or black yarn, chain 23.

Round 1: Double crochet in the 4th chain from the hook. Double crochet in each of the next 18 chains. Make 5 double crochets in the last chain. Working on the opposite side in the unused loops of the beginning chain, double crochet in each of the next 19 loops. Make 6 double crochets in the next chain. Join in at the beginning of the chain 3. (50 dc)

Round 2: Chain 3. Double crochet in each of the next 19 double crochets. Make 2 double crochets in each of the next 5 double crochet. Double crochet in each of the next 20 double crochet. Make 2 double crochets in each of the next 5 double crochets. Join in at the beginning of the chain 3. (60 dc)

Round 3: Chain 3. Double crochet in each of the next 19 double crochet. Make 2 double crochets in the next 10 double crochets. Double crochet in each of next 20 double crochets. Make 2 double crochets in the next 10 double crochets. Join in at the beginning of the chain 3. (80 dc)

Round 4: Chain 3. Double crochet in each of the next 22 double crochets. Make 2 double crochets in each of the next 14 double crochets. Double crochet in each of the next 26 double crochets. Make 2 double crochets in each of the next 14 double crochets. Double crochet in each of the next 3 stitches. Join in at the beginning of the chain 3.  (108 dc)

Round 5: Chain 3. Double crochet in each double crochet. Join in at the beginning of the chain 3.

Round 6-8: Repeat round 5.

Round 9: Chain 3. Double crochet in the next 23 double crochets. Make 2 double crochets in the next 26 double crochets. Double crochet in each of the next 28 double crochets. Make 2 double crochets in the next 26 double crochets. Double crochet in each of the next 4 double crochets. Join in at the beginning of the chain 3. (160 dc)

You can fasten off, but if you want a nice border, switch to your other color.

Border

Round 1: Chain 1. Single crochet in the same chain as joining. Working in the back loops, single crochet in each remaining double crochet around. Join with the first single crochet.

Round 2: *Skip the next single crochet, make 5 double crochets in the next stitch, skip the next single crochet, slip stitch into the next stitch.* Repeat around. Slip stitch into the first stitch. Fasten off.

There you have it! A perfect placemat for Halloween! The best part about this is that you can mix and match different colors for whatever theme you have in your kitchen! I actually make one with white and a lite purple border for my Mother’s Day giveaway!

Also, don’t forget to like my Facebook page, I update it on a daily and it let’s you know when another blog post or free giveaway is!

https://www.facebook.com/katiesblog96971617/

Posted in Crochet, Easy Patterns

Crafty Sassy: Crochet Halloween Coaster (Easy)

Hey Dearies! I know it has been quite a while since I’ve posted for Crafty Sassy, but because Halloween is one of my favorite holidays, not to mention my birthday is in October, I had to share this super cute pattern with you all!

So, this is part of a set, but the placemat will come out next week. This pattern set was part of my Mother’s Day giveaway, while I used a light purple and white. However, this is Halloween, so the colors will be black and orange.

Here is the link for the matching placemat that goes with this coaster: https://katiesblog96971617.com/2019/10/09/crafty-sassy-crochet-halloween-placemat-easy/

20191001_160907.jpg

As much as I love working with black, it’s very difficult to see the stitches, but here are a few tips to help you out.

Tips for working with black yarn:

  1. If you are lucky enough to be a crochet hook collector, you might have heard of the ones that light up, and yes they do work great, especially when you are working with darker colored yarn.
  2. If you don’t have those light-up hooks hanging around, a lamp or overhead lights will be your best friend. I always use an overhead light for my life and when working with darker colors.
  3. If you don’t have any of the 2 above, sunlight or daylight works well!

Let’s talk about what you will need:

  • Medium Size Yarn
    • I’ll be using Pumpkin, in Red Heart Super Saver, and Black, in I Love This Yarn.
  • 5.5mm hook
  • Sewing needle

Take the color you would like to use for the middle. I’ll be using black as my middle.

Chain 6.

Round 1: Chain 3 (counts as double crochet on thisd rounds and the others). 9 Double crochets in the ring. Join at the top of your chain 3. (10 dc)

Round 2: Chain 3. Double crochet in the same chain as joining. 2 Double crochets in each stitch. Join at the top of your chain 3. (20 dc)

Round 3: Chain 3. Double crochet in the same stitch as joining. 2 Double crochets in each stitch. Join at the top of your chain 3. (40 dc)

You can stop here if you want, but if you want to make it bigger, do Round 4. If you want to stop here, skip to the border step. 

Round 4: Chain 3. Double crochet in the same stitch as joining. *Double crochet in the next stitch, make 2 double crochets in the next stitch.* Join at the top of chain 3.

Border

Grab the second color and chain 1 with it.

Round 1:  Single crochet in that same stitch you joined in the last round and all around. Slip stitch into the first single crochet.

Round 2: Chain 1. Skip the next stitch. *Make 5 double crochets in the next stitch. Skip the next stitch. Slip stitch in the next stitch.* Repeat until you reach the end and slip stitch.

Fasten off and sew in any loose ends.

There you have it! Make sure to check in next Tuesday for the placemat that goes with this coaster.

Also, don’t forget to like my Facebook page, I update it on a daily and it let’s you know when another blog post or free giveaway is!

https://www.facebook.com/katiesblog96971617/

Posted in Crochet, Easy Patterns

Crafty Sassy: Crochet Travel Bag (Easy)

Hey Dearies! Back with another super cute pattern! This is a market back that I had a blast making! Plus it was super simple to make as well. I ended up making this for my nieces 5th birthday and she loved it!

I would say that this bag a normal size for a bag, it’s not huge, but it’s big enough to fit what you would normally put in your purse. Well, for me, but you can use it for anything!

This pattern is going to be split into 3 parts. The base, handle, and gussett (which is a long part than connects both of the bases, I will explain more as we get there to hopefully make a little more sense).

Let’s begin talking about what you will need for this project:

  • Medium Yarn
    • Make sure you have 2 skiens of the colors you want to use. You will be working with 2 strains of yarn with this project.
    • I used Red Heart in white and orchard. You don’t have to change colors unless you want to, but I did just to see how it would look like.
    • 5.0 mm hook
    • Sewing needle
    • Stitch markers

Base and Handle (Make 2 of these)

Grab 2 strains of yarn, of your choice, chain 37. 

Row 1: Single crochet in the second chain from your hook and in each chain across. Turn. (36)

Row 2: Chain 1. single crochet across. (36)

Rows 3-12: Repeat row 2. Once row 12 is done, you can change into another 2 strains of color. I dropped the white by cutting it and crocheting over it. I just grabbed the other end of the yarn I was working on to replace my white.

Note: You don’t have to switch colors, but I did.

Row 13: Chain 3 (counts as a double crochet), skip the first stitch, double crochet in the next stitch and in each st across. Turn. (36)

Rows 14-19: Repeat row 13. Once at row 13, go back to using the 2 main colors that you were working with before. (You don’t have to do this unless you want to!)

Rows 20-27: Repeat row 2. Turn.

Now, we are going to be working on the handle part, we are NOT fasting off, not yet, but I just wanted to make sure before you start to fasten off. 

Row 28: Chain 1, single crochet in the next 6 stitches. Chain 50. Single crochet the last 6 stitches.

Row 29: Chain 1. Single crochet in the 6 stitches. Work a single crochet in each of the chains. Single crochet in the last 6 stitches. Fasten off and sew in any loose ends.

Once you have made two of the bases with handles, lets start on the gussett, or the part we are going to use to connect it all together!

Gussett (Make only 1 of these)

Working with 2 strains, again.

Row 1: Single crochet in the second chain from the hook. Single crochet across. Turn. (5)

Row 2: Chain 1. Single crochet across. Turn.

Repeat row 2 until it measures out to be about 30in. Fasten off and weave in any loose ends. Fold the gussett, from front to back, at the folded part, place a stitch marker on the row that is in the middle fold.

Assembly: 

There are two ways to do this:

  1. Single crochet around the long sides of the gussett and single crochet around the 3 sides of the bases. Sewing them together.
  2. Single crocheting all the pieces together, using 2 strands.

Whichever way you want to do it, is fine. I found that the first one made it a little bit easier for me to connect them, but I also wanted that nice thick border it has.

When you connect them, the short side of the gussett is the closest to the handles.

If you are single crocheting around, to connect them, make sure that when you get to the corner, you single crochet 3 times.

20190816_160722.jpg

There you have it! I’ve been one of those people that just love the crochet bag idea and I had to share this on with you all! A very simple pattern, but it can be tricky to assemble!

Make sure you follow my Facebook page for updates on my blog and more extra fun stuff! I do lots of giveaways!

https://www.facebook.com/katiesblog96971617/?ref=bookmarks


Posted in Beginner Patterns, Crochet

Crafty Sassy: Crochet Basic Squared Coasters (Beginner)

Hey Dearies! Back at it again with another super easy pattern for you! This even goes with the can cozies we made last week, but I will be adjusting the size so that it will fit all sizes!

If you want to make a can cozy to go with this, here is the link: https://katiesblog96971617.com/2019/08/06/crafty-sassy-crochet-can-cozies-beginner/

So, when it comes to coaster patterns, a lot of them don’t make them as big as they need to be for normal or bigger size mugs/cups. Sometimes the pattern’s picture is zoomed in, so you really can’t tell if they are that big unless you make them yourself.

20190813_083031.jpg

Let’s talk about what you will need:

  • Medium Size Yarn
    • I’ll be using Red Heart Super Saver in White and the border in the same blue mix as the can cozy.
  • 5.0 mm hook
  • Sewing needle

Let’s begin.

Chain 18

Row 1: Single crochet into the 2nd chain from your hook and in each remaining chains. Chain 1 and turn your work.

Row 2: Single crochet across. Chain 1 and turn. Repeat until your desired length.

20190813_080927.jpg

Note: I kept crocheting until the height of my coaster was about 4in. You also have to keep in mind that we are also adding a border as well!

Once at your desired length, fasten off and weave in your ends.

Boarder

Grab another color, or you can use the same color to make the base. I’ll be using the same blue mix colored yarn for the border.

Insert your hook on any side of your coaster. Chain 1 and single crochet across. When you reach a corner, make sure to make 3 single crochets in that same corner.

Fasten off and weave in any loose ends!

20190813_083001.jpg

There you have it! A perfect and simple coaster to make for your guest or just yourself. If you still want to make the can cozy that goes with this pattern, make sure to check out the link at the top of the page.

Make sure you follow my Facebook page for updates on my blog and more extra fun stuff! I do lots of giveaways!

https://www.facebook.com/katiesblog96971617/?ref=bookmarks


Posted in Beginner Patterns, Crochet

Crafty Sassy: Crochet Can Cozies (Beginner)

Hey Dearies! So, today I have another super easy pattern for you all! Since we are still in the hot weather in Maine, I figured we would make some can cozies for our soda cans! This also goes with a set, so next week, I’ll show you all how to make the coasters that go with them!

If you are just starting out, this is going to be perfect for you! Especially if you don’t want to just make a dishcloth, which is what most crocheters recommend to start out.

Let’s talk about what you will need:

  • Medium Yarn
    • I’m going to be using a multi-colored yarn from Red Heart. I forgot what it was called since I lost the label for it.
  • 5.0 mm hook
  • Sewing needle
  • Stitch Marker

Let’s Begin!

Round 1: Chain 2. Make 7 single crochets in the 2nd chain from your hook. Do NOT join, we will be working into a spiral. (7sc)

Make sure you place a stitch marker at the end of each row. Move the marker up after each row is completed. This will help you stay on track.

Round 2: 2 single crochet in the next 6 single crochets, single crochet in the last single crochet. (13 sc)

Round 3: *Single crochet in the next single crochet, 2 single crochet in the next single crochet* Repeat 6 times. Single crochet in the last single crochet. (19 sc)

Round 4: *Single crochet in the next 2 single crochets, 2 single crochets in the next single crochet* Repeat 6 times. Single crochet in the last single crochet. (25 sc)

Round 5: *Single crochet in the next 3 single crochets, 2 single crochet in the next single crochet* Repeat 6 times. 2 single crochets in the last single crochet. (32 sc)

Round 6: Working in the back loops only. Single crochet in each single crochet around.

Round 7: Single crochet around. Repeat until your project reaches your desired length. I’ll be crocheting until I reach about 3.5 inches tall.

Last Round: Slip stitch in each single crochet around. Fasten off and weave in all loose ends.

20190806_162211.jpg

There it is! Sadly, I didn’t have any cans to actually use and show you how it would look, but I tried my best to shape it so it looks like it was holding a can. I think these are super cute and fun to make or have for guest to use!

Make sure you see next weeks blog post, it will go along with this pattern. It’s a coaster that is perfect for this can cozies!

Make sure you follow my Facebook page for updates on my blog and more extra fun stuff! I do lots of giveaways!

https://www.facebook.com/katiesblog96971617/?ref=bookmarks

Posted in Crochet, Easy Patterns

Crafty Sassy: Crochet C2C Phone Case (Easy)

Hey Dearies! I’ve got another free pattern for you guys and I can’t wait to show it to you all! So, as you all know, if you follow me on Instagram, I showed you one of my pieces that was a C2C (Otherwise called a Corner 2 Corner), that I sadly rushed and didn’t pay attention to the details and ended up taking it apart.

Now, I am currently been practicing with the C2C stitch and I figured this pattern would be an awesome idea, especially if you want to try and make this particular stitch. This phone case is a basic ‘sleeve’ case.

For this case, I ended up pulling out an unused skein of yarn that has been sitting in my closet of yarn, that I got for Christmas. I also know a LOT of people and family members who just LOVE camo stuff and I figured, why not use it for this!

Let’s talk about what you will need:

  • Medium Yarn
    • I am using the Red Heart Super Saver in Camo.
    • You can use whatever colors you wish, but using a mixed colored yarn makes it more fun!
  • 5.0 mm hook
  • Sewing needle

Let’s Begin!

Making the Base

First thing is first, grab your yarn and make a slip knot onto your hook!

Row 1: Chain 5. Double crochet into the 3rd chain from the hook. Double crochet into the next 2 chain stitches.

Row 2: Repeat row 1. *Slip Stitch into the opening gap of the last square you made, in the chain 3 space. Chain 2. Make 3 double crochets in the same gap that you made your slip stitch in. * Repeat * one more. Turn your work.

Repeat Row 1 and Row 2 until you reach your desired height. Mine has 12 squares for my height, I wanted to make it a little bit bigger so it wasn’t so snugged tight. 

When you reach the desired height, turn your work and slip stitch into the next 3 stitches. After that, Chain 2 and make your 3 double crochets. You do this same thing for your width as well. (I did about 13, making sure it wrapped around my phone, but adding an extra row, making it 14 just so it wasn’t as snug.

I know this can sound confusing, but if you need to watch someone do this, I will be leaving a link from Heart Hook Home, that shows you what you need to do. If you are like me, you want to see what you need to do, but once you learn to do it, you’ll catch on pretty quick!

This video was SO helpful when I was looking for a good C2C teaching video. You see, when you do a normal C2C, they have you chain 6 instead of 5, making the project have more of a gap between squares.

Anyway, how long you want to make your width, is totally up to you. I based it on how long it needed to be to wrap around my phone, but I added another row so that it wouldn’t be so tight.

Here is what it will look like:

20190723_085157.jpg
As you can see, my length is about 12 squares going up and my width is about 14 squares going across. 

Border/Sewing Together (Optional)

Now, for the next part, you can do of 2 ways.

  1. Single crochet around the entire base. 
    1. I went with the first one because it does make it easier to add the buttonhole to the case itself. It also makes it look nice and neat.
    2. When you single crochet around, make sure to make 3 single crochets in all of the corners. You’ll see why when we come to the next step!
  2. Fold it and sew it together. 
    1. You can do the second way, but if you are looking for an easier, and simple way to sew them together, step one is the way to go! If you are set on step 2, just skip down to the buttonhole step.

Once you have finished with step 1, grab your sewing needle, sew in any loose ends before we begin. Get enough yarn, that you will think will be enough, and thread your needle.

Note: I usually grab more than necessary, but the extra yarn that is leftover, we are going to use for the buttonhole or you can use it for any scrap projects in the future! NEVER THROW YOUR SCRAPS!

Once your needle is threaded, line the two ends together and tie a know. This will make it so that our sewing is a little thicker. Then start sewing! I went back an forth, going through both of the stitches from the single crochet.

Sew ONLY 3 of the sides, one of the short sides will be the opening for the case itself. Cut any extra yarn and weave in any loose piece of yarn. Any extra yarn we will be using for our next step!

20190723_093834.jpg

Here is what mine looked like, once I sewed around it all!

Buttonhole and Button

By the opening at the top, find where you want to place your buttonhole.

Slip knot the extra yarn onto your hook and insert it onto the top. Single crochet in that same spot.

Chain 20.

Note: You can chain more or less, depending on where you want your button to be, just remember, you need to make sure that it will reach the button. You can always sew the button to where you want it to be and then create the buttonhole. 

Single crochet into the next stitch/and or place.

Fasten off and weave the ends. Add your button and you are done!

20190723_094737.jpg
This is what mine turned out to be!

There you have it! I think these would be perfect gifts for stocking stuffers for the teens or adults. I won’t be surprised if you can fit a PSP or DS in these no problem!

Don’t forget to follow me on Instagram or like my page on Facebook. I update my Facebook page, a lot, so if you are wondering when I’ll have a new post or when I go live, that is the place to check out!

https://www.facebook.com/katiesblog96971617/?ref=bookmarks

Posted in Arts and Crafts, Crochet, Easy Patterns

Crafty Sassy: Crochet Striped Washcloths (Easy)

Hey Dearies! So, today I figured I would teach you how to create a simple washcloth! If you are very new to crochet, this would be the place to start! Creating washcloths are one of the most basic thing to crochet, not to mention, it helps you with learning how to single crochet.

When a beginner is looking for a project to practice on, washcloths are usually where they start from. You can make them with different stitches or styles! This particular pattern also shows you how to change colors and to create a simple single crochet border!

Let’s talk about what you will need:

  • Medium Yarn
    • This pattern requires two types of colors. You can use any colors you would like!
    • I’ll be using Red Heart Super Saver in White and Cherry Red.
  • 3mm hook
  • Sewing needle
  • Stitch Marker (optional)

Now, let’s begin!

Using your main color, chain 35. (I’ll be starting with the White first.)

Row 1: Single crochet in the second chain from the hook. *Single crochet into the next stitch.* Repeat from * to the end. Turn. (34)

Tip: You can place a stitch marker at the end of each row, it will make sure that you don’t lose track or make sure that you don’t add any unwanted stitches!

Row 2-23: Chain 1. *Single crochet into the next stitch.* Repeat from * to the end. Don’t chain 1 on the last row, we are going to change colors at this point! (34)

Should measure about 4 3/4in (12cm). Change to your other color. (I’ll be switching to the Cherry Red.)

Row 24-25: Chain 1 with your second color. *Single crochet into the next stitch.* Repeat from * to the end. Don’t chain 1, when you are the last row.

Switch back to your main color.

Row 26-27: Chain 1 with your main color. *Single crochet into the next stitch.* Repeat from * to the end. Don’t chain 1, when you are the last row.

Row 28-29: Chain 1 with your second color. *Single crochet into the next stitch.* Repeat from * to the end. Don’t chain 1, when you are the last row.

Switch back to your main color.

Row 30-31: Chain 1 with your main color. *Single crochet into the next stitch.* Repeat from * to the end. Don’t chain 1, when you are the last row.

20190709_114444.jpg

Row 32-33: Chain 1 with your second color. *Single crochet into the next stitch.* Repeat from * to the end. Don’t chain 1, when you are the last row.

Switch back to your main color.

Row 34-38: Chain 1 with your main color. *Single crochet into the next stitch.* Repeat from * to the end. Fasten off. Weave in any ends from switching colors.

20190709_121439.jpg

This is what it looks like the washcloth without the boarder. You can leave it like this, but for me, I think the border adds or makes it look better and evener.

Border

Grab the secondary color that you used for the stripes, and attach it to the side of the washcloth. You can start where ever, but I recommend not starting on a corner.

Chain 1 and then single crochet around your washcloth. When you get to the edges, make sure you make 3 single crochets in each corner.

Once you have reached to where you started, slip stitch into the next single crochet and fasten off. Weave in any loose strings.

20190709_123421.jpg

There you have it! A simple washcloth for you! This was the very first one that I’ve ever made. I was one of those beginners that just jumped into beginner patterns and never got a chance to create a washcloth.

The best part, you can use this in the kitchen, bathroom, or living room! Where ever you need it! However, when you do finish creating this, it will be very stiff. The more you get it wet and use it, the more it will start to loosen up.

I recommend hand-washing these in lukewarm water, and having them air dry. Once they begin loose enough, you can put them into the dryer, but I would be careful. I’ve had a few projects unravel in the washer before.


Posted in Arts and Crafts, Beginner Patterns, Crochet

Crafty Sassy: Crochet Ice Pop Cozies (Beginner)

Hey Dearies! So, since we are in summer, I wanted to give you all a pattern that was perfect for this season! As I was growing up, one of the favorite cold treat to have on a hot day, other than ice cream, was freeze pops!

We would always have so many of them that the only ones that were left in the fridge were the colors that we didn’t care to have. My favorites were red, pink, and of course blue!

These cozies are not only super cute, but they are perfect for the little ones and those who don’t like holding cold stuff in their hands. These are just a simple and very basic to make, so if you are short on time, these can be finished within a  few minutes, depending on how fast you crochet.

I have also included two sets of the same pattern, one for switching colors and the other one for making just solid colors. The color switching one will be first and the solid color one will be after that.

Here’s what you will need:

  • Medium Yarn (In any color you would like, or have two colors for more fun!)
  • 4.5 mm hook
  • Stitch Markers (This is optional, but if you are a beginner, I highly recommend to use.)
  • Sewing Needle

Let’s Begin! (Color Switching)

20190611_101902.jpg

Chain 13 and slip stitch into the first ch to create a ring.

Round 1: Ch 2. 13 half double crochet in the ring, slip stitch on the top of your ch 2 to close. Work each round continuously; use a stitch marker to help keep track of the rounds.

Round 2: 13 half double crochet around.

Round 3: 13 half double crochet around.

Round 4: 13 half double crochet around. (This is where you can choose to switch colors if you like.)

Round 5: 13 half double crochet around.

Round 6: 13 half double crochet around.

Round 7: 13 half double crochet around. (This is where you would switch your colors again.)

Round 8: 13 half double crochet around.

Round 9: 13 half double crochet around.

Finish off and sew in ends.


Let’s Begin! (Solid Color)

20190611_101853.jpg

Chain 13 and slip stitch into the first ch to create a ring.

Round 1: Ch 2. 13 half double crochet in the ring, slip stitch on the top of your ch 2 to close. Work each round continuously; use a stitch marker to help keep track of the rounds.

Round 2-9: 13 half double crochet.

Finish off and sew in ends.

This is something that can be done very quickly and it’s also fun to mix the colors around. These are also perfect for selling at craft fairs since it is something simple to create!

Also, if you don’t like the size of the cozie, you can always add more rows to make it longer.

Another thing, if you wanted it to sit at the end of the freeze pop, you can always sew the bottom of it. However, I like the cozy being the size it is since it’s easier to move and adjust when you are eating the freeze pop.


Don’t forget to check out my Facebook page! I try to go live on Tuesdays and if you like my page, I do polls and free giveaways as well! Also, this is usually the first place that I post updates on my blog as well!

https://www.facebook.com/katiesblog96971617/


Posted in Arts and Crafts, Crochet

Crafty Sassy: Crochet Hooks, What Should I Get? (For Beginners)

Hey Dearies! Since I am working on a few projects, I figured I would talk to you about the many crochet hooks that you can come to choose from. Especially if you are a beginner, knowing what hooks to get can is very important!

20190423_090427.jpg

As a beginner myself, I jumped right into buying a set of crochet hooks from Wish and went from there. However, since I got lucky and only paid 3 bucks for a mini set, I wish I would’ve known there was more than just one type of hooks.

Each type of hooks can have a different feel or how they are in general, but before we get into how they feel, let’s talk about the different kinds of hooks you can get:

  • Aluminum Hooks
  • Plastic Hooks
  • Steel Hooks
  • Wooden/Bamboo Hooks
  • Japanese Hooks

I’m going to break each of these down just so you can get a picture of how they are like and if they are for you. The only ones that I don’t have in my possession, are the Japanese Hooks, but I will still explain and have a photo of them just so you know what they look like.

Also, I am going to put a chart of the different sizes of hooks you can get and how they are labeled, as well.

Image result for crochet hooks size chart

As you can see, there are 3 different types of labels for these hooks. USA, English, and Metric. The easiest one to go by is Metric, I found that it was easier to find hook sizes by using their actually metric size.

To me, using letters to determine which size hook, has been confusing and usually if a pattern says a hook size as a letter, I always end up looking up in my crochet books or search in Google, to get the metric size. Hence why my patterns, don’t have the hooks in letter sizes.

If you are a beginner, Metric is the way to go, but you can determine which one you feel most comfortable following. If you are wondering how small these hooks can be, they can get pretty small or really huge.

Now, let’s get down to talking about the actual hooks themselves.


Aluminum Hooks 

WIN_20181220_14_45_00_Pro

There are one of the most common hooks you can get. I prefer them/use them, for almost every project! These hooks were one of the first ones that I bought to get into crocheting. They can come in all different colors and can go as little as 0.60!

However, for the little hook sizes, you have to be VERY careful. I actually have a few of the tiny ones and let me tell you, they can bend very easily. I haven’t even used them once, but they bent trying to get them out of the packaging!

Lucky, I haven’t reached a project where I’m required to use them, yet.

Another thing to look out for is that they can’t get wet! When I mean by that is if you have sweaty palms or hands, they can tend to be more difficult to work. First time I used them, I was so excited and nervous that it made it difficult to want to work with them.

Although, you can get grips or even use tape to place around the handle of the hook, making it easier to grip and easier to handle your work better!

Overall, they are perfect for beginners! Plus, I love the different colors you can get them in. My family usually get me crocheting books, and some of them come with these hooks, so I have already started a collection with my metal hooks!


Plastic Hooks

Image result for crochet plastic hook

These next hooks are another fun-coloring type of crochet hook. Now, I want to let you all know that I haven’t had the pleasure to work with a plastic hook in a ‘normal’ size, meaning the only sizes I have are an 8.0-11.5.

Have I worked with them? Yes, I actually used one of them to make a basket for my mini balls of yarn. I do plan on getting myself a plastic set, just so I can have them for an option, which a lot of crocheters tend to so that.

These hooks work pretty well, I don’t have any complains, although I have seen and heard from a few people, that they are very easy to break, which I figured they would because they are made up of plastic.

However, I haven’t had one break on me, ‘knock on wood’, but I can see the smaller ones breaking a lot quicker than the bigger ones.

Overall, I see more people use the bigger plastic hooks more than I do the smaller ones.


Steel Hooks

20190423_090234.jpg

I know you are probably thinking, ‘What’s the difference between these and the aluminum ones?’. Well, there are a few differences, but let me explain why.

These hooks have a built-in handle, which is perfect for if you have sweaty hands, as I do from time to time. Not only that, having a handle makes it easier for you to grip the hook better, but it makes it easier to control smaller hooks.

Yes, they do make them in smaller hooks. I actually bought myself a set, that also came with a storage bag, because I was looking for something to help me better grip my smaller hooks, especially, since I crochet a lot of towel toppers.

Although, these are one of my ‘go to’s’, the only problem I have with them is the grips. Now, the set that I bought, had rubber grips, but they were starting to slide off and it made it bothers me when they do that. Especially, when you are crocheting.

If you do want to get yourself a set of these hooks, go for the ones that are built onto the hook itself. If you do end up getting a rubber set, take some hot glue or craft glue, and glue the inside of the rubber piece, and slide your hook back on.

Overall, they do have some very cute grip holders and they can come in multiple colors. These are definitely a must, especially, if you are a beginner!


Wooden/Bamboo Hooks

20190423_085900.jpg

These hooks were the first thing that I really wanted, as soon as I got into crocheting! They were handmade and hand-carved, but I really just wanted them as an option and to grow my hook collection.

They are so smooth to the touch and have a point at the top of the hook, which makes going into stitches easier. The size of every hook is hand carved into the hook itself. These were so pretty I didn’t want to use them, but I did have some problems.

The ones I have, they felt weird to use, but when it comes to trying out different hooks, it can take a while to adjust, but it felt weird to use them. It’s not that I didn’t like them, I just the hook itself is very awkward.

I even put on a handle, which I didn’t want to do, but with the handle, it was a little easier.

The smallest size they go, in carving them with would, is a 3.0. Anything smaller is just a metal hook with a wooden grip, which I would like to note, the wooden grip is very strong and I haven’t had any problems with it.

Overall, I like to have a set, just to have it, but I have used them before. It does take some type to get used to, but you also need to be careful because since these are made up of wood/bamboo, they are very easy to break. Hence why they don’t go smaller with size!


Japanese Hooks

Image result for japanese crochet hooks

Now, as I said in the beginning, I’ve never tried these, so I can’t really give a good detailed explanation whether they are good or bad. I do see quite of bit of other crocheters that do use them.

What I have read, from my crocheting books, these hooks are perfect for people who have small hands and it helps with arthritis. From the looks of these hooks, they do look very comfortable.

Overall, you have to try them to get the feel from them. I do plan on getting a set in the near future.


In order to find out what hook works for you, try them all out! Of course, you don’t have to buy the entire set of them, you can always get just one of each and see how they are for you!

I like to have options, especially when crocheting. Have a set of each different hook can give me more options to choose from, no matter what size hook I need!

Leave a comment down below letting me know what kind of hook you prefer to use! I’d love to know!

Don’t forget to follow my Facebook page, I update my temperature blanket daily on there, go live crocheting, and even have free giveaways! Link is down below!


https://www.facebook.com/katiesblog96971617/

Posted in Crochet Blanket 2019

Temperature Blanket Update 2019: March

Hey Dearies! If you have been following me on my Facebook page, you would’ve noticed that I was behind on my daily squares, due to running out of yarn, which can happen when doing a temperature blanket!

Anyway, let’s talk about how this month went, we are FINALLY getting some warmer days and we also had our very first 60-degree day, which was also on the last day of the month.

20190401_125126.jpg

January, February, and March!

So, if you are wondering how big this blanket is going to get, well, it’s going to get pretty big! This blanket is also being laid on a King size bed, so by the time this blanket will be finished, it will most likely go over the sides and fit perfectly on the bed.

We already have about 90 squares on this blanket. In the upcoming month of April, we will be able to start seeing different colors since it is beginning to warm up and make it feel like spring!

Also, you might have noticed a slight color change for my dark purple, this one also one of the colors that I did up end up running out of and had to substitute it with a different type of purple.

It’s still the same Red Heart brand, but a different line of yarn, so I will add that to the list of colors, as well. Hopefully, I won’t have to make any more color changes to this temperature blanket, but it is my first one, so mistakes are bound to happen.

Just in case you want to see what the colors will start to look like, as the temperatures get warmer:

20181222_124142
100 degrees – Fire Red (I Love This Yarn)
90 degrees – Pumpkin (Red Heart Super Saver)
80 degrees – Bright Yellow (Red Heart Super Saver)
70 degrees – Jelly Bean (I Love This Yarn)
60 degrees – Green (Main Stays Basic Yarn)
50 degrees – Turqia (Red Heart Super Saver)
40 degrees – Soft Blue (I Love This Yarn)
30 degrees – Dark Orchid (Red Heart Super Saver) *Changed to the following – Violet (Red Heart With Love)
20 degrees – Orchid (I Love This Yarn) *Changed to the following – Orchid (Red Heart Super Saver)
10 and below – Light Gray (I Love This Yarn)


How do you tell which color to use?

I, personally, go with the overall temperature. So, let’s go by today, for example.

Today in Maine, the overall temperature is 17 degrees. I would choose the light gray.

Let’s say that it was an overall temperature of 22 degrees, I would choose the Orchid color. All my temperatures, for my colored yarn, has to have the same number first number. If that makes any sense, I’m sorry if it doesn’t!

What was the highest temperature for this month?

Well on the last day of March, we got a 60-degree day! So, the light green is just the beginning of what temperatures will start to look like in the upcoming weeks!

What was the lowest temperature for this month?

So, our lowest temperature was actually 20-degrees, but on those days, it felt a lot colder than that!

Do you post daily updates?

Yes, I do. On my Facebook page, I post a picture of the square for each day. I also tried to post every week’s worth, but it was hard to keep track of, so I’ll be posting monthly and daily instead.

If you haven’t liked my Facebook Page, here is the link below! It keeps you posted and updated on my temperature blanket and any updates for my blog and YouTube channel, as well!

https://www.facebook.com/katiesblog96971617/?ref=bookmarks

Posted in Arts and Crafts, Crochet, Easy Patterns

Crafty Sassy: Crochet Stuffed Easter Egg (Easy)

Good Morning Dearies! So, I am going to shake it up a bit and we are doing something for Easter! I know it is a little early, but with my crocheted Easter Baskets up for orders, I wanted to show everyone how to make these cute little eggs, just in time for Easter!

20190226_112506.jpg

These are great for babies for their first Easter or for toddlers if you want them to find something other than jelly beans and candy! These eggs don’t take long to make, but they add the perfect touch to a crocheted Easter Basket!

So, before I begin, I want to talk to you about this pattern. I’ve made about 3 of these eggs, 4 if you include the tutorial I’ll be doing for you all. I’ve used a different brand type of yarn, just to see if there is a difference, and I believe it was my tension, but I’m still unsure.

20190226_112352.jpg

The pattern recommends Red Heart Yarn, so I would just use Red Heart, you can try it with different brands and if you do, and they turn out great, feel free to let me know in the comments!

Anyway, let’s talk about all that you will need:

  • 5.0 mm hook
  • Red Heart Yarn
    • I will be using the color aqua. I’m just guessing because I lost the yarn label for it, but I know it’s Red Heart.
  • Stitch Marker
  • Stuffing of your choice
    • I’m using the stuffing that you get from Walmart in the craft section. Basic stuffing for stuffed animals.
  • Sewing Needle
  • Row Counter (optional)
    • I wrote down the numbers of rows and crossed them off as I go. You don’t need a row counter, but if you are a beginner, I highly recommend that you use one.

Let’s begin!

Round 1: Chain 2. Make 6 single crochets in the second chain from your hook. Don’t connect. (6 stitches)

20190226_100235.jpg

Round 2: Make a single crochet in the next stitch and place a stitch marker(You’ll be moving this stitch marker for every row), then make another single crochet in that same stitch. In the next stitches, make 2 single crochets in each until you reach the stitch marker. (12 stitches)

Round 3: Single crochet in each stitch.

Round 4: Make *2 single crochet in the next stitch, single crochet in the next.* Repeat (18 stitches)

Note: The * are for repeating an amount of different stitches for a round or row.

Round 5: Rep Rnd 3.

Round 6: Work *2 single crochets in the next stitch, single crochet in the next 2 stitches.* Repeat. (24 stitches)

Round 7: Rep Rnd 3.

Round 8: Work *2 single crochets in the next stitch, single crochet in the next 3 stitches.* Repeat. (30 stitches)

Round 9-11: Rep Rnd 3.

Round 12: *Single crochet decrease in the next stitch, single crochet in the next 3 stitches.* Repeat. (24 stitches)

Round 13: Repeat Rnd 3.

Round 14: Single crochet decrease 12 times. (12 stitches)

Round 15: Rep Rnd 3. Stuff the egg. (I used the other side of my crochet hook to help stuff the egg because the hole is really small.)

Round 16: Single crochet decrease 6 times. (6 stitches)

Finish off, leaving a long tail to weave through the remaining 6 stitches. Pull tight and secure the end and make sure to weave it in, as well.

20190226_112520.jpg

There you have it! Perfect pretty Easter eggs for the kiddos!

Posted in Arts and Crafts

Crafty Sassy: What Are C2C?

When you first get into crocheting, the first thing you do, before you even get into it, is figuring out what you want to learn how to make. For me, other than my great-grandmother’s crocheted towel toppers, was the C2C. C2C is a ‘corner to corner’ type of stitch that you would find in blankets.

A corner to corner is something that you would usually see for a blanket, but I have seen many for scarfs and rugs as well. They are perfect for testing the limits to see what you can do with your crocheting skills. Here are a few examples that other’s have made:

Image result for c2c crochet

Image result for c2c crochet

You can get really creative with these types of projects! I will say, these are a lot easier to understand than graphgans. If this is something that you have saved in your Pinterest folder, or you are waiting for all your projects are done before starting something new, sit back and relax! I’m going to answer a few questions and give some tips, I have picked up, on C2C!

What will you need?

Depending on the pattern or idea you have in mind, you will need to start out on graph paper. If you are going for the basic C2C, having a graph will help you keep track of where you are, but graphs are used for more characters or lettering. For example, I am going to use this pixel picture:

Related image

Since we are going to be using this heart, as an example, we need to figure out how many bobbins and colors we will need. I also want to note that you can always change the colors for any of these types of projects. It won’t change how you make the C2C, only the colors.

For this project we need 4 different colors:

  • White
  • Black
  • Dark Red
  • Red

Now, let’s talk about bobbins, if you don’t know what they are, here is a picture of what they look like, you will need these, unless, you are using multiple skiens, which I don’t recommend because you have to turn the project back and forth, when you are done with a row.

Image result for crochet bobbins
These ones aren’t exactly for ‘crocheting’, but the reason why I like these, is because you can clip them onto your work as you are working.

From looking back at the graph, I see that we will need about 9 bobbins, but like i said, every project will be different and you will have to determined what you will need for each project.

How do you start one?

After you have figured out what you need, you can then start. A lot of people start by chaining 6, but I prefer chaining 5. The reason for this is because I am one of those picky people that doesn’t like giant gaps or holes in my projects and I like to keep it that way.

Chaining 6, is what people normally do, but it doesn’t change the C2C. The only other difference is that, when you connect the squares together, they won’t be the same. For now, here is the video I followed:

*Note: This is not my video, this is to show what type of C2C I am currently using. All credit goes to Heart Hook Home.*

Is it easy?

Once you get the hang of it, it isn’t that hard to do! The only parts that I struggle with is changing color, but there are so many videos on YouTube that have helped me out with that!

What videos do you recommend?

I can recommend a few, but you’ll have to find someone that you can follow. Everyone is different, especially, when it comes to crocheting. I am also one of those people that likes to get right down to the point, especially, when it comes to tutorials.

Keep in mind, that some people can give you way too much information, to the point where you aren’t sure what you are doing. Heart Hook Home, did an awesome job explaining a C2C, I highly recommend you watching her tutorial.

If you want to learn, almost everything that is to know about a C2C, then the Crochet Crowd is your best option, although, I personally, don’t recommend him to anyone who is a beginner. I honestly found his video, on C2C, very confusing and especially as a beginner.


This was just a little more information, not a lot, but enough, to possibly get you going in the right direction of C2C. Once you learn how to do it, you won’t want to stop!

If you haven’t liked my Facebook page, I will be going live, tonight, with a surprise, that I am making for this month of January! Make sure to like my page and check it out!


Posted in Arts and Crafts, Crochet, Easy Patterns

Crafty Sassy: Crochet Mug/Coffee Cup Cozy w/ a Pocket (Easy)

Good morning dearies! Today is it snowing, in Maine, and I wanted to tell you about a pattern that I have found, on Pinterest, the other day, that is actually perfect for today, because of the cold weather we got going on.

As you all know, if you don’t already like my Facebook page, I show two different patterns and which ever one wins, I go live, showing you how to make them! This week, it was the coin purse vs. the mug cozy. So, I guess you can already think what won, by the title of this blog post!

Here is the link for the pattern itself:

https://www.thestitchinmommy.com/2014/09/give-sugar-coffee-cozy.html

I want to shout out to the Stitchin Mommy for making this pattern available for us today! I’ll be making her pattern later tonight on my Facebook Page, when I go live!

You all know that I just love making mug cozies, they are perfect for the cold or chilly weather and they prevent you from burning your hand, when you are craving that hot cup of coffee, tea, or hot coco.

This pattern just showed up, out of no where, but I’m glad it did! I have always wonder if someone had came up with pockets for their mug cozy. This pattern is simple and very easy to make, perfect for holiday gifts, but since the holidays are over, I will be making one of these for myself, or for someone in the family.

Best part of this pattern, is that you get to try out different colors, or mix and match the colors for the pocket and the mug base.

The only downfall of this pattern, is that it isn’t for all mug types. This ‘mug cozy’ is technology a ‘coffee cup cozy’. So, chances are, this won’t find on your favorite coffee mug at home.

HOWEVER! I have came up with another pattern idea, that is based off a simple mug cozy, and all I did was add the pocket on the side! Which is what this pattern is really for.

If you just started to follow me, I made a mug cozy pattern way back when I first started to blog (which wasn’t that long ago). I will be basing it off of that pattern, but making it bigger and adding a pocket.

Things you will need:

  • Medium Size Yarn
    • If you want to feel creative, like myself, grab another color and mix it up!
    • I’m using the I Love This Yarn brand for this project.
  • 4.5 mm hook
  • A button
  • Yarn needle
    • As always! Got to make sure to sew in your loose ends!


Mug Cozy Base

20190108_120843.jpg

Chain 10.

Row 1: Find the second chain from your hook (Not counting the chain that is already on your hook). Make a single crochet and a double crochet, in that same chain.

Skip the next chain and in the next chain, make a single crochet and a double crochet. Repeat til you reach the end of the row. Chain 1 and turn.

Row 2: Skip the next stitch. Make a single crochet and a double crochet in the next stitch. Repeat until you reach the end of the row. Chain 1 and turn.

Repeat Row 2, until you reach about 8 inches. If you wish to make it longer, you make do so. Also, keep in mind that the next step, we are making the buttonhole.

I would measure your mug first, and debating on adding more or less rows. Not all mugs are the same! You also don’t want your mug cozy to be too loose, otherwise it will fall off, and you don’t want it too tight either!

Don’t be afraid to ‘frog it’. Rippit, rippit!

Buttonhole

Next Row: In the first two stitches, single crochet together (sc2tog). Single crochet across, until you reach the last two stitches, single crochet together (sc2tog) in those last two stitches. Chain 1 and turn.

Next Row: Half double crochet into each stitch, making sure that you still have 8 stitches. Keep going for another 2 inches, starting where you started your half double crochets. (This is for bases that have the 8 inches crocheted. If you made it bigger, see the * for more info.)

*Depending on how long you made your mug cozy base, measure it, if your mug cozy base is over lapping itself, then you don’t need to keep crochet for another two inches. These will vary for different mugs. Make sure to measure it around your cup, before crocheting!*

Next Row: Now, we are going to make the actual buttonhole. If you haven’t chained one from the last step, do so now and turn your work.

In the first 2 stitches, make a single crochet together (sc2tog). In the next stitch, make a half double crochet. In the next stitch, make a double crochet and a treble crochet, in that same stitch. Chain 3. In the next stitch, make a treble crochet and a double crochet, in that same stitch. In the next stitch, make a half double crochet. In the last 2 stitches, single crochet together (sc2tog).

You can fasten off, or single crochet all around the mug cozy. This is something you don’t have to do, but if you are like me and like stuff to look neat and even, this is something you would want to do!

Making the pocket:

Using the same size hook, that you used for the base of the mug cozy, we are now going to make the pocket.

Chain 11

Row 1:  Find the second chain from the hook and single crochet across. You should have 10 stitches. Chain 1 and turn.

Row 2 – 12: Repeat row 1. Or until it has reached the length you would like. Make sure to leave a long tail, as you will use this to sew it onto the mug cozy itself.

Weave in any ends.

Sew on your button and you are done!

20190108_121100.jpg

I will be posting a video on how to make this mug cozy with pocket on my YouTube channel. I’ll add the video on here, once it is posted.

If you want to see me go live, on making the coffee mug with pocket, make sure you like my Facebook page and keep an eye out on my weekly polls, where you guys get to choose between two items and pick which one you want to see me make live!


Posted in Arts and Crafts

Crafty Sassy: How To Make Bigger Coaster Sizes

Since I have explored more on Pinterest, I can upon this beautiful peppermint coaster. The Purple Poncho was nice enough to make this pattern free for us to use, here is the original link to the coaster here:

https://www.thepurpleponcho.com/peppermint-coasters-free-crochet-pattern/

So, with that in mind, all credit goes to her and a big thanks goes out to her for making this pattern completely free to use!

However, as lovely as this pattern is, I had one problem with it. It wasn’t big enough for my ‘standards’, which is why I am going to tell you how to make the coaster bigger. If you are like me and have giant coffee mugs, the original pattern is too small. The pattern, in my view, is more for wine glasses or just for decoration.

This also might work for some other coaster patterns as well, as long as it has the same ‘basic beanie circle’ idea, then it should work, as long as you use the correct stitch for the project.

I’ll be using the peppermint coaster pattern as an example. After you have checked out the pattern and read through the rounds, after round 4, you start making that beautiful ‘peppermint’ design. Before you start with that design, let’s make it bigger.

This is called ‘increasing stitches’, which you can or do for most projects that require it, or you choose to do so. It’s very simple to do, but can be confusing.

Round 5: Ch 2, make 1 half double crochet (hdc) in the first stitch, then 2 half double crochet (hdc) in the next 2 stitches. Make 2 half double crochet (hdc) in the next stitch (meaning you make 2 half double crochet’s in the same stitch. Repeat.

Just keep adding a single half double crochet stitch (or the type of stitch that you are working on.) to each new row, until you feel like it is where you want the size to be. Then follow the next step in the peppermint boarder.

Does this work with all coaster patterns?

No, it does work for this pattern because this started out like we were going to make a simple basic beanie. Every coaster is different, but depending what it is, you can always figure it out or as the creator if they know how to fix it to be smaller or larger to what you are looking for.

I did go live on showing you how to make the peppermint coaster, if you would like to check that out, visit my Facebook page and don’t forget to like my page, so that you can know when I next go live or for any of my free giveaways. It is also the best place to find updates for my blog.

https://www.facebook.com/katiesblog96971617/

Posted in Arts and Crafts, Crochet, Easy Patterns

Crafty Sassy: Crochet Towel Topper (Easy)

44664318_1911676305807353_5391009887280955392_n

Hey dearies! I wanted to give you guys an updated pattern on the towel topper! I finally mastered it to my liking and I wanted to share it with you guys. If you didn’t know, my great-grandmother has been making these towels since I was really little and I’ve always wanted to know how.

Now that I have more knowledge on how to make them, I created a pattern that is, to me, perfect. Not too much yarn, but just enough to complete the towel itself. As you can see in the picture above, one of them is very long, that was one of my trial ones that I practiced on.

We are going to be making these ones:

20181024_121320.jpg

What you will need:

  • Medium Yarn
    • Find a color that you would think, would go good with the towel.
  • 2 different sizes of crochet hooks. You don’t have to use just one size, you can use whatever size you would like, these are what I prefer to use.
    • 5.0mm – This one, we will use to crochet the actual towel.
    • 3.0mm – This one, we will use to start off the towel.
  • Towel
  • A button, color of your choice
    • The size can be whatever size you would like, but nothing smaller than an inch.
  • Sewing needle
  • Ruler (Optional)
  • Black Marker (Optional)

Let’s begin!

Part 1: Starting the towel –

The first thing we need to do it cut the towel in half, like this:43592885_483374518835072_2761795955673006080_n

As you can see, mine, isn’t completely even, which in normal because of the brand of towel I am using. It doesn’t have to be perfect!

Take one of the sides, of the towel, that you want to work with and lay it flat in front of you. If this is your very first time making this towel, I suggest grabbing a fine point black marker, it will make this next part easier.

Starting from the right side, take a ruler and measure 1/4 of an inch, place a dot with your marker and do that all across the towel. Make sure you are also 1/4 of an inch away from the top of your towel.

Untitled.png
If you aren’t good with measurements, here is 1/4 of an inch on a ruler.

Once you are done making the dots, you can begin! Take the smaller crochet hook (3.0mm) and some yarn. Poke your crochet hook in the very first dot, where you started on the right, pull some yarn threw that first hole and slip stitch (sl st) to lock in the yarn.

You are going to do this all across the towel, until you reach the end. Be careful that you don’t snag any of the towel strings, it can happen for some towel, especially for thin ones.

20181024_130853.jpg
This is what it should look like after you finish the first part.

When you reach the end, turn your work and switch the crochet hook to a bigger hook (5.0mm), and chain 1.

Part 2: Crocheting the towel –

Row 1 – Single crochet (sc) in between each stitch. Chain (ch) 1.

*Note – I am considering this as the first row because this is when we are actually starting to crochet.

Row 2 – Double crochet together (dc2tog) for the entire row. If you end up with an extra stitch that you can’t double crochet together, just do a simple double crochet (dc). Turn your work and chain (ch) 1.

Row 3 – Double crochet (dc) across. Turn your work and chain (ch) 1.

Row 4 – Single crochet (sc) across. Turn your work and chain (ch) 1.

Row 5 – Double crochet together (dc2tog) across. Turn your work and chain (ch) 1.

Row 6 – Single crochet (sc) across. Turn your work and chain (ch) 1.

Row 7 – Double crochet together (dc2tog) across. Turn your work and chain (ch) 1.

Row 8 – Single crochet (ch) across. You should end up with 8 stitches. This is needed for the button hole!

  • If you have 1 extra: Make a single crochet together (sc2tog) in the last two stitches.
  • If you are missing a stitch: Add another single crochet (sc) in that last stitch.

Turn your work and chain (ch) 1.

Row 9-13 – Double crochet (dc) across. Make sure that each row still ends with 8 stitches. Turn your work and chain (ch) 1.

Row 14 – For the last row, I’m going to break it down:

  • Single crochet together (sc2tog) in the first 2 stitches.
  • Half double crochet (hdc) in the next stitch.
  • Double crochet (dc) in the next stitch.
  • In the same stitch you just made the double crochet (dc), treble crochet (tr) in that same stitch. Chain (ch) 3.
  • In the next stitch, make a treble crochet (tr) and in that same stitch, make a double crochet (dc).
  • Half double crochet (hdc) in the next.
  • Single crochet together (sc2tog) in the last 2 stitches.

Fasten off and weave in any extra strands.

Part 3 – Button

Sew on the button in between the middle of the 8th row. Make sure that it is in the middle.

And you are finished!

These are a perfect gift to make for anyone! Especially, for craft fairs and such. Enjoy this pattern and if you make one of these towels using my pattern, please feel free to tag me on Instagram by using the hash tag #KatiePurrPurr.

*I created this pattern to my own liking, I do own it and you are more than welcome to use it or share it, but please do not take this pattern to sell as your own. When sharing this pattern, please make sure that you link it back to my blog. Any questions on the pattern, feel free to contact me*

Posted in Arts and Crafts, Crochet, Intermediate Patterns

Crafty Sassy: Halloween Jar Cozies (Intermediate)

Hey dearies! So, the Halloween Jar Cozies won for me to make on tonight’s live on my Facebook page! If you would like more information about that, scroll all the way to the end.

This is probably going to be on the the most challenging projects that I have tried, so bare with me! I want to shout out to Red Heart for this free pattern! Here is the link of the actually pattern:

Click to access LW4910.pdf

*Note: I don’t own this pattern, all rights go to the owner of the pattern. I make the pattern easier to understand, in my own words, but I DO NOT own this pattern!*

Here’s what you will need:

  • Medium Yarn
    • Red Heart Pumpkin, is what I’ll be using when I go live.
  • Crochet hook sizes 5.0mm and 3.75mm.
    • The smaller crochet hook is used to make some of the faces, you don’t have to do that.
  • Black Fabric
    • This is an option if you are a beginner.
  • Stitch marker
  • Sewing Needle
  • Row Counter
    • You can use a piece of paper, but I recommend using a counter, whether you use one on your phone or have a digital one like myself.

Let’s begin!

Grab your 5.0mm crochet hook and some yarn. Make a magic circle or an adjustable ring.

Round 1: Make 6 single crochets in the magic circle. Make sure that you don’t join this round! Place a stitch marker at the beginning of the round.

*Note: As we keep working up, move the marker up after the end of every round. It will make it easier to keep track of where we are at for each round. 

Round 2: Make 2 single crochets in each of the stitches, until you reach where the marker is.

Round 3: Single crochet in each of the next 2 stitches. Make 2 single crochets in the next stitch. Repeat until your reach the marker.

Round 4: Single crochet in each of the next 2 stitches. Make 2 single crochet in the next stitch. Repeat until you reach the maker.

Round 5: Single crochet in each of the next 3 stitches. Make 2 single crochet in the next stitch. Repeat until you reach the maker.

Round 6: Single crochet in each of the next 4 stitches. Make 2 single crochet in the next stitch. Repeat until you reach the maker.

Round 7: Single crochet in each of the next 5 stitches. Make 2 single crochet in the next stitch. Repeat until you reach the maker.

Round 8: Single crochet in each of the next 6 stitches. Make 2 single crochet in the next stitch. Repeat until you reach the maker.

Round 9: Single crochet in each of the next 11 stitches. Make 2 single crochet in the next stitch. Repeat until you reach the maker.

Round 10: Single crochet in the back loop only, of each stitch around.

*Note: If you don’t know how to single crochet from the back loop only, here is a link to a video that will show you how:
https://www.youtube.com/watch?v=phf7Nj0_LJg

Round 11-15: Single crochet in each stitches around.

Round 16: Single crochet together over the next 2 stitches. Single crochet in each of the next 24 stitches. Repeat once more.

Round 17-33: Single crochet in each stitch around.

Fasten off and you can remove the marker!

Now that we have completed the base, you can leave it how it is or take some black fabric and shape it to look like a pumpkin.

Best part about this pattern is that you can use whatever color you want and it would be the perfect cover for gifts, especially if you can! If you are looking to make it for a larger jar, check the pattern and look at the gauge.

I will be going live on my Facebook page tonight, showing you how to make this! If you are intersected in watching me make this, check out my Facebook page and make sure that you like my page, so that you can keep up to date on when I go live or make sure you don’t miss the polls!

Posted in Arts and Crafts, Beginner Patterns, Crochet

Crafty Sassy: How To Crochet A Flower Pin (Beginners)

20180928_123311.jpg

Hey dearies! You are probably wondering why you are getting a Crafty Sassy on a Friday, so let me tell you why! Since this coming up week will be the beginning of October, I have decided to go live twice, for the month of October!

So, I wanted to show you guys how to make this flower pin, because it also goes with the headband I showed you guys how to make on Tuesday. So, I will be going live on my Facebook Page. More information on that will be at the bottom of this!

Let’s get started! First thing, let’s talk about what you will need for this project:

  • Medium Yarn
    • Any color of your choice. Since this flower goes with the headband, you can match a color to go with it or whatever color you feel works best!
  • Crochet Hook 4.5 mm
  • Sewing needle
  • 1 Pin back
    • It doesn’t required any fancy pin, a safety pin would work find as well!

Part 1: Making the flower

  • Step 1: Chain 53
  • Step 2: Double crochet in the 3rd chain from the hook. Double crochet in every following chain across.
  • Step 3: Chain 1 and turn your work. *Single crochet in the next space. Make 5 double crochets in the next space* (The stars are to let you know that you have to repeat, until you reach the end or if they say otherwise)
  •  Step 4: Fasten off and make sure you leave a long tail because we will be using it to sew the flower altogether.

Part 2: Sewing the flower together

  • Step 1: Loosely arrange the layers to form a flower.
  • Step 2: Using a threaded yarn/sewing needle, stitch each layer of the flower together, ending on the back side.
  • Step 3: Draw the threaded needle through the pin back. Secure the pin back onto the back of your flower and cut the excess yarn to complete the flower pin. And your done!


Having a pin, on the back of your flower, can make it so you can wear it on hats, scarfs, headbands, necklace, etc. So there’s not just one use for this project.

Anyway, I will be going live tonight on my Facebook Page. If you haven’t like my Facebook Page, here is the link!
https://www.facebook.com/katiesblog96971617/

Let’s talk about the NEW plans for the month of October!

I plan on bring Crafty Sassy to you on Tuesday’s and Thursday, just for this month! Instead of the normal stuff that is for beginners and such, I’ve decided to make this month a ‘holiday special’. I will be doing the same for November and December.

If you have any projects that you want me to show you how to make, leave a comment down below, message my Facebook page, or even e-mail me at katie_farrington@aol.com!


Posted in Arts and Crafts, Beginner Patterns, Crochet

Crafty Sassy: How to Crochet a Basic Headband (Beginners)

20180925_150307.jpg

So, there was a tie on my Facebook page on whether I should make the Rose or the Headband, but since the headband has been in the last few polls, I figured I would show you how to make one.

Now, I haven’t mastered this pattern completely, but it is a very fun pattern to make! Especially, if you are a beginner. The Rose actually goes with this headband, so I figure we can make the headband and I then can show you how to make the rose and show you how to put it on, as well.

As always, let’s talk about the supplies you will need:

  • Medium Yarn (Color of your choice)
    • I decided to used the ‘I Love This Yarn’ multi-color yarn to show you guys what it should look like.
  •  5.0 mm Crochet Hook
  • And of course, a sewing needle!

20180925_150444.jpg

So let’s get started!

Step 1:  Chain 44. Now, found it easier to count out loud, while making the chains, just so I don’t lose track of how many chains I made.

Step 2: Make 2 double crochet’s in the 3rd chain from the hook(NOT counting the chain that the hook is on!). *Skip 2 chains, single crochet in the next chain. Chain 2. Make 2 double crochets in that same stitch.* Repeat until you reach the other end, then make a single crochet in that last chain.

Note: The * represent where you start and end. Basically, you are repeating the same step until you reach the end. I will be putting in * to help you know what you need to do! A lot of crochet books use them and they are very helpful! If you are stuck or need help, let me know down in the comments!

Step 3:  Chain 2 and turn your work. Make 2 double crochets in the next available stitch. *Single crochet in the chain-2 part of the work. Chain 2. Make 2 double crochets in that same space.* Repeat until you reach to the other side and then single crochet the top of the last row.

Step 4: Repeat Step 3. Twice. You should have 4 rows altogether.

Step 5: Chain 30. Then slip stitch to the opposite side of your project. Slip stitch across that small side and then chain 30. Slip stitch to the other side and slip stitch across that side. Once you are done, cut your yarn and pull your crochet hook up and pull that end piece of yarn tight.

Step 6:  Sew in any yarn that is hanging around and then you are done!

Note: If your headband does not fit, you can always 4 chains add or decrease 4 chains, to fit your size head. If you are looking for it to fit a baby or child’s head, this might not be the project for that, but you can try and make it work!

For Example: If the headband was too small, I would chain 48. If the headband was too big, I would chain 40. 

If you have any questions, feel free to ask me! I’ll try my best to help you out!

20180925_150941.jpg

Also, don’t forget to check out my Facebook page, I have a poll up every week on what project I should do next! Since Halloween is just around the corner, be prepared to be Spooked!
https://www.facebook.com/katiesblog96971617/

Posted in Arts and Crafts, Beginner Patterns, Crochet

Crafty Sassy: How To Crochet Mug Cozies (Beginners)

Hey dearies! So, today I am going to tell you how to make these super cute mug cozies! Since summer is slowly starting to change into fall, I figured I would show you how to make these cozies, which are perfect for giving away, with mugs, as a gift for the holidays!

This was also the winner for me to make on this weeks Facebook Live! If you don’t know anything about that, scroll all the way down for more information about it!

Image result for mug cozy

As always, before we begin a project, let’s talk about the stuff you’ll need:

  • Medium Yarn (a color of your choice)
  • Crochet Hook 4.5mm or a 7 in U.S
  • A button of your choice
  • As always, a sewing needle

Let’s begin!

Step 1: Make a slip knot onto your crochet hook and chain 8.

Step 2: Single crochet and double crochet in the 2nd chain from the hook. Remember, we are NOT counting the chain that is on the hook itself.

Step 3: Skip the next chain and then single crochet and double crochet in the same chain. Repeat this til you are at the end of row 1. Chain 1 and turn your work.

Step 4: Skip the next stitch and do a single crochet and a double crochet in the next stitch. Repeat til the end of the row. Chain 1 and turn your work. Repeat this step until your work measures 8 in., from the beginning of your work.

Step 5: Skip the first stitch and slip stitch in the next 2 stitches. Then do 1 half double crochet in the next 4 stitches. Chain 1 and turn your work.

Step 6: Now, we are going to work on the buttonhole strip for the next 4 stitches. Do 1 half double crochet in each stitch. Chain 1 and turn your work. Repeat this step until your buttonhole strip measures 2 in. long.

You can always put a marker, if this helps with keeping track from where the buttonhole strip starts, you don’t need to do this, but it can help with making sure it’s measured correctly.

Step 7: Do 1 half double crochet in the first stitch. Chain 2. Skip the next 2 stitches. Make 1 half double crochet in the last stitch.

Step 8: This step, is for making a boarder around the project. Work a single crochet stitch evenly around. Working 3 single crochets in the corners and 2 single crochets in the chain 2 buttonhole space. Join them all with a slip stitch in the first single crochet from where you started.

Step 9: Fasten off the extra strands into your project and sew on your button! Then you are done!

*Tip* – For attaching the button, wrap your cozy around your mug so you can see where you want to put the button. Mark it with a pin, thread your needle and sew on the button, making sure to remove the pin. You don’t have to do this, but it was very helpful for me!

I will be going LIVE on my Facebook page, showing you how to do this. If you haven’t already liked my Facebook page, please do! I give updates on my blog and YouTube channel.

I also post polls on what I should make next on my Facebook page, and which ever one wins, I go live and show you how to make them!

Check out the link!
https://www.facebook.com/katiesblog96971617/


Posted in Arts and Crafts, Beginner Patterns, Crochet

Crafty Sassy: How To Crochet A Granny Square (Beginner)

Today, we are going to talk about the most basic and easier square you can crochet. Granny square can be used to make mini squares, or one giant square! We are going to make a small, simple one.

I am going to point out that everyone has their way of crocheting the granny square. So, if you don’t think it looks right or you don’t like that pattern, then you can always search and find a pattern that works for you!

So, one of my kinda BIG crocheting projects, was the giant rasta color granny square, that I am making for my fiance. Its’ basically a giant granny square. It’s not done, but the bigger it gets, the more difficult it can be on your wrists.

Let’s talk about what you will need:

  • Medium Yarn (If you want, you can choice multiple colors, but I will be using just one solid color, to make it easier for you.)
    • Remember: If you are a beginner, try to stay away from dark colors.
  • Crochet Hook: 5.5mm
    • For the hook, it doesn’t have to be that size, but I found it was easier to work with in the video I watched.
  • Sewing Needle


Now that we having everything we need, we can get this project started!

Step 1: We are going to create a slip knot and pull tightly onto our hook. We are then going to chain 6. Then slip stitch the other end of the chain.

Step 2: Now that we have our circle, we are going to start by chaining 3 (Remember: This counts as 1 double crochet.) Then we are going to double crochet 2 times into the circle. I left a picture done below, just in case you need a refresher.

Image result for double crochet stitch

Step 3: Now, we are going to crochet 3 double crochets in the ring and then chain 3. Do that 2 more times. You should have something like this.

Image result for granny square first step

Slip stitch in the top of the chain to fasten off the base of the granny square.

Step 4: Now we are going to create the second row of the granny square. You can add on another color, if you would like, I’ll leave a picture down below showing how you can do that.

Image result for changing color stitch

Chain 3. (Remember: This will count as our first double crochet!) I always turn my work, but because this is a granny square, you don’t have to turn your work. We are going to now working in the open space with the following:
-Work 2 double crochets. Chain 3. Work 3 double crochets. Chain 1.

Step 5: 3 double crochet, chain 3, 3 double crochet, chain 1, into each space. Slit stitch to finish the second row.

Depending on how big you want your square to be, you are basically repeating steps 2-5.

I will be going live on my Facebook page, if you want to see it done. Make sure to like my page and follow me for more updates on when I post any posts on my blog or for when I go live! Here is the link:
https://www.facebook.com/katiesblog96971617/

I will be working on a video tutorial and create another blog post for those who aren’t beginners and just want the simple pattern.

I’m going to leave this link down below, if you would like to see a slowed down version of the granny square that helped me when I first started to learn how to make one. The Nervous Knitter is amazing and you should check out her other videos:


Posted in Arts and Crafts, Beginner Patterns, Crochet

Crafty Sassy: How To Make A Crochet Hanging Towel Holder (Beginner)


So, the winner to my Facebook page’s poll was the Hanging Towel Holder! Today, I am going to show you how to make these awesome hangers. I will also be going LIVE, on my Facebook page, showing you how to make these hangers. If you are intersected, I will leave the link to my page, don’t forget to like my page, so you don’t miss out on any of my lives!

Link to my Facebook page:
https://www.facebook.com/katiesblog96971617/

Things you will need:

  • Medium Yarn(Any color of your choice, try to avoid using black or dark colors)
  • 1 or 2 Thin Bracelets or Thick Hair Ties(The Goody Ouchless Super Thick Hair Ties are preferred,
  • Size 4.0mm Crochet Hook
  • Button (Bigger than an inch)
  • Sewing Needle (To sew any unwanted strands.)

Before I get started, I want to say thank you to Naztazia, she is the one who made the pattern available to use for free and also created a YouTube video on how to make this towel holder!

Her website:
http://naztazia.com

Her YouTube Channel:
https://www.youtube.com/user/naztazia

Here is the link for the free pattern itself:
https://www.ravelry.com/patterns/library/830272


*So, because this is a pattern from someone else, I am going to explain in my way how to make these. I just want to put out there that this is NOT my pattern and I wanted to give FULL credit to the creator. With that being said, all rights go to the creators, not me.*

Step 1: Decide on whether you are going to use 1 or 2 thin bracelets or the super thick hair ties. Then, make a slip knot on to your crochet hook. When I got live, on my Facebook page, I will be using the thin bracelets.

Step 2: Take your crochet hook and put it into the circle and yarn over, bringing the yarn back in the circle. Pull it through all loops, making sure you only have one loop on your hook, making a slip stitch. Chain 3.

Step 3: Once you have chained 3, take your crochet hook and put it back through the bracelet, yarn over, just like you did for creating the slip stitch, but instead of making another slip stitch, we are going to double crochet. Here is a picture on how to double crochet, just in case you forgot.

Image result for double crochet stitch

Step 4: You are going to double crochet 50 stitches, add more or less depending on the size of the bracelet or hair tie. When you get to the last one, slip stitch to close the ring.

*Remember: The chain 3 counts as 1 double crochet!*

Step 5: Chain 1. Then, make 8 single crochet stitches across. Here is a picture down below, just in case you forgot.

Image result for Single crochet stitch

Step 6: Chain 1 and turn your work.

Step 7: Keep making single crochets across for 17 rows. Make sure you chain 1 and turn your work after finishing each row. You can use a row counter if that helps you remember how many rows you have left to do.

Step 8: Once you are done row 17, chain one and turn your work. This next part can be tricky, so I’m going to break it down, so you don’t get confused.

  1. You are going to single crochet in the first one, but instead of yarning over, you are going to go into the next stitch and single crochet, you should have 3 loops on your hook. This is called a single crochet decreased. Yarn over and pull the yarn through all hoops.
  2. Next, half double crochet in the next stitch. Here is a picture, just in case you forgot, but it is basically doing a double crochet, instead of pulling through 2 twice, you pull through all of the loops. Image result for half double crochet stitch
  3. Double crochet in the next stitch.
  4. In the same stitch, that you did the double crochet, crochet 2 trebles. Here is a picture down below, just in case you forgot. Image result for treble crochet stitch
  5. Chain 1.
  6. In the next stitch, do 2 treble crochet.
  7. Double crochet, in the same stitch you did your trebles.
  8. Half double crochet in the next stitch.
  9. Single crochet the next stitch, but we are going to do another single crochet decrease, just like we did for the start of this row.
  10. End the project, but cutting the working yarn and pulling your hook up. Sew in the tail into the project.

Step 9: Sew the button onto the project, make the button in the middle, just above the ring. In between the ring and the first or second row. Sew and cut any wondering strands of yarn. You’re done!

Don’t forget to check out my Facebook page, where I will be going LIVE, showing you guys how to make this.

I also want to give you guys an update that because I now have a better camera to show you guys how to make these amazing things, make sure you check out my YouTube channel because I am going to try my best to add more content, like this, to it!


Posted in Arts and Crafts, Beginner Patterns, Crochet

Crafty Sassy: How To Make A Towel Topper (For Beginners)

20180828_080830.jpg

Today, I’m going to try to teach you guys how to make these simple towel toppers. My great-grandmother has been making these for years and we always had a few of these hanging around the house. To this day, she still makes them, but not as much as she used to.

I am basing this pattern off of what I have seen on YouTube, other free patterns that they have on the internet, and going by one of her towels. I have NOT perfected this pattern. My great-grandmother never really wrote down her pattern or anything like that, she is one of those ‘make it as you go’ type of crocheters.

I will make a better blog post on the towel topper, but for now, I’m gonna show you how I managed to make my first one.

So, first thing first, lets list off the supplies you will need for this project:

  • Kitchen Towel
    • Any type of towel you can use, but use one with more of a thickness, it makes it easier to work with, in my opinion.
  • Medium or Size 4 Yarn
    • Chose a color that would match with your towel design, if it has any. Try not to chose black, it is harder to work with, same with darker colors.
  • Button
    • I chose to get a pack of white big (not giant) buttons. White matches with mostly anything, and for this being my first towel, I figured it would be easier to work with. You can chose whatever color buttons that you think would fit for your towel, as long as they aren’t the small buttons.
  • Sewing Needle
    • Normal sewing needle, nothing really special. It can help with poking holes through the towel.
  • Crochet hooks: 2.25mm and a 4.5mm
    • These are the hooks I used, I might change the sizes, but the reason why you need two is the smaller one will be for bring the yarn through the towel itself, while the other one will be for the actual crochet part of the towel.

Now that you know what you need, let’s begin!

Step 1: Take the towel, you have chosen to use and fold it in half, hamburger fold, if that makes it easier to visualize. Cut the towel in half.

The reason for this is that if you have a long kitchen towel with the same design, on each side, you’ll be able to make two different towels.

Image result for kitchen towels

Step 2: This next step is going to be a little tricky. You can use the sewing needle to help poke holes in the top of the towel, I found that easier than taking the small crochet hook (2.25mm) and poking it through.

Once you poke your crochet hook through and pull through you yarn. Then, you are going to yarn over and pull through both loops, basically doing a slip stitch.

You repeat this step until you reach the other side of the towel.

*Remember to try not make your holes too close or too far apart. A few of the videos that I watched recommend being a quarter of an inch away from the top of the towel and from your last stitch, or hole you made. It doesn’t have to be exact, but whatever works for you.*

Step 3: Turn your work over. Now, we are going to switch our crochet hook, switch to the 4.5mm. Chain 1.

We are going to double crochet in between each of the stitches of the towel. You are going to keep doing that until you reach the other side of the towel.

*How to double crochet*

For this project, you are going to yarn over, go through or in between the stitches and then yarn over again, go through the first two loops, yarn over and go through the last two loops.

Image result for double crochet stitch

Step 4: You are going to repeat Step 3, for this next row. Instead of going in between the stitches, you are going to go in between each double crochet that we made in the first row of double crochets.

Once you reach to the other side, turn your work over and chain 1.

Step 5: For this next row, we are going to still double crochet, but we are going to skip every other one. For your first double crochet, you are going to double crochet in the first spot, but skip the one next to it.

You keep going until you reach the other side. Make sure to turn your working and chain 1.

Step 6: Repeat Step 5, making sure to skip every other one. Once you reach to the other end of the towel, turn your work and chain 1.

Step 7: As you can see, the towel topper is now starting to become smaller, which is what we want it to do. Now, we are going to repeat Step 3, making sure we double crochet into each one. When you get to the other side, turn your work and chain 1.

Step 8: Repeat Step 3. Turn work over and chain 1.

You are going to repeat Step 3, and making sure you turn your work when done that row and chaining 1. For the next 5 rows.

Step 9: Once you are done double crocheting those last 5 rows, it is now time to finish off the project and make the opening for the button to go through.

Now, everyone does this differently, but I am going to do it differently from what my great-grandmother does.

After you turned your work and chained one, you are going to do 2 double crochets. Chain 2. Skip the next 2 stitches. Then do 3 double crochets.

Step 10: This is the last row we are going to crochet. So, make sure you turn your work and chain 1. We are basically going to double crochet, for the last row.

When you get to the open space, you are going to double crochet twice in that opening.

We you get to the end, bind off by cutting the yarn you were working on and pull your crochet out, don’t remove the crochet hook from the loop, pull it up, so that the yarn is bind off.

Step 11:  The last step is simple, all you have to do is sew the button into the middle of the project, just like shown in the picture above. Then it is complete!

Like I said in the beginning, I will have a better post, when I have mastered a pattern and will update you guys on it. These towels have been a gift for any event or celebration. I love having these because you can hook in on your stove handle, especially if you have one made for the theme for your kitchen.

If you are intersected in learning how to do this, I will be going LIVE on my Facebook page, tonight! Like my Facebook page, because I do post all my blog posts on their, as well as my twitter. Click the link below:
https://facebook.com/katiesblog96971617/


Posted in Arts and Crafts, Top Projects for Crochet/Knitting

Crafty Sassy: Top 10 Crochet Projects You Can Profit From

Everyone loves hand-made crafts. Not a lot of people invest their time into them, but others, like myself, have more projects on your mind that you just don’t know where to start. Well, since I am a stay-at-home mom, I figure I would list some projects that could make you some extra cash on the side.

  1.  Towel Tops
    Image result for crochet towel toppers
    This is probably one of the most popular items you can make and they can sell pretty fast! You just buy a regular kitchen or hand towel and crochet the top so that you can hang it on your stove hanger.

    My great-grandmother always made these and they would be gone before you know it. They are very simple to make and there are a lot of videos on YouTube that can show you how to make these.

    Best part about making these is that you can use any towel, even for holidays! Which is pretty amazing! You always don’t have to do the same pattern either, there are many patterns out there that you can use. From one button to two, it’s completely up to you!

  2.  Towel Hangers
    Image result for crochet towel holder pattern
    I found this a few days ago and this would probably sell like hotcakes, just like the towel tops. The only difference between these and the towel  toppers is that you can hang whatever towel you would like.

    Instead of crocheting the towel itself, you crochet along a hair tie or an elastic band. These too, are pretty simple to make. Best part about these, is that you can make them any color you want them. Again, you can find a few great tutorials on this on YouTube.

  3.  Blankets
    Image result for crochet blanket
    These will always be on the list, but they do take up a good amount of your time, depending what kind of design you are going for. However, baby blankets might be the easiest thing to make, just because they are the smaller version of a big blanket.

    I know a lot of people will save the bigger blankets for family. Don’t get me wrong, they can make you some cash, you just have to be very detailed on how long it might take and you might have to use all of your spare time to finish it in time.

  4.  Hats
    Image result for crochet hats
    These will always be on the list. Hats are a quick and easy thing to make, especially kid hats. A lot of people would buy these with a gloves, scarf combo. Depending on how good the work is, you could make some serious cash(Not enough to pay rent, though. Unless you can supply the demands.)
  5.  Scarfs
    Image result for crochet scarf
    I loved getting scarfs, my great-grandmother would always make the fuzzy ones and get them to us, in our favorite color, for Christmas. I still  have a few from when I was little. Like I said with the hats, it would be a great combo to do together!
  6.  Place mats
    Image result for crochet placemats
    Not a lot of people have crocheted place mats, but they are something someone could sell. You could also be able to customize them for holidays, with different colors and patterns! A set of four would most-likely sell like hotcakes, too!
  7.  Coasters
    Image result for crochet coasters
    Coaster aren’t something you would see at a craft fair, but they are an amazing idea to make for one! A lot of people don’t have coaster, but they don’t want to spend too much money on them.

    These are very easy to make and they can be crocheted, but some of them can be made by hand!These would go great with place mats.

  8.  Gloves/Mittens/Arm Warmers
    Image result for crochet arm warmers
    Gloves might be a expect level project, but mittens would be a lot easier to make. Same with arm warmers, they might be easier to make as well. Arm warmers could also be part of the combo, you can either replace the gloves, or add it to the combo of hats, scarfs and gloves.
  9.  Pins
    Image result for crochet pin
    Yes, there is such a thing as crocheted pins! Although, you would have to work with smaller and finer yarn, they are very amazing to make. Especially, flower ones!
  10.  Mini Stuffed Animals/Characters
    Image result for crochet stuffed animals
    You probably seen these all over the internet or Facebook. They can be very challenging for a beginner. They have all kinds of different characters or objects that you can crochet into stuffy’s.

    Amazon has a wonderful Disney Princess Crocheting Kit, that I haven’t tried out yet. They have a booklet on how to make every princess, but they only give enough yarn to make two. I highly recommend getting it, just for the booklet!


Are there any projects that you see at craft fairs that I missed? Comment down below and comment of which one you see would be more in an high demand!

*Note*

  • These aren’t a quick way to earn millions of dollars. This would be something you would earn on the side for some quick cash. If you make them with great quality and passion, I’m sure you could make a living doing it.
  • I just wanted to make a note, so that everyone knows this isn’t something you can get rich quick and fast. A lot of people make these as a hobby of theirs and put a lot of effort into their projects.