Posted in Arts and Crafts, Crochet, Top Projects for Crochet/Knitting

Crafty Sassy: Top 10 Free Crochet Costumes for Newborns

Hey Dearies! So, I wanted to make this post last year, but I changed my mind. Even tho my daughter will be turning two at the end of this month, I wanted to share some links to some super amazing patterns for newborns!

I didn’t get into crocheting until after my daughter was born and really missed out on making her one of these costumes to do a photoshoot for her. However, just because I missed out, I still want to keep in mind, just in case I ever get asked to make them in the future.

When it comes to looking for free patterns, for this type of project, it is a little bit of slim picking, but if you don’t mind paying for the pattern itself, you can find more Disney characters. (Which I will be making a post with links to those very soon!)

Even if you don’t know how to make them, always see if your friendly crocheters wouldn’t mind creating them for you. I love to getting sent a project to do, such as this, it gives me a challenge and something new to try out!

Disclaimer: None of the patterns shown are mine, all rights go out to their creators. I have left links to where the free patterns come from. Make sure that if you chose to make these, or have them made, that you give credit where credit is due to the original creator.

  • Baby Turtle

Turtle-Newborn-Photo-Prop-Free-Crochet-Pattern.jpg

Here is the link for this free pattern: https://coolcreativity.com/crochet/crochet-turtle-newborn-photo-prop-with-free-pattern/

  • Baby Cinderella

cinderella-dress-free-crochet-pattern--217x300.jpg

Here is the link for this free pattern: https://lovableloops.com/patterns/free-cinderella-dress-crochet-pattern/

  • Baby Chick

Baby+Chick+Infant+Cocoon+Photo+Prop.jpg

Here is the link for this free pattern: https://www.leftinknots.com/home/baby-chick-infant-hat-and-cocoon-free-crochet-pattern

  • Baby Dino

教程-副本-11.jpg

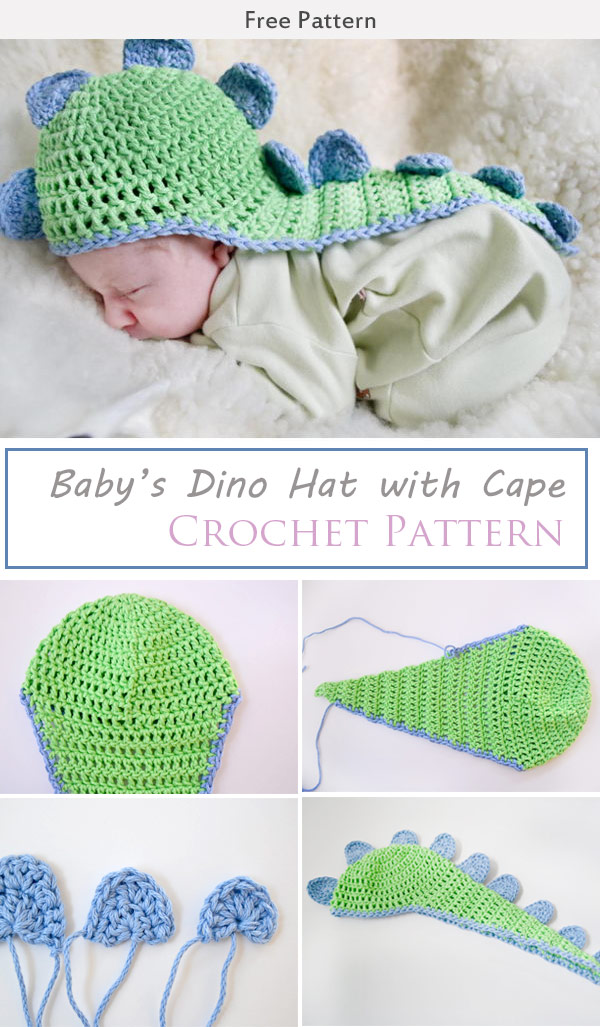
Here is the link for this free pattern: https://letscrochet.org/crochet/free-patterns/babys-dino-hat-cape-crochet-free-pattern/

  • Hello Kitty

IMG_0556-e1369147994896.jpg

Here is the link for this free pattern: http://dearestdebi.com/crochet-newborn-hello-kitty

  • The Hungry Caterpillar

教程-副本-14.jpg

Here is the link for this free pattern: https://letscrochet.org/clothing/baby-caterpillar-cocoon-crochet-free-pattern/

  • Baby Santa

1-Baby-Santa-Hat-and-Cocoon-Bunting-Free-Crochet-Pattern-1024x600.jpg

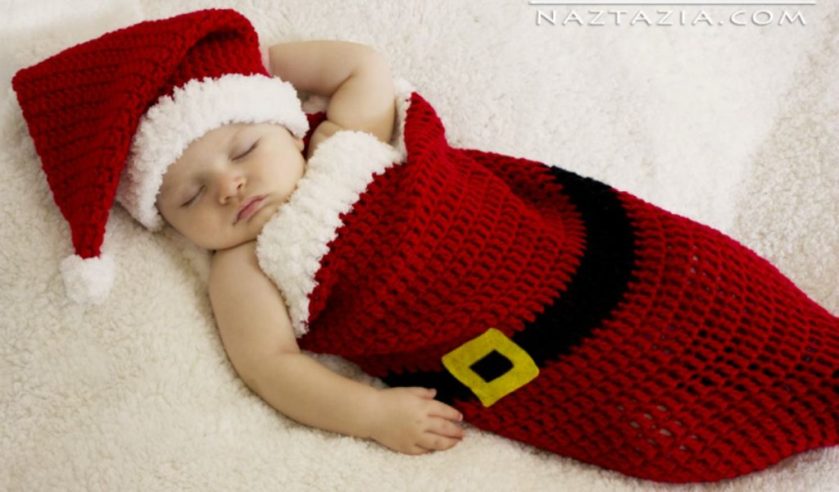
Here is the link for this free pattern: https://yourcrochet.com/baby-santa-hat-cocoon-bunting-free-crochet-pattern-video-tutorial/

  • Baby Firefighter 

Fireman Set.png

Here is the link for this free pattern: https://snugglyfoxdesigns.blogspot.com/2019/02/firefighter-overalls-and-hat-free.html

  • Baby Mermaid 

2e59f5756ff6ed7b22fe9f60f087794f.jpg

Here is the link for this free pattern: https://knitting-bordado.com/crochet-mermaid-baby-outfit-pattern-free/

  • Baby Unicorn

free-crochet-pattern-unicorn-hat-and-diaper-cover-225x300.jpg

Here is the link for this free pattern: https://lovableloops.com/patterns/free-unicorn-diaper-cover-crochet-pattern/

There you have it! A big shout out to the creators of these amazing patterns! Especially for beginners who are looking for something different to try out!


Posted in Arts and Crafts, Beginner Patterns, Crochet

Crafty Sassy: How To Make A Heart-Shape Bookmark (For Beginners)

This project, that I’m about to show you, is a very simple to make and is great for beginners, just like myself! I’m going to break down each step with pictures, and explain the process a little easier for you! I will also have a YouTube video in the makes for those who prefer videos to learn from.

First things first, let’s talk about what items you will need:

  • Meduim (Size 4) Yarn
    • If you are a beginner, I suggest working with light colors than dark ones. Lighter colors you will be able to see a bit better than dark colors.
    • Also, you will need 2 different colors, one for the heart and one for the stem, but if you want to stick with the same color, that is fine as well.
  • Crochet Hook: 4.5 mm/U.S. 7
  • Sewing Needle

Next, I will let you know what type of stitches that are involved with this stitch, I find it useful to know what kind of stitches the project requires, so that I can practice or get to know the stitches before hand:

  • Chain stitch (ch)
  • Double Crochet (dc)
  • Treble Crochet (tr)
  • Slip Stitch (sl st)
  • Small or Large Picot (For the stem)

I also what to remind you that if the first time you make this, it doesn’t come out perfect, that’s okay! It takes a lot of time and practice to make your projects come our perfect.

*Remember: You can always push your work back, if you feel you don’t have enough room to work your stitches in.*

Step 1: Make a magic circle. (Down below I have a slide show on how to make a magic circle. However way you make a magic circle, is totally up to you! This was how I learned to make them.

This slideshow requires JavaScript.

Step 2: Now that we have our magic circle, we can begin! Chain 4 (ch).

Step 3: Next, you will need to crochet 2 tr (Treble Crochet) into the circle. If you don’t know what a treble crochet is, here is a picture that can help you out with that!

Image result for treble crochet stitch

Step 4: Double crochet (dc) into the circle 3 times. Down below will be a picture on how to double crochet.

Image result for double crochet stitch

Step 5: Chain 1 (ch).

Step 6: 1 Treble Crochet (tr) into the circle. (You can look back up to the picture if you forget.)

Step 7: Chain 1 (ch).

Step 8: Double crochet (dc) into the circle 3 times. (You can look back up to the picture if you forget.)

Step 9: Treble crochet (tr) into the circle 3 times.

Step 10: Chain 3 (ch).

Step 11: Make a slip stitch (sl st) into the circle to secure your work.

That’s how you make the heart part of the circle. The next part is the stem or the actually bookmark itself. This might be difficult, so I’m going to try my best to explain it.

Step 12: Make a slip stitch (sl st) into the heart circle with a different color, or with the same color.

Step 13: Chain 42 (ch), or however long you would like it to be. You can make it longer or shorter, but I would stick to chaining 42, just so you can see how long or short you might want it to be.

Step 14: Count from your hook the 6th chain and make a slip stitch (sl st) into that 6th stitch.

Step 15: Then you are going to slip stitch (sl st) into each chain, until you reach the 6th chain.

Step 16: Now, we are going to make a small picot. Chain 3 (ch), insert your hook into the 3rd chain from your hook, the first chain that you made if it is a little easier for you. Then, yarn over and pull through all the loops.

Step 17: Repeat Step 15 and slip stitch (sl st) into each chain until you reach the 6th chain.

Step 18: We are going to now do a large picot. It’s basically the same thing as a small, but you just chain more. So, chain 5 (ch), insert your hook into the 5th chain from your hook. Then, yarn over and pull through all the loops.

Step 19: Repeat Step 15.

Step 20: Repeat Step 16.

Step 21: Repeat Step 15

Step 22: Repeat Step 17.

Step 23: Slip Stitch (sl st) all the way up til you reach the heart and slip stitch into the middle of the hole, in the heart and you are done!

20180821_123805.jpg

Here is what the finished product should look like! Mine isn’t perfect, but no one’s will be perfect the first time. Practice makes perfect!

*If you have already liked my Facebook page, I will be going LIVE tonight on my Facebook page showing how to make this! If you are interested, here is the link to my Facebook page! Please like and don’t forget to share!
https://facebook.com/katiesblog96971617/

Posted in Arts and Crafts, Top Projects for Crochet/Knitting

Crafty Sassy: 5 Easy To Do Beginner Projects For Crocheting

Looking at crocheting project, just looking at them makes you want to learn how to do it, if you are like me, you like to save the page you see them on and come back to it whenever you have time.

Some projects can be very tricky or confusing, so then you forget all about it and never look back until you see it again. This has happened to me so many times, that now that I know how to crochet, I try to go back and find them and see if I am ready to attempt them.

So, if you are truly wanted to enter into this fun and amazing hobby, sit back and check out these easy to do projects, if you are a beginner! Lets begin!

  1. Granny Square Blanket

20180724_070620.jpg

This is the current project that I am working on for my fiance. This is perfect for beginners! If you want to just make a simple blanket, this is perfect to do! Whenever I looked at a granny square blanket, I didn’t think I could make one.

If you don’t know, but I am a visual learner and need everything broken down step by step. YouTube was the first place I looked to find a video that would slow it down, and I finally found one, The Nervous Knitter.

She broke the granny square steps as slow as you can go, but it was easy to understand and learn. I always watch the videos first, before trying them, so I picked up on the steps very quickly. Once you learn how to do it once, it is like riding a bike, something you can’t forget.

If you want to check out her video, here is the link!


2. Scarf

Image result for crocheted scarves

Scarves will always be something that is easy to do. The only difficult thing about them is the patterns you choose. I didn’t understand why my grand-grandmother makes scarfs so much, but after realizing how quit they are to make, I understood why kept making them.

3. Bookmarks

Image result for crocheted bookmarks

You are probably thinking to yourself, bookmarks?? Yes, almost anything you can think of, you can crochet. Now, not all bookmarks are easy and I will be posting a how-to on how to do these ones.

These ones are as simple as granny squares, plus they are cute and pretty quick to make. Why have a plain boring paper or plastic bookmark when you can have a bright and colorful one instead!

4. Beanie Hat

Image result for crochet beanie

Just like the scarves, this is another quick and easy thing to learn how to do. So, if you are a beginner and don’t have any gifts in mind for a birthday or Christmas, you can always crochet a hat and scarf.

I haven’t had a chance to learn how to crochet, but really can’t wait!

5. Granny Square Patchwork Blanket (Mini Granny Squares)

Image result for crochet granny square blanket

I know that I already have the giant granny square blanket on here, but here is the other version that your grandmother might have around her house. The difference between this blanket and the other one I mention is that this is just smaller squares you sew together.

While the other one is just a giant granny square, this one you can get creative and mess around with different colors and see what works and what doesn’t.


Which one would you like to try out? Or which one should I show you how to make? Or which ones have you already made? Leave a comment down below!


Posted in Arts and Crafts

Crafty Sassy – Intro to Latch Hook Projects

I mentioned that I have worked with a few latch hooks, but I never went in detail on what they really are. Latch Hooks are like rugs that are made up of yarn on a grid. There are many things you can with latch hooks. I personally, like making pillows, but they are a lot of hard work.

Image result for latch hook grid

The picture above is what a latch hook looks before you start or add on anything. Also, that is the tool you use to ‘tie on’ the yarn. Now, if you are intersected in making one of these and you are just a beginner, I recommend buying a latch hook kit. It will come with everything you need: the grid, the cut up yarn, and the hook tool.

Image result for latch hook kit

Not all kits are the same! The picture above shows what you would get in a kit, but be warned, not all kits have their colored yarn organized perfectly like this! Some grid might actually have the print of the picture already on the grid, to help guide you through the process.

Also, if you haven’t noticed, most of the latch hook grids have multiple blue squared on them, that helps with knowing where to start, it you aren’t lucky enough to have a kit with the picture printed on the grid. Most of the squares are 10×10, by counting them, but some grid might be different and be like a 10×9 or 9×10.

Image result for latch hook how to

The process is very simple. I didn’t think so, at first, but it is very easy to do. The picture above with show you a little better than how I explain it.

  1. Take a piece of yarn, whatever color you need and wrap it around your hook, your latch hook tool.
  2. Take the hook, while holding on to the yarn that is wrapped around it, and insert into the grid, just the hook and make sure that the hooks open, as shown above.
  3. Next, take your end pieces of your yarn, remember, you still have it wrapped around you hook, and pull it into your hook, making sure that your latch hook tool flap, we will call it, doesn’t close. You have to make sure that stays open for this step!
  4. Then, take your latch hook and pull it through that square, where you want to place the yarn. The hook tool flap will close to keep the yarn in it’s place when you pull through the square.
  5. Last, but not least, tighten the knot and make sure it is on tight!
  6. Once that is done, you keep repeating until the project is done!

Image result for latch hook how to

Sorry, if I didn’t explain it very well. This picture above does a better job, but I figured I would give it a shot and try.

When you finish your project, you will noticed that you have extra strands of yarn leftover. Some kits will add more than enough to finish, other’s might give you enough to just barely finish the project. If you are like me and keep everything, keep the extra strands, just in case you need them for another project, you never know.

If the kit didn’t give you enough yarn, there is another way to get some more. You can always go to a craft store, or look online, and find the color yarn and cut it yourself, but using the size of what the kit gave you. Or, some craft stores will have the yarn cut up already for you, so if you are making the latch hook for someone, they have it for you to grab and go.

Latch Hooks is great for all ages, plus, if you are just starting to get into crafts and such, this would be the way to start out. You can do so much with latch hooks, they don’t just have to be a rug. They can be pillows, stuff animals, wall hangings, etc. They even have blank grids that you can freestyle.

The only downfall with the latch hooks, is that it can take up a lot of your time, sometimes. It’s nothing that you can pick up and finish all in one sitting, maybe if you are quick and did it all in one night, or had a small one to work with. This type of project is a pick up and finish later type of project.

Anyway, I will had a few pictures below of the latch hooks that I have finished. So far, I have made two pillows and two pillow cases. None of which have been for me, but all the ones I have given away, have loved them. Not because I did a great job, but it was something that I made for them and those are the best kinds of gifts!

20170416_094834.jpg

20161212_185354.jpg20180218_152714.jpg20180612_175756.jpg

If you are very intersected in wanting to make one of these, check out your local craft store. You won’t have much luck at a Walmart or Kmart, but Amazon does have a very wide selection!