Hey Dearies! Since this week is the week of Valentine’s Day, I wanted to find some more patterns for this lovely day! Even if you don’t celebrate it, hearts, like these can be the extra accessory to add to many projects!
Now, I looked around to find free patterns for these, but do keep in mind, I’m looking for different ways to crochet a heart. Like I said before, they can add the finishing touch to projects, such as hats, baby blankets, blankets, clothes, bags, and so much more! You can even make these to wear as jewelry!
Note: These are NOT my own patterns, I will be leaving links to these free patterns, but all rights go to the creators themselves.
Crochet Simple Heart
This pattern is fairly simple and very easy to make, it is also like how I made my bookmark or close to the same stitches. If you want a solid perfect heart, this would be the one you go for.
I love the idea of being able to make hearts in all sizes or in different sizes. This creator has three sizes, which is perfect if you are looking for a particular size for projects. Not to mention, these are great practice project for those who are wanting to learn how to crochet.
I think this idea is simple, but it is so beautiful! I think these would make a perfect pin or add a wonderful touch to a headband! Not to mention, it’s not like a normal rose shape or heart shape, its more unique and the pattern is amazing!
Technically, this is a coaster pattern, but there doesn’t mean it has to be just a coaster, you can make this to be a wonderful add-on to a baby blanket or a hat. Not to mention, this is a little different from how a normal shape heart is crocheted.
Here is another pattern, that has 3 different sizes, but they are a little different from the other ones that are on this list. They are more drawn together than the other ones but are just as quick and easy to create.
There we have it! There are many others that I found, but most of them were patterns that you had to pay for the pattern itself, which I only wanted to find the ones that were free.
Especailly, ones that were different or unique to create. Which ones are your favorites?
Hey Dearies! I know this is a day late, but here is it! So, this idea was also based on my daughter and her love of baby dolls, this project is a sleeping bag or pouch to put her babies in.
This again is another C2C design, which is also great practice if you are wanting to get better at the stitch!
Another note I wanted to add that I did not add a pillow to attach to it, but here is my pattern from last week if you want to add a pillow to this project. Here is the link for that pillow:
If you want to make the pouch bigger or small, all you have to do is adjust your hook.
This size is more like a small/medium size for a baby doll
Sewing
Now, if you aren’t familiar with the ‘C2C’ stitch, here is a wonderful video that Heart Hook Home has, that not only helped me understand how to do the stitch but also shows how to increase and decrease. Here is the video:
This pattern is great for learning and getting familiar with the ‘c2c stitch before moving on to bigger and more complicated projects.
The sleeping bag size is 25×41 squares, you can, of course, add or decrease squares to fit a small or large size baby doll.
Let’s Begin!
Sleeping Bag
Chain 5.
Row 1: Double crochet into the 3 chains from the hook and in the next 2 stitches.
Row 2: Chain 5. Repeat from row one. (This is how we increase.) Then flip your ‘square’, like you are going connect it. Slip stitch in the chain three, from the last square. Chain 2. Make 3 double crochets in that same space.
Repeat until you have 25 squares across. Once you do, after making your last square, slip stitch on the top of the square. (This is how you decrease). Chain 2 and make 3 double crochets in that chain 3 space.
Keep going until the other side has reached 41 squares and on that finally square, slip stitch on the top of the square. Chain 2 and make 3 double crochets in the chain 3 space. As you continue to go back and forth, you’ll notice the rows start to get smaller.
Chain 1 and single crochet about the piece and fasten off.
In the next part, you can either hand sew together or single crochet the two sides together.
Assembly:
Fold your project, the long way, or the ‘hotdog fold’. Taking your crochet hook (or needle) crochet or sew one of the longer sides. Once you reach the shorter side, fasten off. Then repeat on the other side.
Then you are done! Fasten off and weave in any loose ends.
There it is! A very simple sleeping bag for the baby dolls! Remember, you can always add a pillow as well! I just didn’t have time to do so.
Make sure you like my Facebook page and follow me on Instagram. I’m more active on my Facebook page than I am on Instagram.
Hey Dearies! So, today I have another super easy pattern for you all! Since we are still in the hot weather in Maine, I figured we would make some can cozies for our soda cans! This also goes with a set, so next week, I’ll show you all how to make the coasters that go with them!
If you are just starting out, this is going to be perfect for you! Especially if you don’t want to just make a dishcloth, which is what most crocheters recommend to start out.
Let’s talk about what you will need:
Medium Yarn
I’m going to be using a multi-colored yarn from Red Heart. I forgot what it was called since I lost the label for it.
5.0 mm hook
Sewing needle
Stitch Marker
Let’s Begin!
Round 1: Chain 2. Make 7 single crochets in the 2nd chain from your hook. Do NOT join, we will be working into a spiral. (7sc)
Make sure you place a stitch marker at the end of each row. Move the marker up after each row is completed. This will help you stay on track.
Round 2: 2 single crochet in the next 6 single crochets, single crochet in the last single crochet. (13 sc)
Round 3: *Single crochet in the next single crochet, 2 single crochet in the next single crochet* Repeat 6 times. Single crochet in the last single crochet. (19 sc)
Round 4: *Single crochet in the next 2 single crochets, 2 single crochets in the next single crochet* Repeat 6 times. Single crochet in the last single crochet. (25 sc)
Round 5: *Single crochet in the next 3 single crochets, 2 single crochet in the next single crochet* Repeat 6 times. 2 single crochets in the last single crochet. (32 sc)
Round 6: Working in the back loops only. Single crochet in each single crochet around.
Round 7: Single crochet around. Repeat until your project reaches your desired length. I’ll be crocheting until I reach about 3.5 inches tall.
Last Round: Slip stitch in each single crochet around. Fasten off and weave in all loose ends.
There it is! Sadly, I didn’t have any cans to actually use and show you how it would look, but I tried my best to shape it so it looks like it was holding a can. I think these are super cute and fun to make or have for guest to use!
Make sure you see next weeks blog post, it will go along with this pattern. It’s a coaster that is perfect for this can cozies!
Make sure you follow my Facebook page for updates on my blog and more extra fun stuff! I do lots of giveaways!
Hey Dearies! So, today I figured I would teach you how to create a simple washcloth! If you are very new to crochet, this would be the place to start! Creating washcloths are one of the most basic thing to crochet, not to mention, it helps you with learning how to single crochet.
When a beginner is looking for a project to practice on, washcloths are usually where they start from. You can make them with different stitches or styles! This particular pattern also shows you how to change colors and to create a simple single crochet border!
Let’s talk about what you will need:
Medium Yarn
This pattern requires two types of colors. You can use any colors you would like!
I’ll be using Red Heart Super Saver in White and Cherry Red.
3mm hook
Sewing needle
Stitch Marker (optional)
Now, let’s begin!
Using your main color, chain 35. (I’ll be starting with the White first.)
Row 1: Single crochet in the second chain from the hook. *Single crochet into the next stitch.* Repeat from * to the end. Turn. (34)
Tip: You can place a stitch marker at the end of each row, it will make sure that you don’t lose track or make sure that you don’t add any unwanted stitches!
Row 2-23: Chain 1. *Single crochet into the next stitch.* Repeat from * to the end. Don’t chain 1 on the last row, we are going to change colors at this point! (34)
Should measure about 4 3/4in (12cm). Change to your other color. (I’ll be switching to the Cherry Red.)
Row 24-25: Chain 1 with your second color. *Single crochet into the next stitch.* Repeat from * to the end. Don’t chain 1, when you are the last row.
Switch back to your main color.
Row 26-27: Chain 1 with your main color. *Single crochet into the next stitch.* Repeat from * to the end. Don’t chain 1, when you are the last row.
Row 28-29: Chain 1 with your second color. *Single crochet into the next stitch.* Repeat from * to the end. Don’t chain 1, when you are the last row.
Switch back to your main color.
Row 30-31: Chain 1 with your main color. *Single crochet into the next stitch.* Repeat from * to the end. Don’t chain 1, when you are the last row.
Row 32-33: Chain 1 with your second color. *Single crochet into the next stitch.* Repeat from * to the end. Don’t chain 1, when you are the last row.
Switch back to your main color.
Row 34-38: Chain 1 with your main color. *Single crochet into the next stitch.* Repeat from * to the end. Fasten off. Weave in any ends from switching colors.
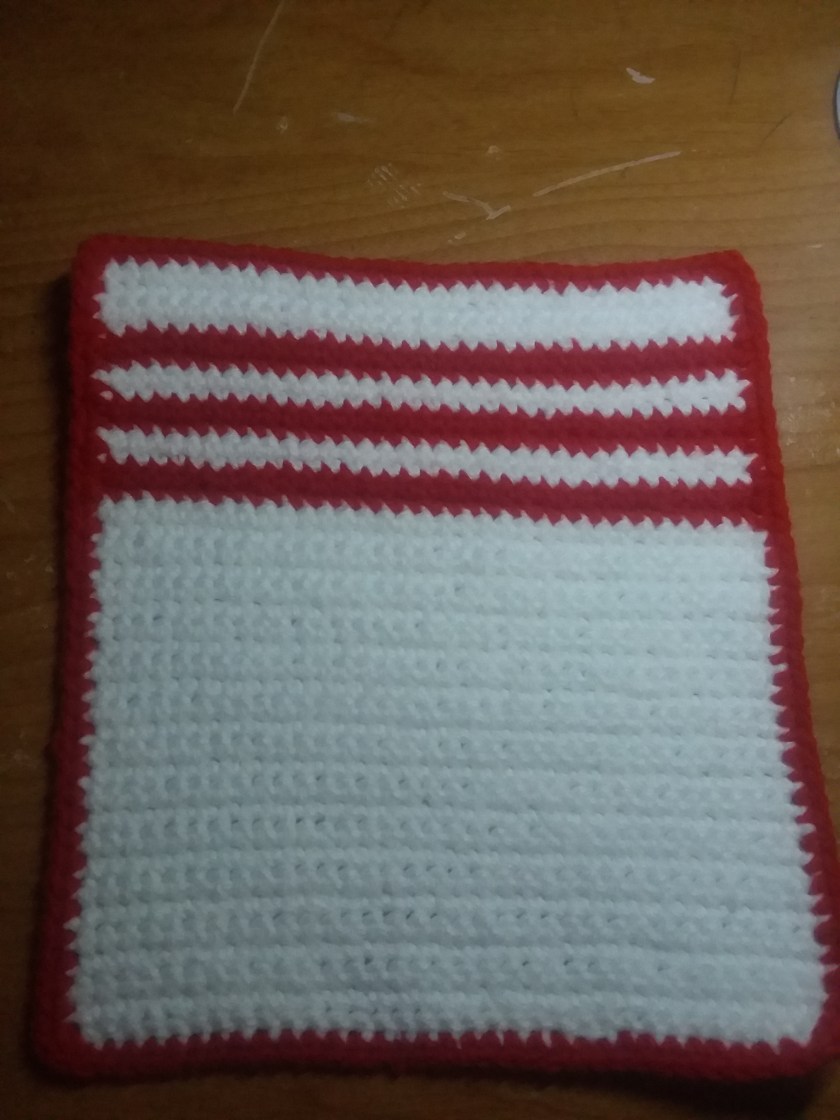
This is what it looks like the washcloth without the boarder. You can leave it like this, but for me, I think the border adds or makes it look better and evener.
Border
Grab the secondary color that you used for the stripes, and attach it to the side of the washcloth. You can start where ever, but I recommend not starting on a corner.
Chain 1 and then single crochet around your washcloth. When you get to the edges, make sure you make 3 single crochets in each corner.
Once you have reached to where you started, slip stitch into the next single crochet and fasten off. Weave in any loose strings.
There you have it! A simple washcloth for you! This was the very first one that I’ve ever made. I was one of those beginners that just jumped into beginner patterns and never got a chance to create a washcloth.
The best part, you can use this in the kitchen, bathroom, or living room! Where ever you need it! However, when you do finish creating this, it will be very stiff. The more you get it wet and use it, the more it will start to loosen up.
I recommend hand-washing these in lukewarm water, and having them air dry. Once they begin loose enough, you can put them into the dryer, but I would be careful. I’ve had a few projects unravel in the washer before.
Hey Dearies! I know I’m a little behind on the update, but I was currently out of the 50-degree yarn and of course, it was the last square for April. The yarn FINALLY came in yesterday, so I was able to finish up April.
So, this month, as you can see, we are starting to warm up a little more! Although it did rain quite a bit in April, we did have some nice days! We haven’t hit 70-degree weather, yet, but I’m pretty sure that we will see some next month for sure!
January, February, March, and April!
Now, as you can see, this blanket is getting pretty big! The more we get into summer, we will start to see the rise in temperatures quite a bit. In Maine, once it gets hot, it gets hot pretty quick before it stays like it.
Right now, this is my kind of weather. Not too hot, but not too cold. Just enough where you might need a sweatshirt, but even if you sit in the sun, you won’t want to have keep taking it off.
Just in case you forgot what colors and yarn I’m using, here it is:
100 degrees – Fire Red (I Love This Yarn) 90 degrees – Pumpkin (Red Heart Super Saver) 80 degrees – Bright Yellow (Red Heart Super Saver) 70 degrees – Jelly Bean (I Love This Yarn) 60 degrees – Green (Main Stays Basic Yarn) 50 degrees – Turqia (Red Heart Super Saver) 40 degrees – Soft Blue (I Love This Yarn) 30 degrees – Dark Orchid (Red Heart Super Saver) *Changed to the following – Violet (Red Heart With Love) 20 degrees – Orchid (I Love This Yarn) *Changed to the following – Orchid (Red Heart Super Saver) 10 and below – Light Gray (I Love This Yarn)
How do you tell which color to use?
I, personally, go with the overall temperature. So, let’s go by today, for example.
Today in Maine, the overall temperature is 17 degrees. I would choose the light gray.
Let’s say that it was an overall temperature of 22 degrees, I would choose the Orchid color. All my temperatures, for my colored yarn, has to have the same number first number. If that makes any sense, I’m sorry if it doesn’t!
What was the highest temperature for this month?
We are still in that 60-degrees mark. We haven’t hit 70-degrees, yet, but we were pretty close to it. As we begin May, we should at least see a few days that will hit 70-degrees.
What was the lowest temperature for this month?
We didn’t get as cold as 20-degrees is, but we did have a few days that were pretty low, which was 30-degrees
Do you post daily updates?
Yes, I do. On my Facebook page, I post a picture of the square for each day. I also tried to post every week’s worth, but it was hard to keep track of, so I’ll be posting monthly and daily instead.
If you haven’t liked my Facebook Page, here is the link below! It keeps you posted and updated on my temperature blanket and any updates for my blog and YouTube channel, as well!
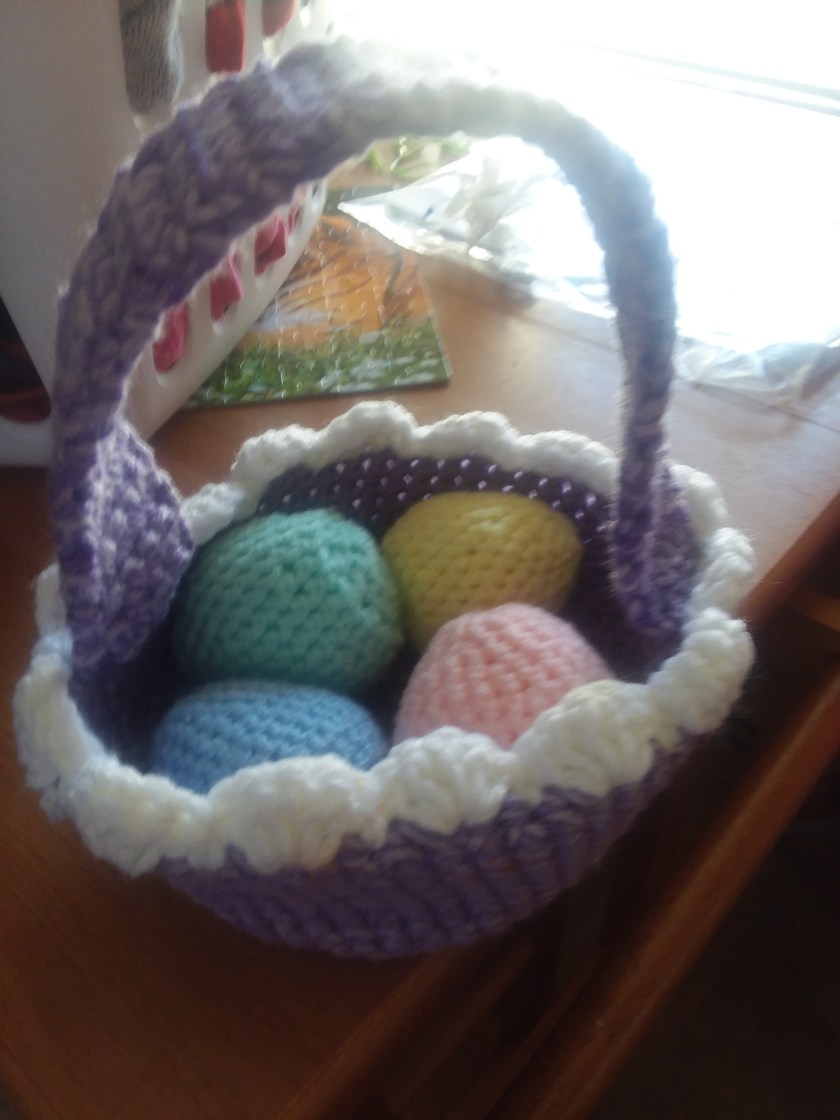
Good Morning Dearies! So, I am going to shake it up a bit and we are doing something for Easter! I know it is a little early, but with my crocheted Easter Baskets up for orders, I wanted to show everyone how to make these cute little eggs, just in time for Easter!
These are great for babies for their first Easter or for toddlers if you want them to find something other than jelly beans and candy! These eggs don’t take long to make, but they add the perfect touch to a crocheted Easter Basket!
So, before I begin, I want to talk to you about this pattern. I’ve made about 3 of these eggs, 4 if you include the tutorial I’ll be doing for you all. I’ve used a different brand type of yarn, just to see if there is a difference, and I believe it was my tension, but I’m still unsure.
The pattern recommends Red Heart Yarn, so I would just use Red Heart, you can try it with different brands and if you do, and they turn out great, feel free to let me know in the comments!
Anyway, let’s talk about all that you will need:
5.0 mm hook
Red Heart Yarn
I will be using the color aqua. I’m just guessing because I lost the yarn label for it, but I know it’s Red Heart.
Stitch Marker
Stuffing of your choice
I’m using the stuffing that you get from Walmart in the craft section. Basic stuffing for stuffed animals.
Sewing Needle
Row Counter (optional)
I wrote down the numbers of rows and crossed them off as I go. You don’t need a row counter, but if you are a beginner, I highly recommend that you use one.
Let’s begin!
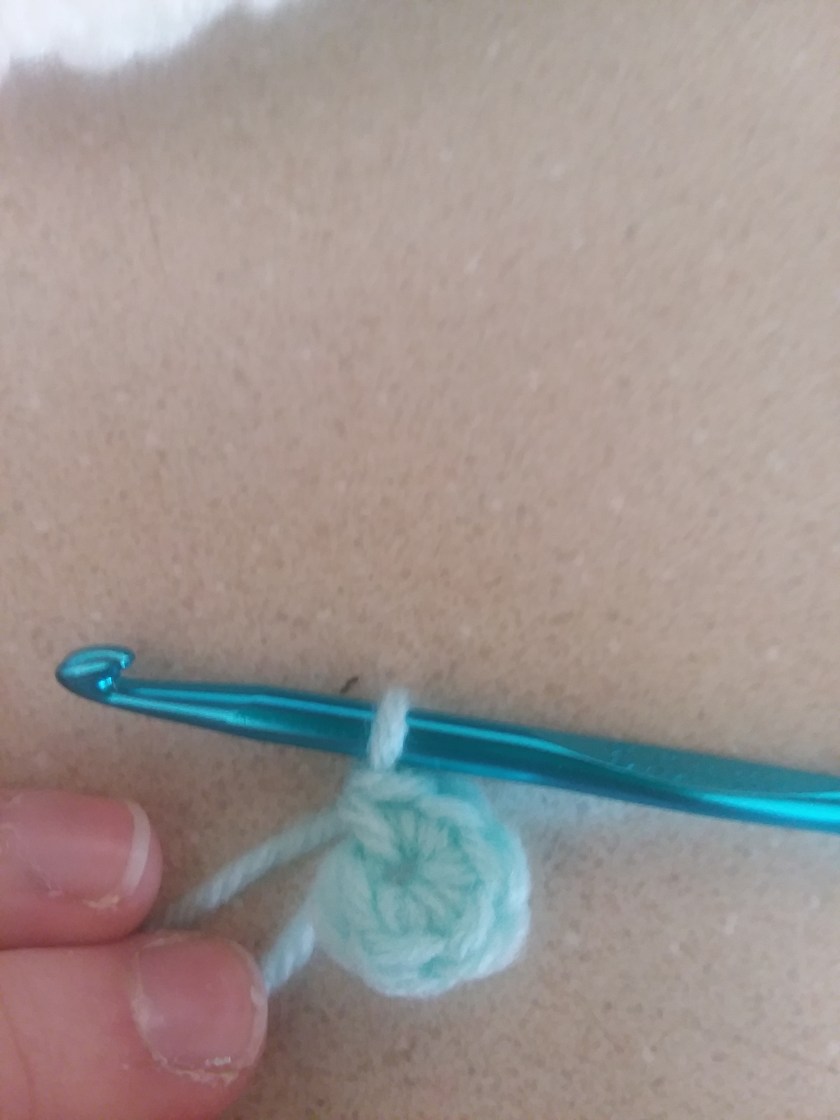
Round 1: Chain 2. Make 6 single crochets in the second chain from your hook. Don’t connect. (6 stitches)
Round 2: Make a single crochet in the next stitch and place a stitch marker(You’ll be moving this stitch marker for every row), then make another single crochet in that same stitch. In the next stitches, make 2 single crochets in each until you reach the stitch marker. (12 stitches)
Round 3: Single crochet in each stitch.
Round 4: Make *2 single crochet in the next stitch, single crochet in the next.* Repeat (18 stitches)
Note: The * are for repeating an amount of different stitches for a round or row.
Round 5: Rep Rnd 3.
Round 6: Work *2 single crochets in the next stitch, single crochet in the next 2 stitches.* Repeat. (24 stitches)
Round 7: Rep Rnd 3.
Round 8: Work *2 single crochets in the next stitch, single crochet in the next 3 stitches.* Repeat. (30 stitches)
Round 9-11: Rep Rnd 3.
Round 12: *Single crochet decrease in the next stitch, single crochet in the next 3 stitches.* Repeat. (24 stitches)
Round 13: Repeat Rnd 3.
Round 14: Single crochet decrease 12 times. (12 stitches)
Round 15: Rep Rnd 3. Stuff the egg. (I used the other side of my crochet hook to help stuff the egg because the hole is really small.)
Round 16: Single crochet decrease 6 times. (6 stitches)
Finish off, leaving a long tail to weave through the remaining 6 stitches. Pull tight and secure the end and make sure to weave it in, as well.
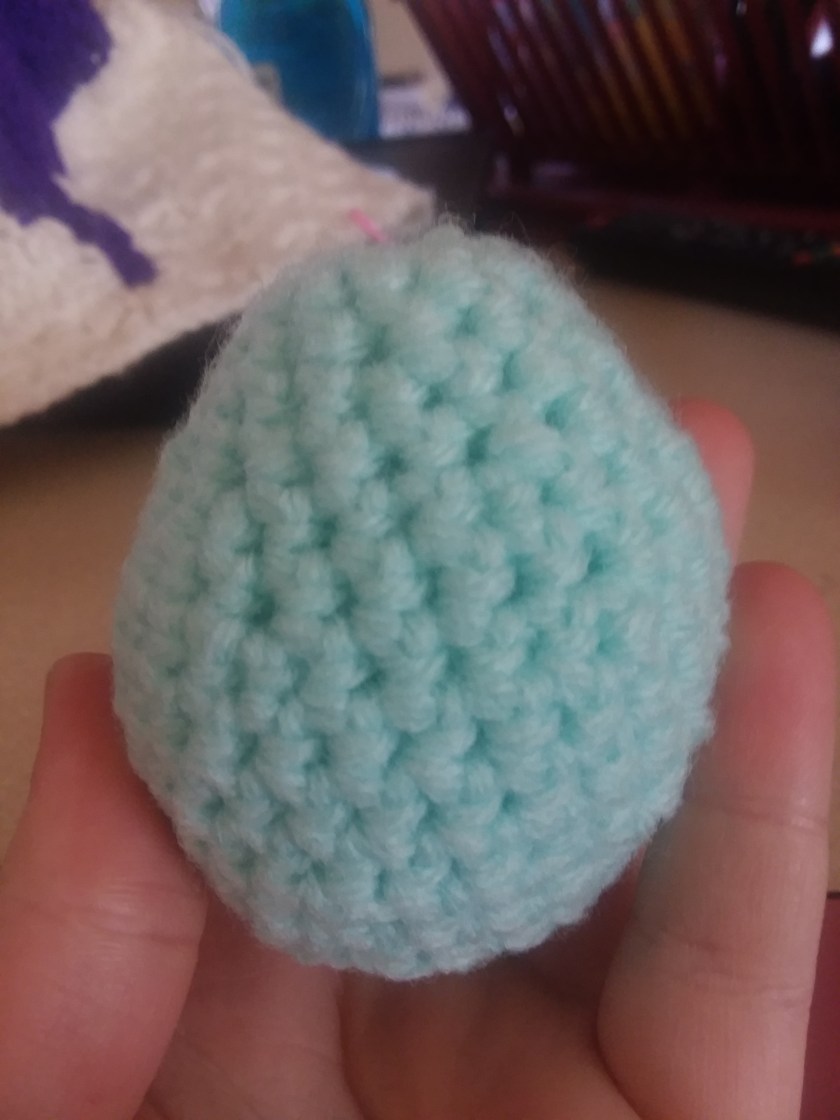
There you have it! Perfect pretty Easter eggs for the kiddos!
Hey dearies! 2019 is just around the corner and as I have mentioned, I want to make a temperature blanket for 2019. I wanted to talk more into what a temperature blanket is and what you need for it.
So, for my temperature blanket, I will updating you on what it looks like at the end of every month, rather than posting every square a day, I figured it would be easier to post on what it looks like at the even of every month. However, I will be posting a square a day on my Facebook Page.
Let’s talk about some questions I have gotten on my Facebook page about the temperature blanket is.
What is a Temperature Blanket?
A temperature blanket is a blanket in which you crochet a square a day, in a color, based on the temperature of what it was that day. The picture below is an example that someone used as their ‘guide’, for their temperature blanket:
This is just a simple chart, but there is a color that represents every temperature. You don’t have to crochet a square a day, you can do whatever you want to do! I’ll be crocheting a solid granny square a day, but you can crochet a row a day, or crochet a different design a day, whatever you would like to try!
You can even do it with one color, but start from the darkest color, and work your way down to the lightest or whitest color. Here is another example:
As you see here, this person used a ‘purple’ as their base color for this project, which you could do for any and all types of colors. The rainbow theme, for a temperature blanket, is more common because when it all get’s put together, it’s amazing to see what they look like.
Best part about seeing these blankets, is that the temperature isn’t the same everywhere you are from. I’m from Maine, and it doesn’t stay in the same temperature all year long. So, we will see a little bit of every color, that I have planned.
Do you have to use the same yarn?
Not at all! Most people use their leftover yarn that is just sitting in their closet. Or, if you are like me, I go out and buy whatever colors I don’t have and go from there.
There also isn’t a brand that you have to stick with either. Whatever yarn you have hanging around, that follows the key, will work! Even if they aren’t all from the same brand.
I’ll be using mostly I Love This Yarn, because it’s one of my favorite brands to use, but their yarn can be rather pricey! I do have a few other types of yarn that aren’t the same brand. Usually, I stick with a brand, when it comes to a project, but this being my first time making it, I’ll be using what I have from my yarn stash.
What colors are you doing for this blanket?
I know a lot of people are wondering what colors I will be using for this blanket. Since this is my very first temperature blanket, I will be doing the ‘rainbow’ color key for this project. So, here is the colors I will be using:
100 degrees – Fire Red
I Love This Yarn
90 degrees – Pumpkin
Red Heart Super Saver
80 degrees – Bright Yellow
Red Heart Super Saver
70 degrees – Jelly Bean
I Love This Yarn
60 degrees – Green
Main Stays Basic Yarn
50 degrees – Turqia
Red Hear Super Saver
40 degrees – Soft Blue
I Love This Yarn
30 degrees – Dark Orchid
Red Heart Super Saver
20 degrees – Orchid
I Love This Yarn
10 and below – Light Gray
I Love This Yarn
This is the line up of what colors I will be using for my temperature blanket for 2019! I included the brand, just in case any of you would like to follow me in making this blanket as well!
Do you have to wait until the beginning of the year to start?
Nope! You can start one when ever you would like! A lot of people I know like to start from the beginning of the year to the end of the year, just to see what it would look like, too!
Another option you can do, is if you are a faster crocheter and want to blanket from, let’s say 2015, you can always use Google to search for what temperatures it was during that year from where you live. It might be a little hard to find, but it would be amazing to see what each year turned out to me.
If you are looking for a later year, Google might not have the information for later years, but if you are a newspaper collector, you might have more luck!
How are you joining your squares?
So, I have learned and watched quite a bit of videos on how to sew together squares and I have two in mind:
Single crochet the squares together
Now, this wouldn’t require a sewing needle at all! Basically, you would put your squares back to back and single crochet the seems together. It’s simple for beginners and you would have sort of have two blankets in one.
This is a stitch that I LOVE to use because of the fact it hides how you stitched it together. I’ve used it multiple times and it is one of my favorites!
Not sure which one I am going to use, but I will show you how to do one of them, when I go live on my Facebook Page.
Do you have to make squares?
Not at all! You can do squares, hexagons, circles, rectangles, rows, and etc. Be creative and try to do a temperature that you think would be amazing.
If you are a beginner, I would start out with squares. You don’t have to do a solid granny square, like I am going to do. A lot of people use a granny square for this type of project, but I like my squares completely squared.
What do they look like?
Well, here are some examples! If you wish to make one of these, for your own collection, keep a look out on my Facebook Page for more details for how to follow along!
This isn’t exactly a temperature blanket, but I wanted to show an example that you can make them in just simple long rows. This is a square temperature blanket, but it is a different design from the original granny square. This one was made with hexagons. Like I said, you can make them using pretty much any time of shape.Another great design, this one looks like they did two types of temperatures, one in the morning and one at night.
I will be doing monthly updates, as well, on my blog to show the progress of each month, but I’ll be doing a weekly and daily update for my blanket on my Facebook page!