Posted in Arts and Crafts, Crochet, Top Projects for Crochet/Knitting

Crafty Sassy – Top 10 Crochet Valentine’s Day Projects

Hey Dearies! With Valentine’s Day just around the corner, I figured I would find some free patterns for this lovely holiday! Even if you don’t do anything, these ideas are perfect to make for the kiddos of your family!

Note: These aren’t my patterns, but free patterns that I have found and will have the website link for that pattern. All rights go to the creators of these patterns!

1. Valentine’s Day Cat

2020-02-04 (2).png

If you are a cat lover, then you should definitely add this to your do-to list! The cutest thing about this cat is that it’s shaped in a heart! Not to mention, you don’t have to sew on the whiskers, another option would use some puffy paint, but it can be challenging to do.

Valentine’s Day Cat crochet pattern


2. Valentine Heart Flap Hat

2020-02-04 (1).png

Super cute hat and since February can still be a little nippy out, these are a perfect gift to gift the kiddos for Valentine’s Day! The best part about these is that you can wear them for all the winter season.

https://classycrochet.wordpress.com/2014/01/21/free-pattern-crochet-valentine-heart-earflap-hat/


3. Crochet Rose Wreath

heart-flower-wreath-1-1.jpg

I’ve actually made a wreath, something like this, but it was so difficult to do and if you have been following me for a while, you’ll know that wreath, such as these, take a very long time to do, but once they are finished they are so worth all the hard work!

Crochet Rose Pattern: Learn How to Crochet a Rose Wreath!


4. C2C Heart Table Runner

ValentineC2C-728x991.jpg

As you know, I love to include kitchen sets, especially when it comes to holiday stuff like this! These are a super cute idea to have for the month of February! This also gives you more on practicing the C2C stitch and how to change colors.

Crochet C2C Valentine’s Heart Table Runner


5. Valentine’s Day Bag

DSC01413.jpg

This is another cute idea to make for the kiddos, especially perfect for putting in some chocolate kisses! This type of pattern is something that you can also use to practice changing colors, as well as switching colors!

https://www.littledoolally.com/2014/02/valentines-day-gift-bag.html


6. Valentine’s Day Mini Gift Bags

VdayGiftBag2wm-1024x711.jpg

When I saw these, all I could think of was what a great idea these would be for teachers! These are small but super easy to make and to make many of these! I’ve always wanted to be a teacher and if  I prepared myself, I would have these for my students!

Valentine’s Day Mini Treat Bags


7. Heart Butterfly

Crochet-butterfly-applique-free-pattern-1.jpg

These are more for decoration when it comes to placemats, blankets, clothing, and even bibs. However, they are also perfect for making them into magnets! Not to mention, these are perfect practice for those that learning to sew pieces of their projects together!

Crochet Butterfly Applique


8. Valentine Bear

2020-02-04.png

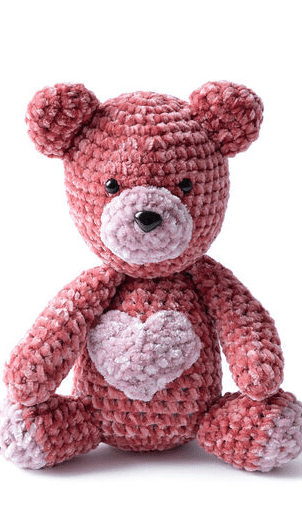
I know, this bear is too cute! The best part about this pattern is that there is a FREE PDF print out! Which makes them perfect to add to your binder of patterns! These bears are super soft and perfect for those babies that were born or will be born around Valentine’s Day!

https://www.yarnspirations.com/bernat-velvet-valentine-crochet-bear/BRC0334-012696M.html?utm_source=pinterest&utm_medium=social&utm_campaign=2019_02_Curated_Valentines&utm_content=BernatVelvetValentineCrochetBear


9. Light Heart Valentine Dishcloth

crochet-light-heart-dishcloth-naztazia_small2.jpg

From one of my favorite crochet YouTubers, Naztazia has created this amazing pattern that is perfect for Valentine’s Day or for people who have a theme of Hearts for their kitchen! The best part, there is a video to show you how to create this amazing dishcloth!

https://www.ravelry.com/patterns/library/893330


10. Heart-Shaped Bookmark

20180821_123805.jpg

Doesn’t this one look familiar? It should because this was the first pattern that I have EVER created and posted on my website! If you have been following me since day one, this was when I was first starting out or getting into crocheting! This is perfect for beginners!

https://katiesblog96971617.com/2018/08/21/crafty-sassy-how-to-make-a-heart-shape-bookmark-for-beginners/


Which ones were your favorites? Which one would you love to create for yourself? Let me know in the comments!

Make sure you like my Facebook page! I post updates on my blog, Youtube channel, and anything else on there!

https://www.facebook.com/katiesblog96971617/

Posted in Crochet Blanket 2019

Temperature Blanket Update – December 2019 (Finished)

Hey Dearies! I am finally finished with our 2019 temperature blanket! The reason it has taken me a few days to post, because I did have a gap where some more squares could’ve gone, so I crocheted some white ones to fill in the blanket.

The only thing I want to do next adds a simple single crochet border and crochet the numbers to make 2019 and add them to the blanket as well! However, I will try my best to post the update of the blanket on my Facebook Page and Instagram, so make sure you are following me on there to check it out!

December came and went as soon as it did! Lower temperature, lead to more blues and purples when it came to squares. I’m just so grateful that this project is now done and finished!

Makine a temperature blanket isn’t as easy, as I thought it was going to be, but I managed to create one! As this being my first blanket to ever work on, I’m really proud how it came out!

Here is the list of colors I used for the blanket:

20181222_124142
100 degrees – Fire Red (I Love This Yarn)
90 degrees – Pumpkin (Red Heart Super Saver)
80 degrees – Bright Yellow (Red Heart Super Saver)
70 degrees – Jelly Bean (I Love This Yarn)
60 degrees – Green (Main Stays Basic Yarn)
50 degrees – Turqia (Red Heart Super Saver)
40 degrees – Soft Blue (I Love This Yarn)
30 degrees – Dark Orchid (Red Heart Super Saver) *Changed to the following – Violet (Red Heart With Love)
20 degrees – Orchid (I Love This Yarn) *Changed to the following – Orchid (Red Heart Super Saver)
10 and below – Light Gray (I Love This Yarn)

How do you tell which color to use?

I, personally, go with the overall temperature. So, let’s go by today, for example:

Today in Maine, the overall temperature is 17 degrees. I would choose the light gray.

Let’s say that it was an overall temperature of 22 degrees, I would choose the Orchid color. All my temperatures, for my colored yarn, has to have the same number first number. If that makes any sense, I’m sorry if it doesn’t!

What was the highest temperature for this month?

Sadly, we didn’t get a 60-degree days, but have had quite of bit of 50 degree days, which isn’t bad, but I prefer my 60 degree days any day!

What was the lowest temperature for this month?

We did hit below 10 degrees, which isn’t fun, but now, I’ll be able to snuggle in this blanket to keep me nice and warm.

Do you post daily updates?

Yes, I do. On my Facebook page, I post a picture of the square for each day. I also tried to post every week’s worth, but it was hard to keep track of, so I’ll be posting monthly and daily instead.

If you haven’t liked my Facebook Page, here is the link below! It keeps you posted and updated on my temperature blanket and any updates for my blog and YouTube channel, as well!

https://www.facebook.com/katiesblog96971617/?ref=bookmarks

Thank you all for watching how this blanket turned out to be! I’m so glad that it’s finally done and the amount of support and motivation that I had was so helpful, so thank you to all that have watched this blanket go from just a few squares to a giant masterpiece!

Here is a slideshow of the progress of the blanket from month to month:

This slideshow requires JavaScript.

Note: The month of February, I forgot to take a photo of, but other than that they are all there!

Posted in Arts and Crafts, Beginner Patterns, Crochet

Crafty Sassy: Crocheting a Completely Solid Mini Granny Square (Beginner)

Hey Dearies! I wanted to show you how to make a solid granny square, but this one is an actually solid granny square. The reason why I wanted to show you what a complete solid granny looks like, I wanted to also kinda see what I’m going to use it for.

The question I know I’m going to get asked is, ‘What’s the difference between a solid granny square and a completely solid granny square?’

Well, let me show you!

The purple square is a completely solid granny square. The blue one is a granny square, which is actually what I used to make my temperature blanket. The difference is that you can’t see the holes that are made for making the granny square.

*Note* They are NOT the same size. The completely solid granny square or the purple one is only 2 rows. While the other square has 5 rows.  

I actually found the pattern on Youtube because I was looking for it for one of my ‘big’ projects. Needless to say, I got very lucky and it just happened to be in my suggestions for videos to watch.

Here is the link for the video: https://www.youtube.com/watch?v=d3TElIayQS8&t=640s

Now, you are probably wondering, ‘What project were you going to use to make with these?’

Well, here’s the thing. I love making stuff for others and I wanted to make my mother a blanket for her birthday, but I ended up going with the C2C method. The only problem was that I jumped into it and made a lot of mistakes.

To the point where I ALMOST finished it, but instead of printing out another sheet and20190416_084725.jpg ripping it, I decided to just rip it and got granny square small instead. Which is why I suggest to really pay attention when it comes to C2C and learn as much as you can!

With that being said, I am currently, been making a bunch of tiny granny squares. You are also probably thinking that I’m crazy for doing so, but in the end, it will look awesome!


However, you don’t need to make a bunch of small ones, as I did. Anyway, let’s get down to what you need for this pattern:

  • Medium Yarn or Size 4
    • I’ve been using Red Heart Super Saver since it’s what I’ve been using for the project itself.
  • 5.0mm hook
    • You can use any size, depending on the size yarn you are using.
  • Marker
    • These are a must when it comes to doing this the first time! Especially if you plan on making these squares bigger!
  • Sewing needle

The pattern is pretty simple, but it can get confusing, let’s begin!

You can either start with a magic circle or a chain 4. The difference between the two is that the chain 4, you have to make a slip stitch to start. Which

Row 1 ( If you used a Magic Circle to start): Chain 2.(counts as your first stitch) Make 2 double crochets in the circle. *1 treble crochet. 3 double crochets.* Repeat from * until you have 4 corners. Join with a slip stitch at the top of the chain 2. Place a marker at the top of each of your treble crochets.  

Row 1 (If you chained 4 to start): Make 2 double crochets in the last chain from your hook (You’ll be working in this chain). *Make 1 treble crochet. 3 Double crochet.* Repeat from * until you have 4 corners. Join with a slip stitch at the top of the chain. Place a marker at the top of each of your treble crochets. 

The next row is the same for both the magic circle and chain 4.

Row 2: Chain 2. *Double crochet in the next stitches, until you reach your stitch marker or first corner, remove it and remember to put it back for each treble crochet stitch. Make 2 double crochets where your stit marker was. Make treble crochet in that same stitch and another 2 double crochets in that same stitch.* Repeat from *. Join with a slip stitch in the top of your chain 2.

Repeat Row 2 until you have reached the desired size. Fasten off and weave ends in. 

There you have it! I will also make sure that I update you on my current project that I’m working on for my mom!

Make sure you are following my Facebook page! I do free giveaways on some stuff that I have made! Here’s the link: https://www.facebook.com/katiesblog96971617/


Posted in Uncategorized

What’s Going On For My Blog, YouTube Channel, and Facebook Page?

Hey Dearies! It has been awhile since I’ve posted a blog post and I wanted to chat up with you about what has been happening in my life and the future of my blog, YouTube channel, and Facebook page.

I’m NOT done! Making this very clear! I ain’t quitting any time soon!

I’ve had a lot going on in my personal life and we also had a death in the family. I’m doing my best to mourn over our family’s lost, it’s a lot easier said than done. So, if I’m not able to post stuff on here or any of my social media platforms, please be patient with me.

Another thing that is happening is that there is a lot going on in my mind. The holidays can be very difficult for me because of the lost of my son. It can be difficult to do some stuff with my daughter and realize I won’t ever be able to do it with my son.

Image result for changes

Anyway, that’s what has been going on, but let’s talk about what the future is going to be like for the following platforms of mine.

My Facebook Page/Online Business (Katie’s Craft Studio):

I’m very active, when it comes to my Facebook page, so if you are ever looking for an update, check it out! It is where I will mostly post any updates or when blog posts are going to be out.

The online business, I am trying to get some more stuff together, working on a logo and business card. If you want to order anything that I offer, you can send me an e-mail or message me on my Facebook page for the time being.

I am currently working on a online order form for my small business, but it is still in the works. I’ll update the status of that on my Facebook page. I have thought about Etsy, but I want to offer more products, but I need to have the clients to order them first. Again, I’ll be posting an update on it.

My Blog: 

Yes, I will still be doing my blog. I have a couple new ideas, just to make sure that I am active everyday. I am also still working on Unclear 2, which I will explain that in a second.

Starting January 1st, I will be doing the 365 blog posts, it’s like a writing prompt which can help be become a better blogger and writer, so that will be public for your viewing pleasure.

Unclear 2 is in the works, it is out on Wattpad and I have been updating it, very slowly, but I will be doing a ‘short story’ of the month where I have a set theme and I have to write a short story on that theme or topic.

I’ll start doing reviews about anything. From books, TV shows, movies, or products! I’ve always wanted to do this, so for next year, I’m going to try my best to make it happen, at least once a month!

As for Crafty Sassy, I am going to have a plan on what items I would like to show every Tuesday. I can go live on my Facebook page, but I feel it would be better to give you guys an actually video on how to make some of the stuff, but more edited and clear to understand. Which will be posted on my blog and on my YouTube page, but we will get to that.

For wrestling and WWE stuff, I’m going to try and figure something out with that because I still love watching it, but it might just be for the pay-per-views and what I thought about the matches. I have thought about doing just a Superstar of the month and not every week because I feel like I have rushed most of them and I want to take the time to make them better.

The gaming part of my blog will be more active! I have a few ideas and I am actually going to try and live stream for my YouTube channel. I will also record myself showing how to’s- for Minecraft, Sims, etc.

YouTube Channel (KatiePurrPurr):

Nope, I’m also not done for this either. Although, I am working on getting a better camera because the one I have isn’t the best, when it comes to going live. So for now, I’ll try my best to ‘work with it’, but it isn’t going to be the best thing ever. I also need to get some better lighting as well.

The Sims series, I am working on it, right now, I do have a problem with the Sims because I need them to get to the weekend days, so that I can film. I will also have different idea for the series, I’m going to ‘free film’, basically filming without having a script. I’ve never done that before, but it will be new to me!

The second episode is in the works, I just need to film it and then I will go from there.

Image result for patience quotes

So, a few things are changing for my platforms, but I’m not done! I’m not giving up! I just need to get back on track, which I will be on January 1st of 2019. For the time being, I will do my best to post stuff, but it might just be Crafty Sassy stuff.

Thank you for all that have supported me and have stayed with me through this progress!


Posted in Arts and Crafts, Beginner Patterns, Crochet

Crafty Sassy: How To Make A Crochet Hanging Towel Holder (Beginner)


So, the winner to my Facebook page’s poll was the Hanging Towel Holder! Today, I am going to show you how to make these awesome hangers. I will also be going LIVE, on my Facebook page, showing you how to make these hangers. If you are intersected, I will leave the link to my page, don’t forget to like my page, so you don’t miss out on any of my lives!

Link to my Facebook page:
https://www.facebook.com/katiesblog96971617/

Things you will need:

  • Medium Yarn(Any color of your choice, try to avoid using black or dark colors)
  • 1 or 2 Thin Bracelets or Thick Hair Ties(The Goody Ouchless Super Thick Hair Ties are preferred,
  • Size 4.0mm Crochet Hook
  • Button (Bigger than an inch)
  • Sewing Needle (To sew any unwanted strands.)

Before I get started, I want to say thank you to Naztazia, she is the one who made the pattern available to use for free and also created a YouTube video on how to make this towel holder!

Her website:
http://naztazia.com

Her YouTube Channel:
https://www.youtube.com/user/naztazia

Here is the link for the free pattern itself:
https://www.ravelry.com/patterns/library/830272


*So, because this is a pattern from someone else, I am going to explain in my way how to make these. I just want to put out there that this is NOT my pattern and I wanted to give FULL credit to the creator. With that being said, all rights go to the creators, not me.*

Step 1: Decide on whether you are going to use 1 or 2 thin bracelets or the super thick hair ties. Then, make a slip knot on to your crochet hook. When I got live, on my Facebook page, I will be using the thin bracelets.

Step 2: Take your crochet hook and put it into the circle and yarn over, bringing the yarn back in the circle. Pull it through all loops, making sure you only have one loop on your hook, making a slip stitch. Chain 3.

Step 3: Once you have chained 3, take your crochet hook and put it back through the bracelet, yarn over, just like you did for creating the slip stitch, but instead of making another slip stitch, we are going to double crochet. Here is a picture on how to double crochet, just in case you forgot.

Image result for double crochet stitch

Step 4: You are going to double crochet 50 stitches, add more or less depending on the size of the bracelet or hair tie. When you get to the last one, slip stitch to close the ring.

*Remember: The chain 3 counts as 1 double crochet!*

Step 5: Chain 1. Then, make 8 single crochet stitches across. Here is a picture down below, just in case you forgot.

Image result for Single crochet stitch

Step 6: Chain 1 and turn your work.

Step 7: Keep making single crochets across for 17 rows. Make sure you chain 1 and turn your work after finishing each row. You can use a row counter if that helps you remember how many rows you have left to do.

Step 8: Once you are done row 17, chain one and turn your work. This next part can be tricky, so I’m going to break it down, so you don’t get confused.

  1. You are going to single crochet in the first one, but instead of yarning over, you are going to go into the next stitch and single crochet, you should have 3 loops on your hook. This is called a single crochet decreased. Yarn over and pull the yarn through all hoops.
  2. Next, half double crochet in the next stitch. Here is a picture, just in case you forgot, but it is basically doing a double crochet, instead of pulling through 2 twice, you pull through all of the loops. Image result for half double crochet stitch
  3. Double crochet in the next stitch.
  4. In the same stitch, that you did the double crochet, crochet 2 trebles. Here is a picture down below, just in case you forgot. Image result for treble crochet stitch
  5. Chain 1.
  6. In the next stitch, do 2 treble crochet.
  7. Double crochet, in the same stitch you did your trebles.
  8. Half double crochet in the next stitch.
  9. Single crochet the next stitch, but we are going to do another single crochet decrease, just like we did for the start of this row.
  10. End the project, but cutting the working yarn and pulling your hook up. Sew in the tail into the project.

Step 9: Sew the button onto the project, make the button in the middle, just above the ring. In between the ring and the first or second row. Sew and cut any wondering strands of yarn. You’re done!

Don’t forget to check out my Facebook page, where I will be going LIVE, showing you guys how to make this.

I also want to give you guys an update that because I now have a better camera to show you guys how to make these amazing things, make sure you check out my YouTube channel because I am going to try my best to add more content, like this, to it!