Hey Dearies! Forgot to post this Saturday, but I wanted to review this webcam since it was something that I ended up getting for myself when I was doing Facebook lives all the time.
One of the reasons as to why I was looking into webcams that were overhead, was because I wanted to record videos of my crocheting so that I could post them on my blog and/or to YouTube.
Most of the camera’s that I found were between $99-$200. Since I didn’t know anyone else, I figured to see how well the cheaper camera would do. Now, a lot of the time it is a hit or miss when you buy something that is cheaper, so I took a chance.
When I got this item, I paid $50 buck for it on Amazon, which wasn’t too bad, I just hoped that it would do the job that I was hoping it would do, which is sort of did. It also came in four different colors: green, red, blue, and of course black. I got the green one.
If you have been following me since the beginning, you know that some of my lives are used with my phone and a tripod, but in some of the other videos, you couldn’t see the tripod, which was when I was using the HUE Webcam.
Now, before I purchase any products, especially on Amazon, I always just see the reviews, both good and bad, which for this product, it was kinda split in half. Meaning it worked for some and others, not so much.
For me, the first few times I worked with the camera, it worked great, downloading the CD program worked on my computer and it worked with no problems, but after a few times of trying to record longer and live, it started cutting out or not working.
I’m not sure if it was my computer or not, but it made it really hard for me to want to record or try to go live. I would even uninstall it and reinstall back onto my computer, sometimes it works that way, other times, not to much.
The good thing that I liked about the camera when it was working for me, was when I could adjust the picture or video clearly by turning the lens of the camera. I also like how there is a light to indicate when the webcam is plugged in, however, there is no manual control to turn it off and on.
Also, another feature is that you can attach and detach the camera from the base, which I found really helpful because if the base doesn’t want to work for you, you can always plug the camera directly into your computer base.
I might have to try it out on my laptop, and see if it works or not, and I will update when I do that.
Overall, for the price, it was okay, I wouldn’t get it again unless it was a last resort or they had it upgraded to something that was better than before. If anything, I would try out one of the more expensive ones, just to see if there is a major distance.
The good news is that, in good lighting, it records great! I just don’t understand why it was cutting in and out all the time. One of the options that I found very helpful, was that you could adjust the camera very easily, to any angle you needed it to be.
Have you tried out this camera? How was it for you? Or did you have the same problems as I did? Let me know in the comments down below and if there are any products you would like me to try out, let me know in the comments as well.
Hey Dearies! I’ve been quite busy with college since my finals are almost here, I figured I would post another free pattern for you! Now, since I’ve shown you how to do a regular granny square, I figured it was time to show you what a solid square looks like and how to make it.
So, when I first started crocheting, I didn’t like the granny square and how there were spaces in between it all, but now, I don’t mind it for some projects. Which lead me to create my temperature blanket squares with solid granny squares instead of regular granny squares.
Not only is this square is something you can play with the colors with, but it is really simple to make for those who are looking to try something new to do!
Let’s talk about what you will need for this project:
5.0 mm hook
Medium Size Yarn (Size 4)
Sewing needle
Note: You don’t need to use a 5.0 mm hook or size 4 yarn, you can use whatever hook or yarn you would like, but if you are a beginner, I recommend using my suggestions.
Let’s Begin!
First, make a magic circle, however, if you don’t know how to make a magic circle, you can always chain 4 and slip stitch into the first chain to create a circle that we will be working into.
Tip: Using a magic circle will make it so that the hole will be closed tighter, however, it can be undone if you don’t leave a long tail. Chaining 4 will keep it more together.
Round 1: Chain 3. (This counts as 1 double crochet). Working in the circle, make 2 double crochets, chain 1, make 3 double crochet, chain 1, 3 double crochet, chain 1, 3 double crochets, chain 1. Slip stitch into the top of the chain 3.
Round 2: Chain 3. In the first corner, double crochet. *Double crochet until you reach another corner. When you get to the next corner, make 2 double crochets, chain 1, 2 double crochets.* Repeat * til you get to the last corner. 2 double crochets and chain 1. Slip stitch into the top of the chain 3.
Round 3-5: Repeat round 2 until the desired length. For my temperature blanket, I went 5 rounds but only recommend 4 rounds. Fasten off and weave in your ends!
Get creative and change up each row with a different color or use a multi-colored yarn!
There you have it! A simple solid granny square that makes an incredible blanket! Not to mention, for the beginners, this gives you something different to try out.
Make sure to follow me on Facebook, that is where I am mostly active on and I also let you know whether when a post will be out or delayed!
Hey Dearies! Back with another book review for you all! So, this one I never thought this was really a book, but it is and you can find it on Amazon.
Ever After is a motion picture that Drew Barrymore stars in as the main character, Danielle. This movie is one of my all-time favorite version of a Cinderella story, next to Hillary Duffs more modern version in A Cinderella Story.
The ‘Cinderella’ story has been told in many different ways in, by different writers and in different genres. In my opinion, ‘Cinderella’s story is one of the easiest recreations that any writer can do, but I’m always curious to see what writers come up with and try to do.
The same goes for any other fairy tale story, but I think this version is the best because not only is it in the perfect timeline and location to do it.
The theme of where this Cinderella story is set more like how the original Cinderella story started. Danielle lives with her father, her more died in childbirth and her father raises her the best he can. Of course, when she is 8, he re-marries Baroness Rodmilla of Ghent, otherwise known as her evil stepmother, and has two daughters of her own.
However, the reason why Rodmilla marries Danielle’s father is to get further up the line, or into the castle, basically wanting to live the life of riches. So, she really doesn’t care about Danielle, anyway, makes Danielle a ‘slave’ when her father dies.
I will say, Danielle puts up with a bunch of crap as a servant, but how she meets Prince Henry is even funnier than how the other versions. She ends up meeting him and throws apples at him thinking that he is stealing their horse.
The entire book is an exact play-by-play of the movie, which made me feel like I was just reading the movie and I ended up finishing it in a day. So, instead of watching the movie, you can read it, however, depending on how fast you read, it could take a day, perfect for passing the time.
There are only a few slight things that weren’t in the movie, but even if it wasn’t, it doesn’t change the way the book is, instead, I feel like it gives more of a backstory to some of the parts that are ‘rushed’ when created into a movie, or they were parts that they didn’t put into the movie.
Overall, this is an amazing book, even though it is literally the movie script, but in a book form and since I don’t own the movie, it’s not a bad way to pass the time. Perfect for a rainy or snowy day when you can’t go anywhere and want to snuggle up to a good book.
I also think that it would be a great bedtime story or a book that you could read to your kids before bed, you won’t finish it all before bed, but you could finish a chapter a night before bed no problem.
So, since I’ve reviewed the book, later in this month, I will be reviewing the movie because you know that’s what makes sense to do, right?
What do you think about the book? Were you as shocked as I to find out that there was a book to the movie? Let me know in the comments below.
Hey Dearies! Since I finally have finished both books, I figured I would do both of them in one review, just to make it easier! So, if you don’t know or haven’t been following me, I am a HUGE fan of Shane Dawson, I’ve been a fan since the first video I watched of his, which was ‘Fred is Dead’.
After that, I followed him through his YouTube journey and to what he is currently doing now, however, I never got a chance to get his books until a year ago. Which is why this review is very overdue, but I don’t care because Shane is amazing!
So, when I finally got his books, I got more of an understanding of not just his past, but some of the challenges he had to face when he was younger and up now. As you look at him now, he does struggle with some of those challenges today, but I see him as more confident now, than he was before.
You see, when you watch YouTubers videos, you see what they want you to see, you don’t see the depression, anxiety, or any of their struggles outside of the YouTube community. Sadly, if anyone does bring light to what’s going on in the background, but Shane did in his book and just like how Brittani Lousie Taylor did in her book.
I don’t want to spoil the books for anyone that hasn’t had a chance to read it, so I just want to say that the first book was amazing and it gave me the insight to sort of how his childhood and teen years were like for him.
Also, he did a short film of the Prom chapter, which I will leave a link for here, if you would like to see them, they are hilarious!
Part 2
Also, I want to note that one of the reasons why I follow and another Shane is because we have the same problem that we share together, whether he knows it or not. We both have been struggling with our weight.
As like him, I’ve been struggling with it for as long as he has and it sucks. In high school, I got picked on and judged because I had the extra weight. I used to wear a sweatshirt on all the time because I didn’t want anyone to see how fat I am.
Even after having kids, I’m still struggling with it, but if there is one thing Shane has taught me, it is to love yourself and to not listen to those who judge you based on your weight. In other words, live your best life however you want to live it.
After his first book launched, then he had a second one, which was around the time of when he came out as bisexual, so one of the chapters talks about how he struggled as a kid on what type of gender he was attracted to.
I don’t know much about that because I’ve never had to deal with something like that, all I know, that it is a very hard thing to do, for those who struggle with who they are.
That essay made me understand that he wasn’t just struggling with his sexuality for a few months or years, but almost his entire life.
The very last chapter was a chapter that his mom wrote and I loved that he let her do that because if you grew up watching Shane, you grew up watching his mom and they would do skits and videos together.
Not to mention, he loved to surprise her and when he bought her to see Kathy Griffin, it was amazing for him to do that for her. I love the closeness that they had together as Mother and Son, which I hope I will have the same closeness to my daughter as they had.
Here is another short film that he made for the second book!
Overall, I loved both the books, there was a love of things that I didn’t know about Shane, or what he didn’t want our fans to see and I’m glad I know. It makes me love Shane and want to support him more and more!
One more thing, I just want to add, this has nothing to do with the books, but the friendship that he has with Jeffree Star I think is amazing and I wish I had a friendship like that!
Are any of you Shane Dawson fans? Or have you read his books? Let me know in the comments down below!
Hey Dearies! Since most of us are stuck home, some of us, like me, are taking the time to get some reading done. Or you are a bookworm, like me, then these patterns are perfect for you!
Not only are these bookmarks super cute and fun to make, but they are also free patterns! Now, I had to do some real digging to find these! These are perfect for a beginner project and these gifts can be perfect for those kiddos that are trying to learn how to read!
These projects are also very quick to make and don’t require a lot of yarn either, which is perfect for another item to sell at a craft fair or online to your friends!
Note: These aren’t my patterns, all rights go to those creators. The link for each of these patterns will be provided.
1. Bow Bookmark
Theses bows are not only super cute, but you can crochet these very quickly! Not to mention, if you are a teacher, these are perfect to make for your students to have! These would also make a perfect addition to a craft fair or a gift!
Since spring is just around the corner, I had to include these cute leaf bookmarks! These are perfect for those bookworms who also have a love for gardening! Not to mention, these are also perfect for the classroom or giving them away as gifts! If you wanted to be a little more creative, you can always add a flower with the leaves as well!
Another spring theme bookmark, I just love these! I love this pattern because you can get creative with what kind of button to use for the center of the flower. Not to mention, you can always use just the flower part as a pin, or adding design for any hats or clothes!
For those of you, who love cats just as much as I do, these bookmarks are perfect for you! This pattern is another simple easy one to create and would make an amazing addition to any book fair or craft fair.
This pattern has more of a longer tale, which I don’t mind and if you are like me, you don’t want your bookmarks getting too thick, especially for those of us that have lots of paperbacks, this are perfect for those!
I know this one is more of a ‘Christmas’ theme, but if you are looking to try something different, here is another pattern you can try! You can also start crocheting these for Christmas presents now! It’s never too early for that!
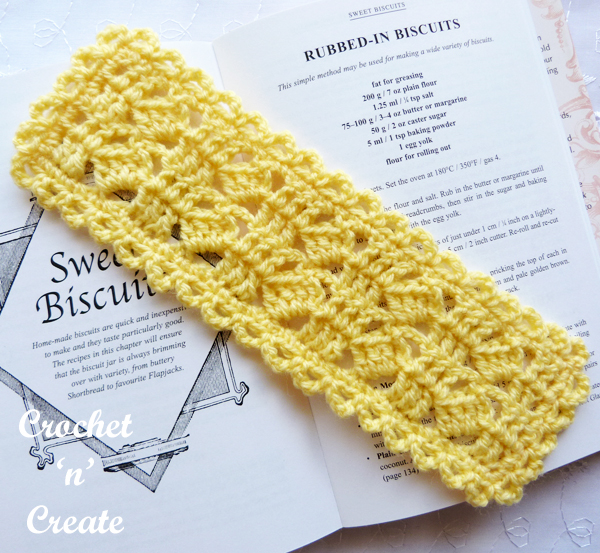
This bookmark is more of a traditional one, but has a lot of detail that’s put into it, which I love! Also, as you can see in the background, this bookmark is being used for a recipe book, which works! I just can’t get over the detail!
As you know, I LOVE to find anything with elephants in it and when I saw this pattern, I just had to share it! I also LOVE Heart Hook Home, she does an amazing job with her patterns and I was so excited to find out she made a bookmark! These are perfect for the kiddos that are learning how to read! Not to mention, this is more of a 3D bookmark, which is always fun!
Here is another 3D bookmark pattern and this one is a little bit more towards the spring or Easter theme! Especially if you can’t see those family on Easter, you can always send them a bookmark for Easter! Not to mention, you can always not add the bow on the top and take a ribbon and tie it to the neck for the boys!
Rainbows are another favorite for the kids and these are fun to make as well! Not to mention, the cheeks have a little bit of blush, under their eyes, which makes this pattern even more perfect! Details, as such, are what make these projects just so amazing to make!
What do you think about these patterns? Any of them look super cute enough for you to want to make them for yourself or others? Which one was your favorite? Let me know down in the comments!
Also, make sure you are following my Facebook page to get the latest updates of what’s going on with my blog!
Hey Dearies! I am back with another product review! So, if you don’t know, I LOVE to do jigsaw puzzles in my free time and especially during this time, they help not only pass the time but it also keeps your eyes from staring at a smartphone all day either.
Not to mention, my 2-year-old daughter loves to watch and help me with them, so we have a few puzzles that are perfect for her to do. This product is more for those who are like me and LOVE doing the bigger puzzles, such as a 1000 piece puzzle. They are lots of fun but can take a lot of time and patience to complete.
This is when this product comes into need! Especially if you can just leave the puzzle where it is because it’s either in the way, or you have little ones that will try and ‘help’ to get it done.
This roll-up mat can not only keep your unfinished puzzle intact, but you can roll it up an store it for another day or when you are ready to finish it.
I got mine a few years back and have only used it a few times. My big problem with these is if you have a puzzle that you have done multiple times, meaning the pieces are a little wore down, they don’t like to stay on the mat together very well.
Not to mention that the mat is felt, so it’s hard to move pieces. If you were doing a newer puzzle, it wouldn’t be so difficult, but you do have to push some of the pieces back together, when you roll it out, again.
However, I do not recommend leaving the pieces, that aren’t connected, by itself on this mat. I’ve had a few times where they have fallen out and I lost the pieces to those puzzles, which is never fun to go closet search for puzzle pieces when your closet is full of open boxes.
Leaving the extra pieces in the box would be a better idea, or try putting them in a sandwich baggie and attach the baggie to the storage roll or inside of it.
Overall, if you live in a small place or just can’t leave the puzzle out by itself, then this would be ideal for you. I also want to note that there are mats that are bigger or smaller for whatever size puzzle you plan on doing, so be sure to make sure you check out the size of your puzzle before buying one of these roll-up mats.
The ideal is to have a puzzle table, but those can run from $90-$150 bucks, but if you don’t have the room or have kids or pets that like to be ‘helpful’, then these mats are perfect and only run from $15-$30 bucks, depending on the size that you want, I would always go the biggest, if you can, just because you never know when you are in the mood to do a big puzzle.
What do you think about the Puzzle RollUp Mat? Have you used one, or are you thinking about getting one? Let me know in the comments down below!
Hey Dearies! So, this month’s product review is actually gonna be for make-up. Now don’t worry, I’m not reviewing any make-up palettes or lipsticks, we are going to be focusing on a product that is supposed to make it easier to clean your brushes.
So, where did I see this product?
As you know, if you have been following me on Instagram, you have probably noticed I’ve been wearing make-up more or testing products out, lately. So, I’ve been using my brushes quite a bit, to the point where I didn’t even know that you had to clean them on daily.
Which, I was told, that you don’t have to clean them every day, but at least once a week, if not more, depending on how often you use them. Which is also what lead me to purchase this make-up brush cleaner.
Now, since I didn’t have any knowledge of how to clean make-up brushes, I figured I would look on Amazon for an easier way to do so. Originally, I wanted to get this product as a gift, for a few people, but me being curious, I wanted to know if it really worked.
All you do is load up your brush, you can choose any of the different options for each different type of brush. Then a drop of dish soap, or make-up brush cleaning solution, to the mixing bowl and slowly dip the brush in and out of the solution, while it’s spinning. Then let it dry spin for a few and it should be dry or barely wet.
The max it should take, for each brush, is about 10 to 30 seconds. Which to a lot of make-up people is AMAZING timing! I like the fact that it’s that quick that it dries.
How’s the quality?
Because I’m not a great make-up artist and almost have no idea what I’m doing, the quality of how clean these brushes get is not bad, but it’s not great either. Setting it up is a pain in the butt, but I feel that it doesn’t clean enough.
Does it work for me?
In all honestly, yes, this product does work, but for someone who isn’t a HUGE make-up guru’s. I recommend getting this for someone who is or does use their make-up brushes all the time. Although it doesn’t clean the brushes well, it does make it quicker for them to get dry quickly.
Is it worth the money?
At the time, I paid about $17.00, for it on Amazon. I’ve seen them range from $9.99 – $25.00, if not more depending on the brand. It is worth the money, but if you don’t use it all the time, this product is more of a waste of space.
Overall, is it something I would use or buy again?
I wouldn’t buy this again since I already own it, but I do see myself using this again, just because it drys the brushes so quickly! I do however, see this as a great gift to those who are make-up lovers.
What do you think about this product? Is it something that you would use or have used? Let me know what you think about it in the comments!
Hey Dearies! So, this month, we had an extra Saturday and instead of doing nothing on that Saturday, I figured I would do something a little bit different. The random reviews are a review that are based off of anything, could be from arts and crafts supplies to kitchen or office stuff.
This week, I wanted to talk about these super cool finger counters and if they are really worth it or if they are helpful.
So, when I first got into crocheting, I was counting rows on paper and pen, which does make it easier to follow rows because I write out the rows on paper and cross them out when I’ve completed that row.
Plus if I have to go back or figure out exactly what row I’m on, I can look down onto that sheet of paper and find out where exactly I left off. However, there are a lot of downfalls to using pen and paper, especially if you have younger kids that LOVE to get into anything.
Which is when I next looked into other ways to count my rows, without dragging the paper and pen around. I wanted something that was portable and easier to keep tract of counting, which is when I found the electric row counters for your fingers.
First, let me start off by saying that I got really excited to use these, which I ended up getting myself a pack of 2, just in case, which there is really no harm in doing so.
I honestly loved them!
However, as much as I loved them, I did have a few minor complaints.
Having this on your finger, to me, was a pain in the butt. Then again I have really long and thick fingers, which doesn’t help the fact that the adjustable band doesn’t fit ‘perfect’ on my finger.
To me, it’s a little too loose for my liking. Other than that, it worked great!
One of the best features of these little counters is that after a few minutes of not counting your rows, it would shut off, but keep track of what row you were on when you turned it back on.
Another great feature it has is that it’s not just in one boring color, but can come in many different colors, currently, I have a green and pink ones since those are my two favorite colors!
Not to mention, it does a better counting, I feel than any other app that is out there. (Which I will review that in the future.)
What do you think about this little gadget? Do you have one or wasn’t sure about getting one? Leave a comment down below and let me know what you think about them!
Hey Dearies! So, our first product review of the year will be from Color Street. Now, if you haven’t heard about this product before, they are an ‘MLM’ business that sells an easier way to applying nail polish in less time than it takes you to actually take the time to get your nails painted.
This company also offers the same opportunity to those who would like to be apart of this brand and sell it themselves, kinda like Avon or Paparazzi.
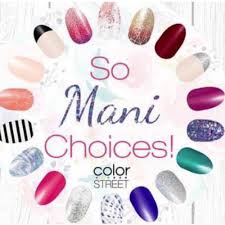
Now, this product, not only does it make it easier to apply nail polish, but there are tons of different designs and colors to try from.
If you are a mom like me, it can be difficult to actually take the time to paint your nails, not to mention having enough time to let them dry as well. So an easier way to not only apply nail polish but also not having to deal with having to air out your room or house because of the smell sounds like a plus to me!
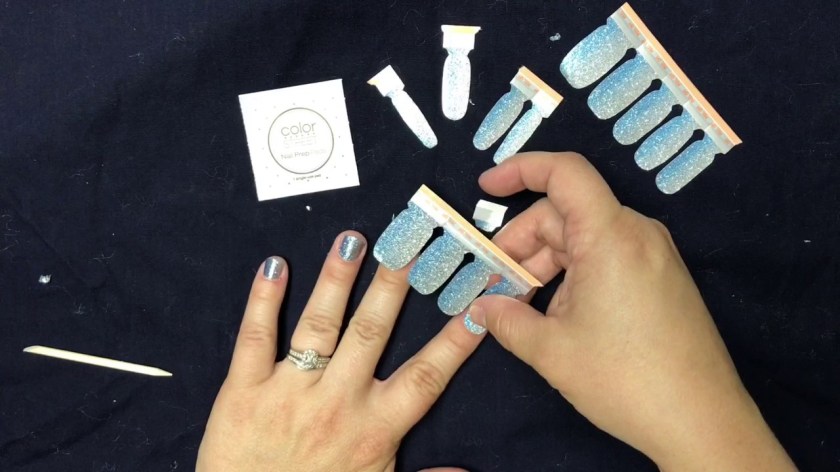
Here’s what they look like:
By the way, if this hasn’t already caught your eye, noticed how photoshopped the nail polish are to the fingers? Not kidding, this is how they show you what it looks like on their website!
I know what you are thinking, ‘Sounds good, but are they really worth it?’.
Well, let’s talk about it some more. So, when I am doing these types of reviews, I like to ask myself a few questions about the product before coming to a final conclusion. Because this is part of an MLM, I’ll be asking myself some other questions, such as these:
How’s the quality?
How long does it last?
Does it work for me?
Is it worth the money?
Would it be worth signing up?
Overall, is it something I would use or buy again?
-How’s the quality?
I would say the quality looks pretty good in person versus online or in pictures. If this product isn’t shown on actual fingers and not ‘photoshopped’ on the same hands over and over, I think it would catch the eyes of customers better.
As you see in the photo above, if I didn’t mention the photo was clearly photoshopped, were you able to notice?
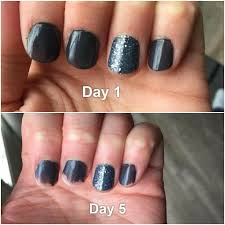
-How long does it last?
These last about a week, depending on how active you are with your hands, it can last longer, but the real problem is that you can’t keep them on for long periods of time. My mom kept her Christmas ones on for little over 3 weeks and they turned her nails yellow.
Not to mention that once they start chipping off, they become pretty easy to peel off and once you start, you’ll keep going until they are completely off.
-Does it work for me?
Yes, it does. Even though the process can be a pain in the ass, they are definitely worth trying at least once. I hate to paint my nails and especially during the wintertime when you can’t or don’t want to open a window to air out the fumes of actual nail polish, they are very easy to put on either during the kiddos nap time or after they go to bed.
-Is it worth the money?
As of February 2020, they are priced at $13.00. You 2 full sets of nail strips to do both of your hands twice. They also have them in different sizes, so they should fit for all sizes if not, they can stretch a little bit to make them fit.
In one of the full strips, they only recommend you to use one of the full strips for each hand, but if your nails aren’t as long, you can definitely get to wear these or try them out 2 times and see if you like them or not to purchase again or give to a friend to have them try it out.
Another downfall with these as well is that once they are opened from that plastic seal they tend to get hard if they are left out for too long. I recommend putting your extra strips in a plastic baggie and making sure there isn’t any air for them to get dried up.
Overall, if you want a quicker way to do your nails, they are worth it, but because they have so many options, it’s hard to want to try out only a few.
-Would it be worth signing up?
The big question that everyone asks or should ask before joining an MLM company, is it truly worth it? Remember, if you aren’t passionate about the product or products you are selling, DON’T waste your money over it!
As always, before joining one of these groups, you have to have the extra money to purchase a ‘kit’ that is needed in order to start selling.
In my honest opinion, as much as I love doing my nails, I wouldn’t sign up. To me, I wouldn’t want to spend $125 dollars on a kit when I can use that money towards something else. Even though its a one time purchase, even after that, you still got to buy more products and get more people to join in order to make money.
This is something that you would have to look into and DO RESEARCH on BEFORE joining. Also, talking to current members and ex-members is very helpful, they can tell you if it’s worth it or not.
-Overall, is it something I would use or buy again?
Sure, it’s an easier way to put nail polish on, but I don’t think this would be something I would buy all the time. I do love the options they have on different colors, designs and glitters to choose from, but with it being $13 dollars for about 2 tries, it might be cheaper for me to get my favorite plastic stick-on nails that it would be to buy these.
I think these are perfect for holiday gifts and even if you want to have salon nails for the holidays. It’s hard to not want to try them all, but the fact that they have to photoshop their nail design, instead of placing them on actual nails, really bothers me.
What do you think about Color Street Nails? Have you tried them or have seen your friends selling them? What do you think about them? Let me know in the comments below!
‘Hey, Dearies! So, this is the first, of many, short stories that I’ll be posting every Friday. I’ll be posting the writing prompt or idea from where I got it from, and then you’ll get to read my version of the story. These are all fiction, nothing is real unless said otherwise. These are something fun to do and if you want to comment or send me a version of your story, from the prompt, I’ll be happy to read it and possibly post it on my blog, if you would like!’
Tell the story of a scar, whether a physical scar or emotional one. To be a writer, said Stephen King, “The only requirement is the ability to remember every scar.”
The Scars He Left Behind
Looking up from the stars, Lela was waiting for something to catch her eye, whether it be a shooting star or the moon turning full as it looked down upon her. The full moon gave
Lela a sense of power, made her feel safe.
She usually did this every night, feeling the hot summer day finally cool off and letting the dark sky raise over the town like a blanket, hiding us underneath it. It was her favorite time of day.
Until now.
Things have changed for her, she had a busy plate, going into her 3rd year of high school. She wasn’t a straight-A student but did enough work to make sure she passed her classes. This year was different, not only had she given up on love, but she found it again.
Or so she thought.
It started out so simple, she thought, but how wrong was she. It started with a random message on a chat room, she was on there talking to one of her two best friends about the excitement that happened during lunch, a fight broke out and they got to witness it first hand.
It was the most exciting thing that had ever happened to them on that day, but for Lela, it was him.
The message from him popped up on her screen, she didn’t know what to do, nor react. She never had a guy take interest in her since middle school, but even then, she still didn’t know what to say, nor how to respond.
‘Can you help me meet Sarah? She seemed to log off.’
Little did Lela know that would be the start of a new chapter for her, not her friend Sarah.
‘Can’t you ask her yourself?’
Lela snapped back, thinking that this man wouldn’t want any interest in her. Why would they?
‘Sadly, I can’t seem to find her. I was supposed to meet her at the library, but I can’t seem to find her?’
Lela laughed at the message. She remembered Sarah was meeting up with her mystery guy today, but with midterms just about to start, she ended up setting up her date at the library with him.
Lela decided to stay home since she had to make sure to be home for her younger brother.
‘Didn’t you use her profile picture?’
Lela tried to explain, as much as she didn’t want to continue the conversation, she felt that she had to at least help him. Although, she chuckled at the fact that he didn’t have much common sense and wondered what Sarah saw in him.
She decided to do some snooping of her own and clicked on his profile picture. He looked semi-cute, or average. He wasn’t fat, nor was he too skinny. His dark hair complemented his eyes. As she kept looking, it seems that she found that they had more in common than she thought.
Lela thought he was kinda cute, but when she saw the year of his birth, she froze. Not only was Sarah talking to a much older guy, but a guy that would be legally called a man.
Chills went down Lela’s back as the conversation continued. Not only had it changed from helping him find Sarah, but his interest in her instead.
That was only the beginning.
After that same conversation, things changed. Lela and this man got closer and not even the 3rd day of talking, they finally met. To her mother’s disgrace, she didn’t want to see her 15-year-old daughter with someone who was 5 years older but tried her best to fight it.
She didn’t know what else to do, she banned her from seeing him, but that just made Lela want to be with him much more. The more the mother forbid it, the more she snuck around to see him.
It had been a week together for Lela and him, but in that week she lost so much. She didn’t know how it happened, it just did. His tongue mouthed words that made her jump into his bed. Making it seem that her virginity was something he wanted to take from her. Claim in with the others he took before hers, add it to his collection.
Once it was gone, she never got it back. The worst part is what came after that.
For months, she tried to build a so-called relationship with him, but he didn’t seem invested in her. Instead, his games came before her, the only time he wanted her was when he needed to be pleasured by her.
The times she did nor didn’t, he still went off and found another woman to laid in his bed. Forgive and forget, she thought over and over, the many times that he cheated. She didn’t know what else to do.
The scar.
He left two on that day in June. The heat was too hot to do much, but he still managed to leave a scar on her shoulder. She wanted to spend time with him, wanted to be apart of that world he was so attached too, but instead cut her left shoulder, and left her there, thinking she was wrong.
The second scar ended right in heart, making it seem like she might never find love again. Making it be more impossible or out of reach, just like the stars are from our grasp.
Once Lela had enough, she ended it, walking away from the first relationship she could ever call her own. She always looks down at that scar, to remind her that she is stronger than those dark times from where she got it from.
Looking back at the stars once more, she took a deep breath and smiled. Getting up from the patch of grass she was laying on and standing up tall, ready to walk into her next chapter, even with the scar he gave her.
Let me know in the comments of what you thought about this short story! These will be posted every Friday and if you have a prompt or idea that you would like me to try out, let me know in the comments!
Hey Dearies! As you all know, I’ve been working on a temperature blanket all year long! If you are a follower and like my Facebook page, you will know that I have been posting updates and squares, as I go along, but because this was my first ever temperature blanket, I’ve picked up on some tips and tricks to help out anyone who wants to create one.
Now, I want to explain that a temperature blanket isn’t a bunch of granny squares that you sew together as you go. You can choose to use any type of blanket for this, although, if you want to do a C2C blanket, you’ll have to work on a lot of planning to make one of those. Here are a few examples:
This slideshow requires JavaScript.
Any blanket pattern you can think of, you can pretty much make it into a temperature blanket! If you are still confused about what a temperature blanket is, let me explain a little better:
A temperature blanket is when someone who knits or crochets the temperature of each day for a year. Using different colors to represent all of the temps.
That’s just a quick explanation of what it is. Let’s talk about what you are gonna need to do, in order to actually start this blanket. I really wished I did some more digging on what colors and how big or small I needed to make my squares.
–Making a color chart
This is one of the most important things you need to think about before even starting the temperature blanket! I looked on Pinterest, just to get an idea on what others have done for their temperature blankets, but here’s mine:
100 degrees – Fire Red (I Love This Yarn) 90 degrees – Pumpkin (Red Heart Super Saver) 80 degrees – Bright Yellow (Red Heart Super Saver) 70 degrees – Jelly Bean (I Love This Yarn) 60 degrees – Green (Main Stays Basic Yarn) 50 degrees – Turqia (Red Heart Super Saver) 40 degrees – Soft Blue (I Love This Yarn) 30 degrees – Dark Orchid (Red Heart Super Saver) *Changed to the following – Violet (Red Heart With Love) 20 degrees – Orchid (I Love This Yarn) *Changed to the following – Orchid (Red Heart Super Saver) 10 and below – Light Gray (I Love This Yarn)
See anything wrong with it? I had to scratch out the original colors, for a few of the temperatures, due to me not having enough yarn for a few of the temperatures. Not to mention, the way I planned this out, wasn’t the best idea. Let’s look at a few other peoples temperatures charts:
I based my chart off of this person temperature chart, which isn’t a bad idea, but if you are going to do it this way, make sure you have a few skeins stocked for each color, which I did not, hence why I wouldn’t update on time because I ran out of color.
This slideshow requires JavaScript.
These two examples are what I wished I went with because there are more colors for all the temperatures. When I mean by that, more colors means more yarn, but less likely of a chance of running out very quickly.
Not to mention, more colors, the more you’ll be able to have a rainbow blanket.
If you aren’t a big fan of rainbow colors, it doesn’t mean you have to do them. I’ve seen people do different shades of one color, with the added greys, browns, or whites added in.
The best part of these, you can switch out the ‘purple’ color for any color you wish! Not only are these are a little different than the normal temperature blanket, but these would make a great gift to crochet the temperature of their baby’s first year!
With whatever you decide to do, making a chart by scratch or following someone else temperature chart, make sure you have the extra yarn for each temperature, just in case so you have back up!
-Picking out the supplies
This is another step that determines, not only how much yarn you’ll go through, but also how thick or thin your blanket will me. I used a size 5.0mm hook, which is the normal size that most projects require, I consider this to be the normal hook that most people and beginners, work with a lot.
Of course, you can change the hook to be bigger or smaller, depending on what you are going for.
Remember, the small the hook, the thinner or smaller your stitches will me. The bigger the hook, the thicker or bigger your stitches will be.
Either way, whatever hook size you chose to use, should be decided on the type of yarn you use. Not all yarns are the same. For my temperature blanket, most of my yarn was a mix of ‘I Love This Yarn’ and ‘Red Heart Super Saver’.
I do recommend using the SAME brand when it comes to your temperature blanket. If you want it to look good, I would use the same brand, but if you are going through your stash of yarn, that’s okay too.
If this is your first time creating a temperature blanket, using your stash or straps isn’t a bad idea, but will give you a chance to make trial and errors, when starting this project.
-How to start working at it?
Once you have the temperature color chart ready and what type of supplies you need, its time to make time for this project. Since you are crocheting a color according to the temperature, doing it every day can be a challenge or you may not have the time.
Writing the temperatures is never a bad idea, but I also found it very helpful, especially when I get behind or run out of yarn, you can always look back and have the temperature written down and ready to go when you need it so.
I want to say that I used to crochet a square a day, which wasn’t a bad idea, but sometimes I would forget to do so. That’s why I started writing down the days and what their temperatures were so that I could catch up during the weekend.
This system not only made it easier but also gave me more time to spend with the project itself. Whatever works for your schedule.
-Don’t forget to have fun!
Temperature blankets always sound fun to make in the beginning, but don’t just work on that project, have a few mini-projects to work on along with your temperature blanket. Sometimes only working on a temperature blanket can become boring, especially if you have been doing the same stitch.
If you are like me, and only thought of having one project at a time, versus working on 5 to 6 unfinished projects. I didn’t think I could be someone that got bored, but I understood that once you start a big project, it can get bored or old faster if that’s the only one you are currently working on.
I’ve learned that having a few or more projects unfinished is okay to have, but it keeps the balance of making sure that you are always doing something different versus repeating the same stitch over and over again.
That’s all the tips and tricks I have for you this year! I’m not sure if I’m going to be making a temperature blanket for 2020, but if I do, I’ll let you all know all the details when I do.
Are you working on a temperature blanket? If so, what design are you going for? Let me know in the comments!
Make sure to follow me on my Facebook page, Twitter, and Instagram, to keep up with what my final result will be when I finish my 2019’s temperature blanket. Not to mention, I’m usually active on Facebook, especially when it comes to my blog.
When you first get into crocheting, the first thing you do, before you even get into it, is figuring out what you want to learn how to make. For me, other than my great-grandmother’s crocheted towel toppers, was the C2C. C2C is a ‘corner to corner’ type of stitch that you would find in blankets.
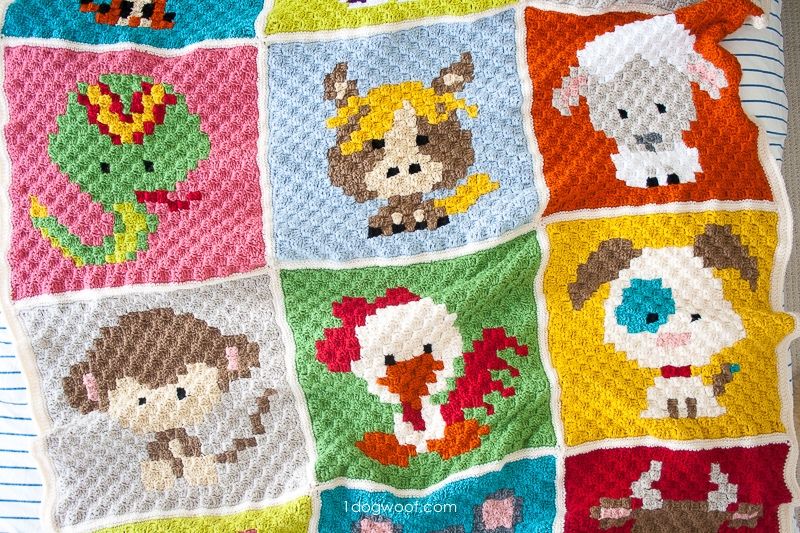
A corner to corner is something that you would usually see for a blanket, but I have seen many for scarfs and rugs as well. They are perfect for testing the limits to see what you can do with your crocheting skills. Here are a few examples that other’s have made:
You can get really creative with these types of projects! I will say, these are a lot easier to understand than graphgans. If this is something that you have saved in your Pinterest folder, or you are waiting for all your projects are done before starting something new, sit back and relax! I’m going to answer a few questions and give some tips, I have picked up, on C2C!
What will you need?
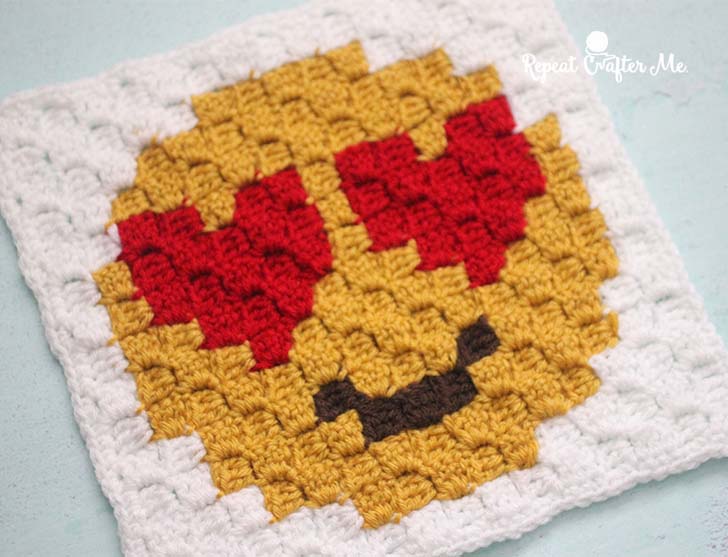
Depending on the pattern or idea you have in mind, you will need to start out on graph paper. If you are going for the basic C2C, having a graph will help you keep track of where you are, but graphs are used for more characters or lettering. For example, I am going to use this pixel picture:
Since we are going to be using this heart, as an example, we need to figure out how many bobbins and colors we will need. I also want to note that you can always change the colors for any of these types of projects. It won’t change how you make the C2C, only the colors.
For this project we need 4 different colors:
White
Black
Dark Red
Red
Now, let’s talk about bobbins, if you don’t know what they are, here is a picture of what they look like, you will need these, unless, you are using multiple skiens, which I don’t recommend because you have to turn the project back and forth, when you are done with a row.
These ones aren’t exactly for ‘crocheting’, but the reason why I like these, is because you can clip them onto your work as you are working.
From looking back at the graph, I see that we will need about 9 bobbins, but like i said, every project will be different and you will have to determined what you will need for each project.
How do you start one?
After you have figured out what you need, you can then start. A lot of people start by chaining 6, but I prefer chaining 5. The reason for this is because I am one of those picky people that doesn’t like giant gaps or holes in my projects and I like to keep it that way.
Chaining 6, is what people normally do, but it doesn’t change the C2C. The only other difference is that, when you connect the squares together, they won’t be the same. For now, here is the video I followed:
*Note: This is not my video, this is to show what type of C2C I am currently using. All credit goes to Heart Hook Home.*
Is it easy?
Once you get the hang of it, it isn’t that hard to do! The only parts that I struggle with is changing color, but there are so many videos on YouTube that have helped me out with that!
What videos do you recommend?
I can recommend a few, but you’ll have to find someone that you can follow. Everyone is different, especially, when it comes to crocheting. I am also one of those people that likes to get right down to the point, especially, when it comes to tutorials.
Keep in mind, that some people can give you way too much information, to the point where you aren’t sure what you are doing. Heart Hook Home, did an awesome job explaining a C2C, I highly recommend you watching her tutorial.
If you want to learn, almost everything that is to know about a C2C, then the Crochet Crowd is your best option, although, I personally, don’t recommend him to anyone who is a beginner. I honestly found his video, on C2C, very confusing and especially as a beginner.
This was just a little more information, not a lot, but enough, to possibly get you going in the right direction of C2C. Once you learn how to do it, you won’t want to stop!
If you haven’t liked my Facebook page, I will be going live, tonight, with a surprise, that I am making for this month of January! Make sure to like my page and check it out!