
Hey Dearies! I’ve got another free pattern for you guys and I can’t wait to show it to you all! So, as you all know, if you follow me on Instagram, I showed you one of my pieces that was a C2C (Otherwise called a Corner 2 Corner), that I sadly rushed and didn’t pay attention to the details and ended up taking it apart.
Now, I am currently been practicing with the C2C stitch and I figured this pattern would be an awesome idea, especially if you want to try and make this particular stitch. This phone case is a basic ‘sleeve’ case.
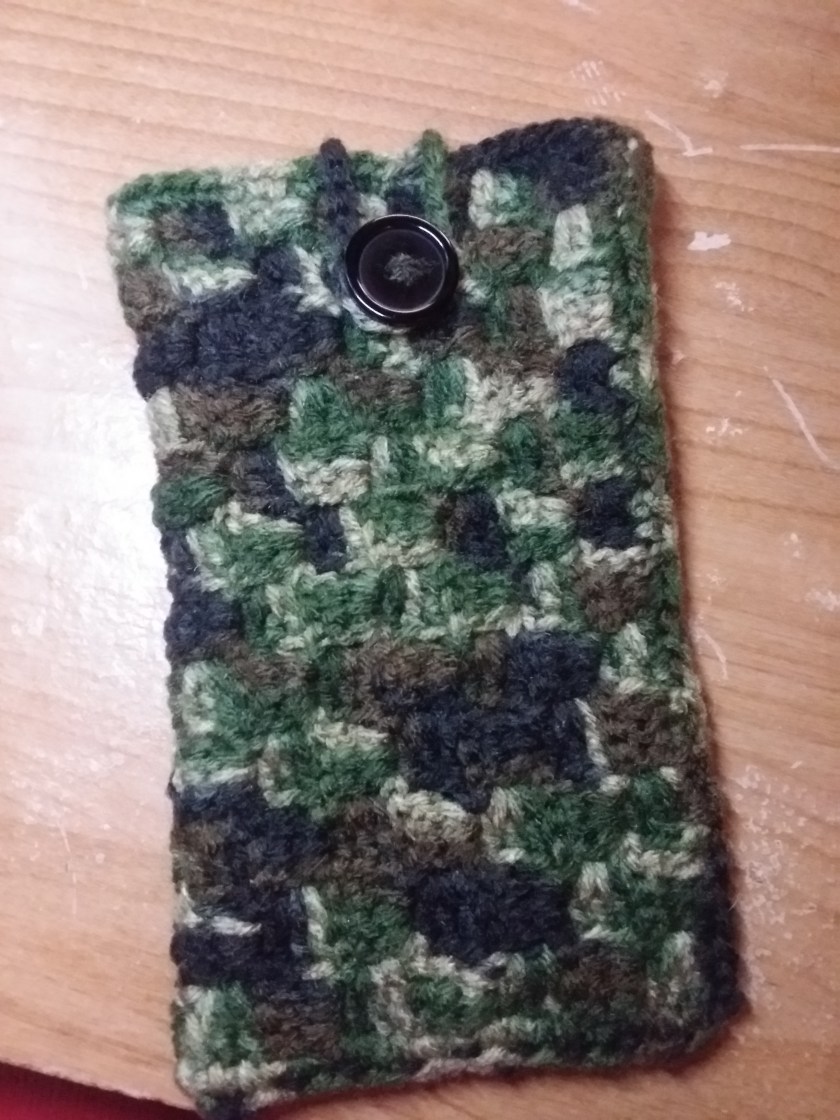
For this case, I ended up pulling out an unused skein of yarn that has been sitting in my closet of yarn, that I got for Christmas. I also know a LOT of people and family members who just LOVE camo stuff and I figured, why not use it for this!
Let’s talk about what you will need:
- Medium Yarn
- I am using the Red Heart Super Saver in Camo.
- You can use whatever colors you wish, but using a mixed colored yarn makes it more fun!
- 5.0 mm hook
- Sewing needle
Let’s Begin!
Making the Base
First thing is first, grab your yarn and make a slip knot onto your hook!
Row 1: Chain 5. Double crochet into the 3rd chain from the hook. Double crochet into the next 2 chain stitches.
Row 2: Repeat row 1. *Slip Stitch into the opening gap of the last square you made, in the chain 3 space. Chain 2. Make 3 double crochets in the same gap that you made your slip stitch in. * Repeat * one more. Turn your work.
Repeat Row 1 and Row 2 until you reach your desired height. Mine has 12 squares for my height, I wanted to make it a little bit bigger so it wasn’t so snugged tight.
When you reach the desired height, turn your work and slip stitch into the next 3 stitches. After that, Chain 2 and make your 3 double crochets. You do this same thing for your width as well. (I did about 13, making sure it wrapped around my phone, but adding an extra row, making it 14 just so it wasn’t as snug.
I know this can sound confusing, but if you need to watch someone do this, I will be leaving a link from Heart Hook Home, that shows you what you need to do. If you are like me, you want to see what you need to do, but once you learn to do it, you’ll catch on pretty quick!
This video was SO helpful when I was looking for a good C2C teaching video. You see, when you do a normal C2C, they have you chain 6 instead of 5, making the project have more of a gap between squares.
Anyway, how long you want to make your width, is totally up to you. I based it on how long it needed to be to wrap around my phone, but I added another row so that it wouldn’t be so tight.
Here is what it will look like:

Border/Sewing Together (Optional)
Now, for the next part, you can do of 2 ways.
- Single crochet around the entire base.
- I went with the first one because it does make it easier to add the buttonhole to the case itself. It also makes it look nice and neat.
- When you single crochet around, make sure to make 3 single crochets in all of the corners. You’ll see why when we come to the next step!
- Fold it and sew it together.
- You can do the second way, but if you are looking for an easier, and simple way to sew them together, step one is the way to go! If you are set on step 2, just skip down to the buttonhole step.
Once you have finished with step 1, grab your sewing needle, sew in any loose ends before we begin. Get enough yarn, that you will think will be enough, and thread your needle.
Note: I usually grab more than necessary, but the extra yarn that is leftover, we are going to use for the buttonhole or you can use it for any scrap projects in the future! NEVER THROW YOUR SCRAPS!
Once your needle is threaded, line the two ends together and tie a know. This will make it so that our sewing is a little thicker. Then start sewing! I went back an forth, going through both of the stitches from the single crochet.
Sew ONLY 3 of the sides, one of the short sides will be the opening for the case itself. Cut any extra yarn and weave in any loose piece of yarn. Any extra yarn we will be using for our next step!

Here is what mine looked like, once I sewed around it all!
Buttonhole and Button
By the opening at the top, find where you want to place your buttonhole.
Slip knot the extra yarn onto your hook and insert it onto the top. Single crochet in that same spot.
Chain 20.
Note: You can chain more or less, depending on where you want your button to be, just remember, you need to make sure that it will reach the button. You can always sew the button to where you want it to be and then create the buttonhole.
Single crochet into the next stitch/and or place.
Fasten off and weave the ends. Add your button and you are done!

There you have it! I think these would be perfect gifts for stocking stuffers for the teens or adults. I won’t be surprised if you can fit a PSP or DS in these no problem!
Don’t forget to follow me on Instagram or like my page on Facebook. I update my Facebook page, a lot, so if you are wondering when I’ll have a new post or when I go live, that is the place to check out!
