Posted in Arts and Crafts, Crochet, Top Projects for Crochet/Knitting

Crafty Sassy: Top 5 Free Crochet Freeze Pop Cozies

Hey Dearies! Since it is summer time, the best thing to have on a hot day is ice cream! Well, if there isn’t any ice cream, freeze pops work as a amazing treat instead! Especially for the kiddos as well!

I remember picking the colors blue and pink, but now, I don’t mind having any of them! Although, the one thing that I wished I had was something to hold my freeze pop because sometimes they were too cold or sweaty.

Instead of having these cozies, we ended up using paper towels or wash clothes, which helped for a bit, but it didn’t do much, not to mention it wasn’t fun to have a plain old paper towel.

So, let’s look at some of the freeze pop cozies that I found that are not only cute, but the patterns are free for you to try!

Note: None of these patterns are mine, all rights go out to the original creators. I’ll be leaving links to the patterns for each one.


  1. Shark Fun Pop Cozy

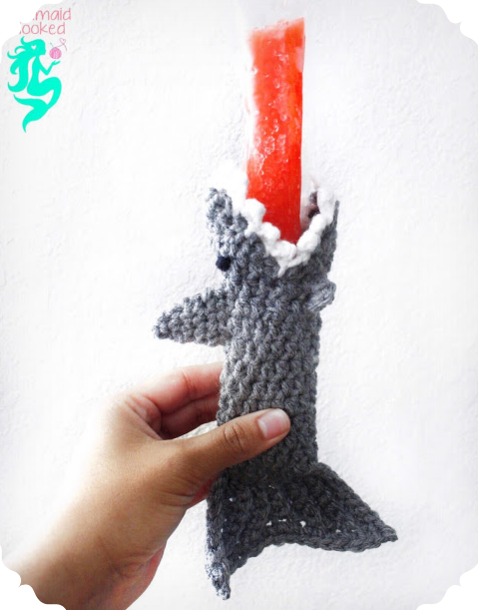
This freeze pop cozy is something I’ve actually made and I love this pattern! It was very easy to understand and not to mention, I love how this shark looks! The eyes might the be most difficult to do, but if you have any black puffy paint around, you can use that instead!

Link to the pattern: https://mermaidhooked.com/2018/07/21/hungry-shark-freeze-pop-cozy/


2. Monster Ice Pop Holders

These lil monsters aren’t as scary as they seem, but they are so adorable! I also love the touch of using googly eyes! Not to mention, I love the bright colors that they used for these pop cozies and the finishing touches for the mouth is amazing!

Link to the pattern: https://blackstone-designs.com/monster-ice-pop-holders/


3. Unicorn Freeze Pop Cozy

This one is especially cute for all the little ones that love unicorns! I haven’t made this one yet, but I just love how cute this is! Not to mention, this pattern actually uses puffy paint for the lashes. Plus, you can try out different colors for the horn and hair as well!

Link to the pattern: https://mermaidhooked.com/2018/08/31/unicorn-freeze-pop-cozy/


4. Light Saber Freeze Pop Holder

This one is for the inner child in us, or for those big Star Wars fans. I remember using a light saber, the plastic ones they sold that you could change the light different colors, but the next best thing was freeze pops! Even they are smaller than the normal light saber, I can finally change the colors!

Link to the pattern: http://greenfoxfarms.blogspot.com/2017/05/light-saber-freeze-pop-holder-tutorial.html


5. Mermaid Fun Pop Holder

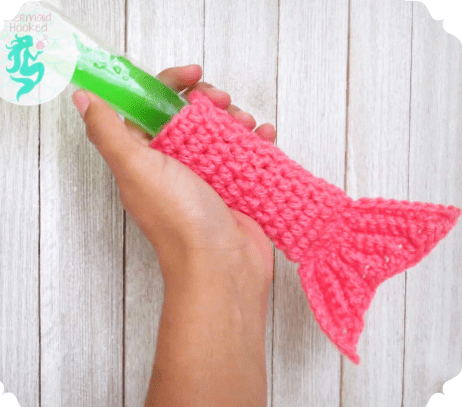
Another cozy that I made, and it was fun to make! Although I did add a different color yarn that was around the beginning of the tail. Not to mention, this is something that is very easy to make and explore with different colors and yarns!

Link to the pattern: https://mermaidhooked.com/2018/06/23/mermazing-funpop-holder-free-pattern/


There you have it! A few freeze pop cozies that are fun for all ages during these hot months of summer months!

Once we are able to do craft fairs again, these are something that are supper easy and quick to make and sell! Not to mention, how cute it would be to have these for the kids, too?

Also, what was your favorite treat to have during the summer months? If I’m honest, it was s’mores, but if we are talking about a cold treat, I would go with a mint-chocolate chip ice cream in a sugar cone.

Let me know what yours were in the comments down below!

Posted in Arts and Crafts, Crochet, Top Projects for Crochet/Knitting

Crafty Sassy: Top 10 Free Crochet Shawl Patterns

Hey Dearies! So, here is another top 10 list, but for shawls! Since spring/summer is the perfect time to wear these, and since most of us are stuck at home with nothing to do, these are something you want to make.

Shawls can be used for fashion or something that can keep you warm, especially if you decide to go to the ocean or coast and don’t necessarily need or want to put on a sweatshirt.

One of the best things that I just love about these shawls is that they are perfect for using yarn cakes, which are a type of yarn that is in a ‘cake’ shape that is in different colors. Which turn out beautiful!

Note: These are not my patterns, all rights go out to their original creators. I will leave links to the patterns. 


1. In The Garden Shawl

Screenshot (9)

This shawl is perfect for enjoying your garden views or taking a hike in the forest. The design is open but very beautiful. This shawl isn’t using a ‘cake’ yarn, but if you have extra yarn laying around, I would use it to make one of these.

Link to the pattern: https://knotions.com/in-the-garden-shawl-2/


2. Triangle Shawl

Screenshot (10)

I just love the ‘cake’ yarn that they used for this shawl, especially when the greens slowly turn into pink. In this showing, of a shawl, it shows that you don’t have to wear it as a wrap, but you can wear it as a sort of scarf.

Link to the pattern: https://www.anniedesigncrochet.com/2019/09/23/crochet-triangle-shawl-with-shells-free-pattern-fragrant-shawl/?utm_medium=social&utm_source=pinterest&utm_campaign=tailwind_tribes&utm_content=tribes&utm_term=838450652_35449804_530964


3. The Earth Shawl

nainai nai

One of the thicker looking shawls, however, more simple to create, perfect for a starter shawl. I also just love the colors, although when I saw that this shawl was called an ‘Earth’ shawl, I was surprised to see that they didn’t choose more of the green colors.

Link to the pattern: https://merrymarystories.blogspot.com/2019/01/how-to-crochet-earth-shawl.html


4. Cara Shawl

bb-1440x1139

A more inclosed shawl, perfect for those chilly nights to hang around the campfire. This is more of a solid color, which is perfect if you are looking to make a simple shawl. It would also make a wonderful gift to grandmothers, as well.

Link to the pattern: https://trulycrochet.com/cara-shawl-free-crochet-pattern/?utm_medium=social&utm_source=pinterest&utm_campaign=tailwind_tribes&utm_content=tribes&utm_term=932303504_41169220_351291


5. Mahogany Shawl

Screenshot (11)

This flower shawl is amazing! I just love the pattern and the color that they choose. Plus, the deep purple that they used, makes seeing the flowers easier and in more detail. Making this to go with a simple white dress, would look perfect together.

Link to the pattern: https://www.ravelry.com/projects/tearaleaf/south-bay-shawlette


6. Amore Wrap

Screenshot (12)

Another ‘cake’ yarn pattern, but this one is the blues turning into pinks, which is beautiful, not only does it look like the perfect yarn to make a baby blanket with, but shawls look amazing in it.

Link to the pattern: https://noowul.com/amore-wrap-free-crochet-pattern/


7. Fairy Tale Shawl

Screenshot (13)

I am one of those people that just love a good fairy tale and this shawl is perfect for whenever you think of the word ‘fairy tale’. The design is simply amazing, I just love the boarder, plus this shawl is longer, kinda like a cape.

Link to the pattern: https://www.ravelry.com/patterns/library/fairy-tail-2


8. Bella Vita Shawl

Bella-Vita-Shawl-crochet-1024x522

Looking for a shawl to make that isn’t too open or flashy? This one is perfect for those who work in an office setting, this shawl is simple yet elegant. The ‘cake’ yarn that they used is amazing, perfect for making a lap blanket.

Link to the pattern: https://wilmade.com/bella-vita-shawl/


9. Primrose and Proper Triangle Shawl

PrimroseProperEasyTriangleShawlCrochetPattern1_web

Another thicker shawl that would be perfect for those chilly days that we get in between spring and summer. I also love the tassel idea, but if you have cat, watch out because they will think you made the shawl not just for yourself, but for them as well. This is also another design that is simple and perfect for beginners when it comes to making shawls.

Link to the pattern: https://kirstenhollowaydesigns.com/2019/12/primrose-and-proper-easy-triangle-shawl-crochet-pattern.html?crlt.pid=camp.1QzozM5GPMil


10. Bottom Up Shawl

watermellon-man-1-1440x977

Last, but not least, this shawl is one of my favorites, when it comes to the pattern and the ‘cake’ yarn that they chose for this project. Not only is the pattern look simple, but it looks like if you cut the solid granny square in half. You can also use this shawl to make it into a scarf, as well.

Link to the pattern: https://trulycrochet.com/bottom-up-shawl-free-crochet-pattern/


What do you think of these shawls? Is this something you would want to make or wear? Let me know in the comments.

Also, I will no longer have my Facebook page, so my updates will be posting on Instagram in my news feed or ‘story’, make sure to follow that as well.

Posted in Crochet, Easy Patterns

Crafty Sassy: Crochet Travel Bag (Easy)

Hey Dearies! Back with another super cute pattern! This is a market back that I had a blast making! Plus it was super simple to make as well. I ended up making this for my nieces 5th birthday and she loved it!

I would say that this bag a normal size for a bag, it’s not huge, but it’s big enough to fit what you would normally put in your purse. Well, for me, but you can use it for anything!

This pattern is going to be split into 3 parts. The base, handle, and gussett (which is a long part than connects both of the bases, I will explain more as we get there to hopefully make a little more sense).

Let’s begin talking about what you will need for this project:

  • Medium Yarn
    • Make sure you have 2 skiens of the colors you want to use. You will be working with 2 strains of yarn with this project.
    • I used Red Heart in white and orchard. You don’t have to change colors unless you want to, but I did just to see how it would look like.
    • 5.0 mm hook
    • Sewing needle
    • Stitch markers

Base and Handle (Make 2 of these)

Grab 2 strains of yarn, of your choice, chain 37. 

Row 1: Single crochet in the second chain from your hook and in each chain across. Turn. (36)

Row 2: Chain 1. single crochet across. (36)

Rows 3-12: Repeat row 2. Once row 12 is done, you can change into another 2 strains of color. I dropped the white by cutting it and crocheting over it. I just grabbed the other end of the yarn I was working on to replace my white.

Note: You don’t have to switch colors, but I did.

Row 13: Chain 3 (counts as a double crochet), skip the first stitch, double crochet in the next stitch and in each st across. Turn. (36)

Rows 14-19: Repeat row 13. Once at row 13, go back to using the 2 main colors that you were working with before. (You don’t have to do this unless you want to!)

Rows 20-27: Repeat row 2. Turn.

Now, we are going to be working on the handle part, we are NOT fasting off, not yet, but I just wanted to make sure before you start to fasten off. 

Row 28: Chain 1, single crochet in the next 6 stitches. Chain 50. Single crochet the last 6 stitches.

Row 29: Chain 1. Single crochet in the 6 stitches. Work a single crochet in each of the chains. Single crochet in the last 6 stitches. Fasten off and sew in any loose ends.

Once you have made two of the bases with handles, lets start on the gussett, or the part we are going to use to connect it all together!

Gussett (Make only 1 of these)

Working with 2 strains, again.

Row 1: Single crochet in the second chain from the hook. Single crochet across. Turn. (5)

Row 2: Chain 1. Single crochet across. Turn.

Repeat row 2 until it measures out to be about 30in. Fasten off and weave in any loose ends. Fold the gussett, from front to back, at the folded part, place a stitch marker on the row that is in the middle fold.

Assembly: 

There are two ways to do this:

  1. Single crochet around the long sides of the gussett and single crochet around the 3 sides of the bases. Sewing them together.
  2. Single crocheting all the pieces together, using 2 strands.

Whichever way you want to do it, is fine. I found that the first one made it a little bit easier for me to connect them, but I also wanted that nice thick border it has.

When you connect them, the short side of the gussett is the closest to the handles.

If you are single crocheting around, to connect them, make sure that when you get to the corner, you single crochet 3 times.

20190816_160722.jpg

There you have it! I’ve been one of those people that just love the crochet bag idea and I had to share this on with you all! A very simple pattern, but it can be tricky to assemble!

Make sure you follow my Facebook page for updates on my blog and more extra fun stuff! I do lots of giveaways!

https://www.facebook.com/katiesblog96971617/?ref=bookmarks


Posted in Beginner Patterns, Crochet

Crafty Sassy: Crochet Basic Squared Coasters (Beginner)

Hey Dearies! Back at it again with another super easy pattern for you! This even goes with the can cozies we made last week, but I will be adjusting the size so that it will fit all sizes!

If you want to make a can cozy to go with this, here is the link: https://katiesblog96971617.com/2019/08/06/crafty-sassy-crochet-can-cozies-beginner/

So, when it comes to coaster patterns, a lot of them don’t make them as big as they need to be for normal or bigger size mugs/cups. Sometimes the pattern’s picture is zoomed in, so you really can’t tell if they are that big unless you make them yourself.

20190813_083031.jpg

Let’s talk about what you will need:

  • Medium Size Yarn
    • I’ll be using Red Heart Super Saver in White and the border in the same blue mix as the can cozy.
  • 5.0 mm hook
  • Sewing needle

Let’s begin.

Chain 18

Row 1: Single crochet into the 2nd chain from your hook and in each remaining chains. Chain 1 and turn your work.

Row 2: Single crochet across. Chain 1 and turn. Repeat until your desired length.

20190813_080927.jpg

Note: I kept crocheting until the height of my coaster was about 4in. You also have to keep in mind that we are also adding a border as well!

Once at your desired length, fasten off and weave in your ends.

Boarder

Grab another color, or you can use the same color to make the base. I’ll be using the same blue mix colored yarn for the border.

Insert your hook on any side of your coaster. Chain 1 and single crochet across. When you reach a corner, make sure to make 3 single crochets in that same corner.

Fasten off and weave in any loose ends!

20190813_083001.jpg

There you have it! A perfect and simple coaster to make for your guest or just yourself. If you still want to make the can cozy that goes with this pattern, make sure to check out the link at the top of the page.

Make sure you follow my Facebook page for updates on my blog and more extra fun stuff! I do lots of giveaways!

https://www.facebook.com/katiesblog96971617/?ref=bookmarks


Posted in Beginner Patterns, Crochet

Crafty Sassy: Crochet Can Cozies (Beginner)

Hey Dearies! So, today I have another super easy pattern for you all! Since we are still in the hot weather in Maine, I figured we would make some can cozies for our soda cans! This also goes with a set, so next week, I’ll show you all how to make the coasters that go with them!

If you are just starting out, this is going to be perfect for you! Especially if you don’t want to just make a dishcloth, which is what most crocheters recommend to start out.

Let’s talk about what you will need:

  • Medium Yarn
    • I’m going to be using a multi-colored yarn from Red Heart. I forgot what it was called since I lost the label for it.
  • 5.0 mm hook
  • Sewing needle
  • Stitch Marker

Let’s Begin!

Round 1: Chain 2. Make 7 single crochets in the 2nd chain from your hook. Do NOT join, we will be working into a spiral. (7sc)

Make sure you place a stitch marker at the end of each row. Move the marker up after each row is completed. This will help you stay on track.

Round 2: 2 single crochet in the next 6 single crochets, single crochet in the last single crochet. (13 sc)

Round 3: *Single crochet in the next single crochet, 2 single crochet in the next single crochet* Repeat 6 times. Single crochet in the last single crochet. (19 sc)

Round 4: *Single crochet in the next 2 single crochets, 2 single crochets in the next single crochet* Repeat 6 times. Single crochet in the last single crochet. (25 sc)

Round 5: *Single crochet in the next 3 single crochets, 2 single crochet in the next single crochet* Repeat 6 times. 2 single crochets in the last single crochet. (32 sc)

Round 6: Working in the back loops only. Single crochet in each single crochet around.

Round 7: Single crochet around. Repeat until your project reaches your desired length. I’ll be crocheting until I reach about 3.5 inches tall.

Last Round: Slip stitch in each single crochet around. Fasten off and weave in all loose ends.

20190806_162211.jpg

There it is! Sadly, I didn’t have any cans to actually use and show you how it would look, but I tried my best to shape it so it looks like it was holding a can. I think these are super cute and fun to make or have for guest to use!

Make sure you see next weeks blog post, it will go along with this pattern. It’s a coaster that is perfect for this can cozies!

Make sure you follow my Facebook page for updates on my blog and more extra fun stuff! I do lots of giveaways!

https://www.facebook.com/katiesblog96971617/?ref=bookmarks

Posted in Arts and Crafts, Crochet, Easy Patterns

Crafty Sassy: Crochet Striped Washcloths (Easy)

Hey Dearies! So, today I figured I would teach you how to create a simple washcloth! If you are very new to crochet, this would be the place to start! Creating washcloths are one of the most basic thing to crochet, not to mention, it helps you with learning how to single crochet.

When a beginner is looking for a project to practice on, washcloths are usually where they start from. You can make them with different stitches or styles! This particular pattern also shows you how to change colors and to create a simple single crochet border!

Let’s talk about what you will need:

  • Medium Yarn
    • This pattern requires two types of colors. You can use any colors you would like!
    • I’ll be using Red Heart Super Saver in White and Cherry Red.
  • 3mm hook
  • Sewing needle
  • Stitch Marker (optional)

Now, let’s begin!

Using your main color, chain 35. (I’ll be starting with the White first.)

Row 1: Single crochet in the second chain from the hook. *Single crochet into the next stitch.* Repeat from * to the end. Turn. (34)

Tip: You can place a stitch marker at the end of each row, it will make sure that you don’t lose track or make sure that you don’t add any unwanted stitches!

Row 2-23: Chain 1. *Single crochet into the next stitch.* Repeat from * to the end. Don’t chain 1 on the last row, we are going to change colors at this point! (34)

Should measure about 4 3/4in (12cm). Change to your other color. (I’ll be switching to the Cherry Red.)

Row 24-25: Chain 1 with your second color. *Single crochet into the next stitch.* Repeat from * to the end. Don’t chain 1, when you are the last row.

Switch back to your main color.

Row 26-27: Chain 1 with your main color. *Single crochet into the next stitch.* Repeat from * to the end. Don’t chain 1, when you are the last row.

Row 28-29: Chain 1 with your second color. *Single crochet into the next stitch.* Repeat from * to the end. Don’t chain 1, when you are the last row.

Switch back to your main color.

Row 30-31: Chain 1 with your main color. *Single crochet into the next stitch.* Repeat from * to the end. Don’t chain 1, when you are the last row.

20190709_114444.jpg

Row 32-33: Chain 1 with your second color. *Single crochet into the next stitch.* Repeat from * to the end. Don’t chain 1, when you are the last row.

Switch back to your main color.

Row 34-38: Chain 1 with your main color. *Single crochet into the next stitch.* Repeat from * to the end. Fasten off. Weave in any ends from switching colors.

20190709_121439.jpg

This is what it looks like the washcloth without the boarder. You can leave it like this, but for me, I think the border adds or makes it look better and evener.

Border

Grab the secondary color that you used for the stripes, and attach it to the side of the washcloth. You can start where ever, but I recommend not starting on a corner.

Chain 1 and then single crochet around your washcloth. When you get to the edges, make sure you make 3 single crochets in each corner.

Once you have reached to where you started, slip stitch into the next single crochet and fasten off. Weave in any loose strings.

20190709_123421.jpg

There you have it! A simple washcloth for you! This was the very first one that I’ve ever made. I was one of those beginners that just jumped into beginner patterns and never got a chance to create a washcloth.

The best part, you can use this in the kitchen, bathroom, or living room! Where ever you need it! However, when you do finish creating this, it will be very stiff. The more you get it wet and use it, the more it will start to loosen up.

I recommend hand-washing these in lukewarm water, and having them air dry. Once they begin loose enough, you can put them into the dryer, but I would be careful. I’ve had a few projects unravel in the washer before.


Posted in Arts and Crafts, Beginner Patterns, Crochet

Crafty Sassy: Crochet Ice Pop Cozies (Beginner)

Hey Dearies! So, since we are in summer, I wanted to give you all a pattern that was perfect for this season! As I was growing up, one of the favorite cold treat to have on a hot day, other than ice cream, was freeze pops!

We would always have so many of them that the only ones that were left in the fridge were the colors that we didn’t care to have. My favorites were red, pink, and of course blue!

These cozies are not only super cute, but they are perfect for the little ones and those who don’t like holding cold stuff in their hands. These are just a simple and very basic to make, so if you are short on time, these can be finished within a  few minutes, depending on how fast you crochet.

I have also included two sets of the same pattern, one for switching colors and the other one for making just solid colors. The color switching one will be first and the solid color one will be after that.

Here’s what you will need:

  • Medium Yarn (In any color you would like, or have two colors for more fun!)
  • 4.5 mm hook
  • Stitch Markers (This is optional, but if you are a beginner, I highly recommend to use.)
  • Sewing Needle

Let’s Begin! (Color Switching)

20190611_101902.jpg

Chain 13 and slip stitch into the first ch to create a ring.

Round 1: Ch 2. 13 half double crochet in the ring, slip stitch on the top of your ch 2 to close. Work each round continuously; use a stitch marker to help keep track of the rounds.

Round 2: 13 half double crochet around.

Round 3: 13 half double crochet around.

Round 4: 13 half double crochet around. (This is where you can choose to switch colors if you like.)

Round 5: 13 half double crochet around.

Round 6: 13 half double crochet around.

Round 7: 13 half double crochet around. (This is where you would switch your colors again.)

Round 8: 13 half double crochet around.

Round 9: 13 half double crochet around.

Finish off and sew in ends.


Let’s Begin! (Solid Color)

20190611_101853.jpg

Chain 13 and slip stitch into the first ch to create a ring.

Round 1: Ch 2. 13 half double crochet in the ring, slip stitch on the top of your ch 2 to close. Work each round continuously; use a stitch marker to help keep track of the rounds.

Round 2-9: 13 half double crochet.

Finish off and sew in ends.

This is something that can be done very quickly and it’s also fun to mix the colors around. These are also perfect for selling at craft fairs since it is something simple to create!

Also, if you don’t like the size of the cozie, you can always add more rows to make it longer.

Another thing, if you wanted it to sit at the end of the freeze pop, you can always sew the bottom of it. However, I like the cozy being the size it is since it’s easier to move and adjust when you are eating the freeze pop.


Don’t forget to check out my Facebook page! I try to go live on Tuesdays and if you like my page, I do polls and free giveaways as well! Also, this is usually the first place that I post updates on my blog as well!

https://www.facebook.com/katiesblog96971617/