Posted in Arts and Crafts, Crochet, Top Projects for Crochet/Knitting

Crafty Sassy: Top 10 Crochet St. Patrick’s Day Free Patterns

Hey Dearies! I know this post is a little late, but since my midterms are literally around the corner, it’s been hard to push out these blog posts, but once the madness of midterms is over, I should be back on track, or that’s the plan.

Anyway, because St. Patrick’s Day is just around the corner, I figure I would share some of the free patterns that are available to give you some ideas. I know St. Patrick’s Day isn’t a very celebrated holiday, but if you are me and love to theme your house with those decorations, even if it’s for a short time.

Note: All these patterns are NOT my own, all rights go out to the creators. I will be leaving a link for each of the patterns.

So, let’s get started!


1. St. Patrick’s Day Leprechaun Gonk

2020-03-07 (9).png

This cute guy, ‘Gonk’, is perfect for St. Patrick’s Day. The perfect decoration for the holiday! Not to mention, he’s a perfect gift for those kiddos who were born in the month of March.

Link for the pattern: https://hookedonpatterns.com/a-gonks-journey/gonk-free-crochet-patterns/st-patricks-day-leprechaun
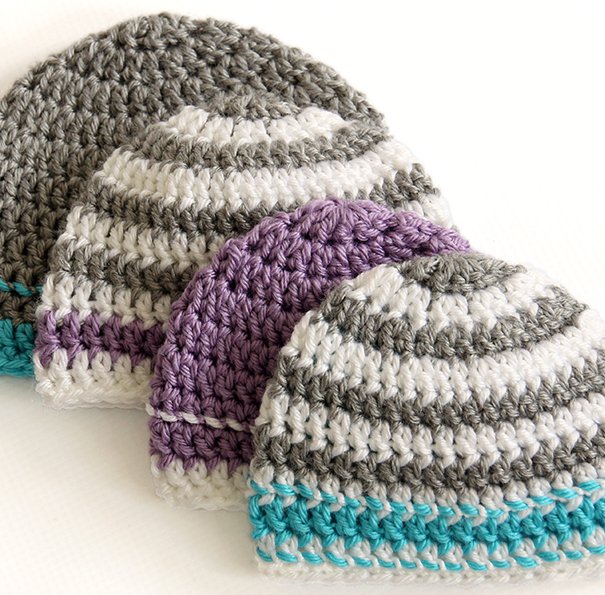

2. Pot-Of-Gold Hat

2020-03-07.png

This is a very decorated hat, that is perfect for the kids who love to get excited for each holiday, not to mention, they are perfect to still wear for the month of March if you are like me and it’s still chilly out, you might need a hat still!

Also, when you click on the link for the pattern, the hat pattern is on another link, so make sure you check out that link, it will be in green saying ‘Link Here’, that’s for the hat.

Link for the pattern: https://pattern-paradise.com/2014/03/02/free-crochet-pattern-pot-o-gold/


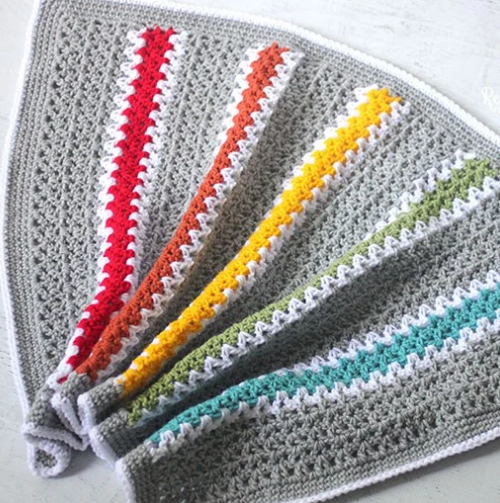
3. St. Patrick’s Day Scarf

2020-03-07 (1).png

Scarfs are always my favorite to create and like I said with the hats, it’s still a little chilly in March, so we can still wear scarves. These ones can be a little tricky, just because of the detail, when it comes to crocheting the shamrock. I think it would definitely be fun to make.

Link for the pattern: https://www.repeatcrafterme.com/2016/02/crochet-shamrock-scarf.html


4. Classy Leprechaun Boot Cuffs

2020-03-07 (2).png

I love boot cuffs and when I saw these, I got excited! This pattern is not only perfect for St. Patrick’s Day, but it is more simple and can work with your outfit easily. It doesn’t have those really bright greens, but more of the settled greens that make this boot cuff more desirable to make.

Link for the pattern: https://www.mamainastitch.com/st-pattys-easy-crochet-boot-cuffs-with-poms/


5. Shamrock and 4 Leaf Clover

2020-03-07 (3).png

You can’t have St. Patrick’s Day without seeing or creating a few of these shamrocks and 4-leaf clovers. These are perfect for adding them to blankets, hats, scarves, or anything else you can think of. The cutest part about these is that they are shaped in tiny hearts.

Link for the pattern: https://www.goldenlucycrafts.com/2017/02/22/crochet-st-patricks-day-shamrock/


6. St. Patrick’s Day Wreath

2020-03-07 (4).png

You probably knew I was going to have more than just one type of decoration and the St. Patrick’s Day Wreath is perfect! I love how much detail the creator put into this and it makes me want to create one for myself to hang on my door, although, it would have to be on the back of the door since these aren’t water proof.

Link for the pattern: https://www.highlandhickorydesigns.com/st-patricks-day-wreath/


7. Leprechaun Hat Beer Cozy

2020-03-07 (5).png

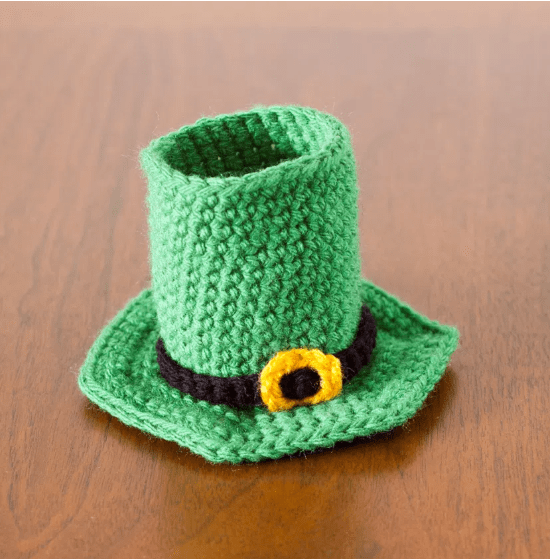
If you have been following my blog for a while, I asked on a poll to make one of these life and since this didn’t get picked, I decided to make sure I at least have a free link for making these super cool beer cozies! These are perfect for the men in your life, or for yourself!

Link for the pattern: https://www.youshouldcraft.com/leprechaun-hat-beer-cozy/2/


8. St. Patrick’s Day Leprechaun Hat

2020-03-07 (6).png

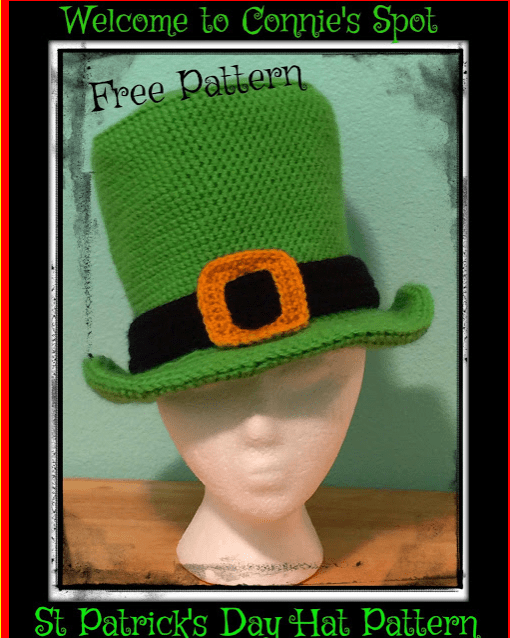
I had to find a leprechaun hat, not only is it super cute for St. Patrick’s Day, but if anyone in your family wants to dress up as Lucky, from Lucky Charms Cereal, this hat is perfect for that!

Link for the pattern: https://spotconnie.blogspot.com/2017/02/free-crochet-st-patricks-day-hat.html


9. St. Patrick’s Day Mickey Mouse 

2020-03-07 (7).png

Here is a tribute to all of those Disney fans out there, but more importantly, those Mickey Mouse lovers. My daughter is in that stage where Mickey Mouse is her favorite stuffy to sleep with, so I figured I had to find something “Mickey” related, not to mention my mom is a HUGE fan of it too!

These can be used for decorations, I’ve seen a few people add pin clips to the back of these to wear as a pin or attaching them to a headband. You could even add these to a blanket, the possibilities are endless!

Link for the pattern: https://www.olyat.com/st-patricks-day-mickey-head-crochet-pattern/


10. St. Patrick’s Day Shamrock Baby Booties

2020-03-07 (8).png

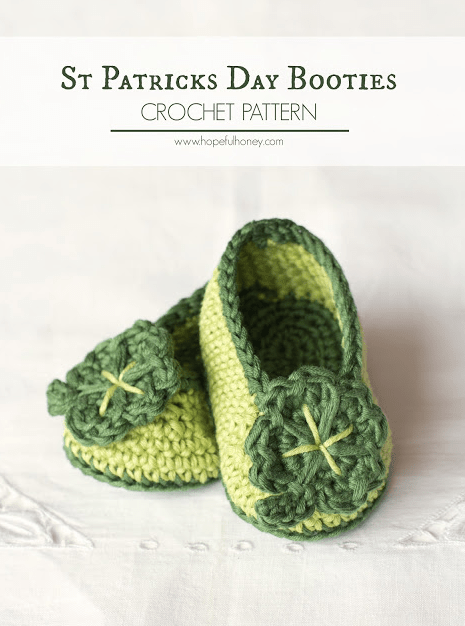
Now, last, but not least, are some super adorable baby booties. So, if you know someone who just had a baby or is due in March, these are a perfect gift to create for them!

Link for the pattern: http://www.hopefulhoney.com/2016/02/st-patricks-day-shamrock-baby-booties.html


There we have it! I hope this gave you all some ideas on what to make for St. Patrick’s Day! There are a few that I have on my list and I really can’t wait to make a few of these.

Make sure you follow me on Facebook, for upcoming stuff and updates!

Posted in Crochet, Easy Patterns

Crafty Sassy: Crochet C2C Scarf (Easy)

Hey Dearies! I’m officially on break from school and wanted to show you guys what I’ve been working on! As most of you know the Christmas season is here and as most of us crocheters start working on last-minute Christmas presents.

So, for the past year or so I’ve been making hand-made items, such as these, for my family, mainly my nieces and nephews. I’m always on the lookout for new things to try, but at the same time, I have to do what I know I can get done before Christmas.

I actually got the idea from the Grinch C2C crochet scarf that I found on Pinterest and alter the pattern to work out for my nephew.

Here’s what you will need:

  • Medium Yarn (Size 4)
    • I’m using, as always, Red Heart Brand.
    • You don’t have to use just two colors, you can switch it up and use as many or just one color, whatever you like!
  • 5.0 mm hook
  • Sewing needle

If you don’t know how to do the C2C and find it easier to see what it looks like, here is a video from Heart Hook Home that I found very useful. Not to mention, if you like your C2C stitches to look nice and neat, her way works amazing and it’s the same way that I’ll be using for this pattern.

Let’s Begin!

Chain 5.

Row 1: Double crochet into the 3 chains from the hook and in the next 2 stitches.

Row 2: Chain 5. Repeat from row one. (This is how we increase.) Then flip your ‘square’, like you are going connect it. Slip stitch in the chain three, from the last square. Chain 2. Make 3 double crochets in that same space.

Repeat until you have 9 squares across. Once you do, after making your last square, slip stitch on the top of the square. (This is how you decrease). Chain 2 and make 3 double crochets in that chain 3 space.

Keep repeating until you have 140 squares. (In order to make it longer, add more squares if needed.) Then end it, as you did for the other side and then fasten off.

Tips for changing color: 

  • I worked with the same color for 5 squares, and then switched to another color.
  • Try out different colors, have fun with it!


20191213_205336.jpg

There you have it! A simple scarf that is quick and easy to make, especially if you don’t know what to make for anyone!

Make sure you like my Facebook page and follow me on Instagram. I’m more active on my Facebook page than I am on Instagram.

Posted in Arts and Crafts, Top Projects for Crochet/Knitting

Crafty Sassy: Top 10 Crochet Projects You Can Profit From

Everyone loves hand-made crafts. Not a lot of people invest their time into them, but others, like myself, have more projects on your mind that you just don’t know where to start. Well, since I am a stay-at-home mom, I figure I would list some projects that could make you some extra cash on the side.

  1.  Towel Tops
    Image result for crochet towel toppers
    This is probably one of the most popular items you can make and they can sell pretty fast! You just buy a regular kitchen or hand towel and crochet the top so that you can hang it on your stove hanger.

    My great-grandmother always made these and they would be gone before you know it. They are very simple to make and there are a lot of videos on YouTube that can show you how to make these.

    Best part about making these is that you can use any towel, even for holidays! Which is pretty amazing! You always don’t have to do the same pattern either, there are many patterns out there that you can use. From one button to two, it’s completely up to you!

  2.  Towel Hangers
    Image result for crochet towel holder pattern
    I found this a few days ago and this would probably sell like hotcakes, just like the towel tops. The only difference between these and the towel  toppers is that you can hang whatever towel you would like.

    Instead of crocheting the towel itself, you crochet along a hair tie or an elastic band. These too, are pretty simple to make. Best part about these, is that you can make them any color you want them. Again, you can find a few great tutorials on this on YouTube.

  3.  Blankets
    Image result for crochet blanket
    These will always be on the list, but they do take up a good amount of your time, depending what kind of design you are going for. However, baby blankets might be the easiest thing to make, just because they are the smaller version of a big blanket.

    I know a lot of people will save the bigger blankets for family. Don’t get me wrong, they can make you some cash, you just have to be very detailed on how long it might take and you might have to use all of your spare time to finish it in time.

  4.  Hats
    Image result for crochet hats
    These will always be on the list. Hats are a quick and easy thing to make, especially kid hats. A lot of people would buy these with a gloves, scarf combo. Depending on how good the work is, you could make some serious cash(Not enough to pay rent, though. Unless you can supply the demands.)
  5.  Scarfs
    Image result for crochet scarf
    I loved getting scarfs, my great-grandmother would always make the fuzzy ones and get them to us, in our favorite color, for Christmas. I still  have a few from when I was little. Like I said with the hats, it would be a great combo to do together!
  6.  Place mats
    Image result for crochet placemats
    Not a lot of people have crocheted place mats, but they are something someone could sell. You could also be able to customize them for holidays, with different colors and patterns! A set of four would most-likely sell like hotcakes, too!
  7.  Coasters
    Image result for crochet coasters
    Coaster aren’t something you would see at a craft fair, but they are an amazing idea to make for one! A lot of people don’t have coaster, but they don’t want to spend too much money on them.

    These are very easy to make and they can be crocheted, but some of them can be made by hand!These would go great with place mats.

  8.  Gloves/Mittens/Arm Warmers
    Image result for crochet arm warmers
    Gloves might be a expect level project, but mittens would be a lot easier to make. Same with arm warmers, they might be easier to make as well. Arm warmers could also be part of the combo, you can either replace the gloves, or add it to the combo of hats, scarfs and gloves.
  9.  Pins
    Image result for crochet pin
    Yes, there is such a thing as crocheted pins! Although, you would have to work with smaller and finer yarn, they are very amazing to make. Especially, flower ones!
  10.  Mini Stuffed Animals/Characters
    Image result for crochet stuffed animals
    You probably seen these all over the internet or Facebook. They can be very challenging for a beginner. They have all kinds of different characters or objects that you can crochet into stuffy’s.

    Amazon has a wonderful Disney Princess Crocheting Kit, that I haven’t tried out yet. They have a booklet on how to make every princess, but they only give enough yarn to make two. I highly recommend getting it, just for the booklet!


Are there any projects that you see at craft fairs that I missed? Comment down below and comment of which one you see would be more in an high demand!

*Note*

  • These aren’t a quick way to earn millions of dollars. This would be something you would earn on the side for some quick cash. If you make them with great quality and passion, I’m sure you could make a living doing it.
  • I just wanted to make a note, so that everyone knows this isn’t something you can get rich quick and fast. A lot of people make these as a hobby of theirs and put a lot of effort into their projects.
Posted in Arts and Crafts, Top Projects for Crochet/Knitting

Crafty Sassy: 5 Easy To Do Beginner Projects For Crocheting

Looking at crocheting project, just looking at them makes you want to learn how to do it, if you are like me, you like to save the page you see them on and come back to it whenever you have time.

Some projects can be very tricky or confusing, so then you forget all about it and never look back until you see it again. This has happened to me so many times, that now that I know how to crochet, I try to go back and find them and see if I am ready to attempt them.

So, if you are truly wanted to enter into this fun and amazing hobby, sit back and check out these easy to do projects, if you are a beginner! Lets begin!

  1. Granny Square Blanket

20180724_070620.jpg

This is the current project that I am working on for my fiance. This is perfect for beginners! If you want to just make a simple blanket, this is perfect to do! Whenever I looked at a granny square blanket, I didn’t think I could make one.

If you don’t know, but I am a visual learner and need everything broken down step by step. YouTube was the first place I looked to find a video that would slow it down, and I finally found one, The Nervous Knitter.

She broke the granny square steps as slow as you can go, but it was easy to understand and learn. I always watch the videos first, before trying them, so I picked up on the steps very quickly. Once you learn how to do it once, it is like riding a bike, something you can’t forget.

If you want to check out her video, here is the link!


2. Scarf

Image result for crocheted scarves

Scarves will always be something that is easy to do. The only difficult thing about them is the patterns you choose. I didn’t understand why my grand-grandmother makes scarfs so much, but after realizing how quit they are to make, I understood why kept making them.

3. Bookmarks

Image result for crocheted bookmarks

You are probably thinking to yourself, bookmarks?? Yes, almost anything you can think of, you can crochet. Now, not all bookmarks are easy and I will be posting a how-to on how to do these ones.

These ones are as simple as granny squares, plus they are cute and pretty quick to make. Why have a plain boring paper or plastic bookmark when you can have a bright and colorful one instead!

4. Beanie Hat

Image result for crochet beanie

Just like the scarves, this is another quick and easy thing to learn how to do. So, if you are a beginner and don’t have any gifts in mind for a birthday or Christmas, you can always crochet a hat and scarf.

I haven’t had a chance to learn how to crochet, but really can’t wait!

5. Granny Square Patchwork Blanket (Mini Granny Squares)

Image result for crochet granny square blanket

I know that I already have the giant granny square blanket on here, but here is the other version that your grandmother might have around her house. The difference between this blanket and the other one I mention is that this is just smaller squares you sew together.

While the other one is just a giant granny square, this one you can get creative and mess around with different colors and see what works and what doesn’t.


Which one would you like to try out? Or which one should I show you how to make? Or which ones have you already made? Leave a comment down below!


Posted in Arts and Crafts

Crafty Sassy: How To Loom Knit A Scarf (Figure 8 Stitch)

Happy Tuesday to all my crafters! Today, I’m going to take you step-by-step on how to loom knit a basic scarf. I’m going to break it down, just in case some others go way too fast.

20180703_145052.jpg


Now, I am going to be using a solid blue color yarn, I figured using a plan color would be easier to focus on. I’m also using a medium size yarn, which is a basic yarn that you would get from the craft store.

If you don’t have a looming set or kit, you can buy them on Amazon, Walmart, or your local craft store. The one I have is the KB Tadpole Loom, I got this from either Walmart or Kmart. It comes with the loom set and a little booklet, that shows you how to 8 different thinks with the loom.

So, first thing is first, we need to create a slip knot. Now, if you don’t know what a slip knot is, that’s okay because I am going to explain it too you. A slip knot is a basic knot that is used for knitting, crocheting, looming, etc, projects. I basically holds the start of your work together.

A lot of people do a slip knot differently, you don’t have to do it my way, but I would look on how other’s make a slip knot and choose whatever makes you comfortable. Here is a quick visual on how I make a slip knot:

  1. Find the start of your yarn and hold on to it. I have used this yarn before, as you can see. If you are using a brand new yarn, you can either find the start of it by grabbing the middle string, that might be sticking out, or look around the yarn and see if you can find the other end. Personally, I rather grab from the outside, because mostly every time that I grab onto the middle and pull, sometimes it be in a knot.
    1. 20180703_145501.jpg
  2. Wrap the yarn around your finger, leaving a enough space in between them. See photo below:
    1. 20180703_145513-1.jpg
  3. Next, you are going to pull the first yarn over the second yarn, like this, see below:
    1. 20180703_145557.jpg
  4. Then, you are going to pull the end of the yarn, so that it’s tight, not too tight on your finger, though.
    1. 20180703_145616.jpg
      • And there you have your slip knot!

Now that we have a slip knot, we can begin! So, take the slip knot off of your finger and place it on one of the end pegs, and tighten it, not too tight, though. Like shown below:

20180703_145650.jpg

What we need to do next is wrap the yarn around the pegs. Pay very close attention to how we do the figure 8 stitch.

It will look tricky at first, but it’s very simple, just make sure that you are wrapping each and every peg, as shown in the picture above. Once you get to the other side, see below, go back and re-wrap all the pegs, using the same stitch that you just did.

When you finish wrapping all the pegs again, your work should look like this, if I explained it well enough. This is the top view:

20180703_150058.jpg

Here is what the side view will look like:

20180703_150113.jpg

If you haven’t already noticed, that there was one peg that was only wrapped once. That is okay! It is supposed to be like that. Every time that you wrap them a second time, there will always be one that isn’t wrapped twice.

Now, because this loom doesn’t have a end peg that you can wrap around, I wrapped the yarn around the side of my loom, because if you don’t, your work will come undone. That is the only down fall with this loom, it doesn’t have a place to wrap your yarn.

Anyway, here comes the more difficult part. You will need your hook for this step. Take your hook and grab, from the first set of yarn that we cased on, you are going to pull it over the peg and over the second yarn. Note: It doesn’t matter which side you start on, but which every one you decide to start on, finish it before moving on to the other side. 

20180703_150230.jpg


You keep doing this, on the side you are working on, it should look like this, when you finish your first side.

20180703_150345.jpg

It’s okay if they are a little loose, most of them will end up in the middle anyway, so it’s okay that they don’t, at first.

Once you have completed the other side, your work should look like this:

20180703_150500.jpg

Then, just gently push the middle of your work down and recast another figure 8 stitch, until you get it to the length you desire. I have added a chart, for the average lengths, but if you want a scarf that fits perfect, for you or whoever you are making it for. Hold you arms out side and have someone measure from fingertip to fingertip, that will give you the exact length you need.

Image result for scarf sizes

How To End Your Work

I don’t have any pictures on how to cast off, so I am going to explain the best I can. I will be making a YouTube video about this blog post and will attach, once it is uploaded. I will make sure to have pictures, as well.

Basically, you’ll be transforming one side to the other and then binding off. So, grab your hook and take one of your yarn, from your first peg, and wrap it around the peg across from that peg. Note: I’m pretty sure you can start from either side, when you bind off. But don’t quote me on it. 

 Once you have finished that, and got to the final hook, your work should just come off and you should be all set.

There you have it! I’m sorry if I didn’t explain it a little better. I will be making a video on how to do it, as soon as possible and I will edit at this post, once I do! If you have any ideas or want me to try out something new, let me know in a comment or send me an e-mail at katie_farrington@aol.com!