Posted in Arts and Crafts, Crochet, Top Projects for Crochet/Knitting

Crafty Sassy – Top 10 Free Crochet Bag Patterns

Hey Dearies! Since summer is right around the corner, I figured I would show you some free bag patterns. When it comes to crocheting, there are lots of bag patterns, from purses to handbags to market bags and so much more!

It’s crazy to see so many designs and patterns that they have for these super cute bags! I’ve made a few of them myself, which I have ended up using a few of them myself, not to mention, I’ve figured out what type of yarn is the best for crocheting bags, too.

So, these patterns, you can use the yarn that is recommended, but I’m going to put in my suggestion, just in case you don’t like how the cotton or acrylic feels or looks like as a crochet bag.

I recommend using the Bernat Maker Home Dec. I’ve used this yarn to create my make-up travel bag and I love how it’s not fuzzy, but it also looks a little better. Not to mention, this yarn is perfect for creating placemats, seat covers, or even coasters. The link below is where you can find some of this yarn, but you can find this at Walmart as well.

Note: These patterns are not my own, all rights go out to the creators. I will be linking the website for each pattern. 


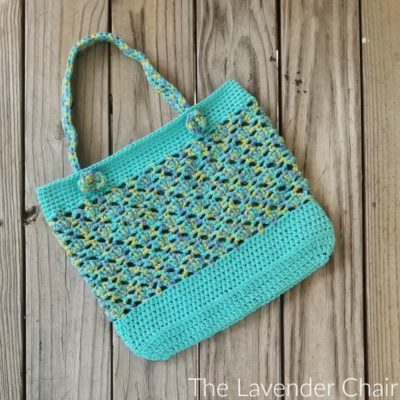
1. Valerie’s Market Bag

Valeries-Market-Bag-Free-Crochet-Pattern-The-Lavender-Chair-400x400.jpg

I’ve done a few patterns from The Lavender Chair and I just love her designs! I actually made my daughter’s first Easter dress from one of her patterns. Her bags though are just so beautiful! I also love the colors that she chooses for her bags as well!

Link to pattern: https://www.thelavenderchair.com/valeries-market-tote-crochet-pattern/


2. Beginner Market Tote Bag

MarketTote.jpg

This one is a simple market bag or for those of you that have little ones, this would be perfect to hold any sand toys, the best part is the gaps that would allow sand to fall out as you are leaving the beach. This is a pretty simple pattern if you are looking to learn how to crochet a market bag.

Link to pattern: https://easycrochet.com/market-tote-bag-crochet-pattern/?utm_content=buffer56f22&utm_medium=social&utm_source=pinterest.com&utm_campaign=buffer#.VcZWYCZVikp/


3. Easy Market Tote

Screenshot (2).png

I love the colors that they used for this bag! Perfect for the little girls that you know, especially if they want a bag like their mommy. This is another easy bag and has the granny square build into it, which is very simple to follow in a pattern.

Link to pattern: https://loopsandlovecrochet.com/2019/07/18/easy-market-tote-free-crochet-pattern/


4. Beach Please Summer Tote

Screenshot (3).png

I actually have this bag save in my ‘to-do’ list for myself! I love the design, but they are also using the same yarn that I recommend! Also, the color combination is perfect for this tote bag! I think I will actually get the yarn to recreate this!

Link to pattern: https://loopsandlovecrochet.com/2019/07/07/beach-please-summer-tote-free-crochet-pattern/


5. 1 Skein Farmer’s Market Bag

IMG_5047.jpg

Another simple farmer’s market bag, but this one is different from the others. Some of the bags that are on this list or others that you might find somewhere else might require to use more than just one skein, however this pattern, you’ll only need one. This is super helpful if you have a skein of yarn just hanging around and your not quite sure what to make with it, which would make this project perfect for that!

Link to pattern: https://www.sewrella.com/1-skein-crochet-farmers-market-bag/?epik=dj0yJnU9M3pTN2p3ZDBsd0VweXJqS09wZFVoN1hkR1hiNVVoeGYmbj1ZMVVyRHQwRUVVZTFQdk5IWXBEaUFnJm09MyZ0PUFBQUFBRjI1Ny1V


6. Starling Handbag

IMG_4474_small2.jpg

I love this one as well, a simple, yet beautiful design. I just love how the ribbon intertwines with the bag. This bag looks a little smaller than the others, so if you are looking for a bag that is perfect for a ‘Mommy & me’, this one would be perfect! Not to mention, all you would need to do, to make a smaller bag would be to use a smaller hook size to do so.

Link to pattern: https://www.ravelry.com/patterns/library/starling-handbag


7. Solid Granny Square Bottom Bag

Screenshot (4).png

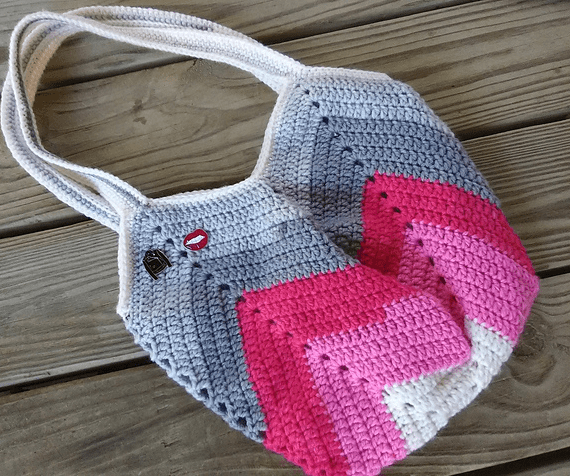
This bag is a solid granny square, which is perfect for those beginners wanting to practice with patterns or just to challenge yourself with something new to do! I also love the colors they choose for this, going from white to pink to dark pink into grey!

Link to pattern: https://www.ravelry.com/patterns/library/solid-granny-square-bottom-bag-crochet-tutorial


8. Sweet Pea Tote Bag

Sweet Pea.jpg

I would say this is the perfect bag for the beach, just because the stitch is a shell stitch! I also love the yarn they used for this. I think I might add this to my list of endless patterns to try out! However, I might more of an ocean color yarn mix or a blue color yarn mix or add some 3D crochet turtles onto the bag.

Link to pattern: https://capscrochet.webs.com/apps/blog/show/1523376-sweet-pea-tote-bag-pattern


9. Meshy Shells Market Tote

Meshy-Shells-Market-Tote-Free-Crochet-Pattern-The-Lavender-Chair-400x400.jpg

Another shell’s bag, but instead of the shells being really close to together, they are more spaced out, which is makes this a wonderful bag to use for either the market or for the beach or ocean. I also love the handle that she chose for this pattern!

Link to pattern: https://www.thelavenderchair.com/meshy-shells-market-tote-crochet-pattern/


10. Puff Stitch Market Bag

Screenshot (5).png

Another granny square stitch, but this bag is a little bigger than the other one, which would be perfect for the beach, not to mention the colors that they chose for the bag, I just love it! I also like how this bag is taller, which is perfect for holding quite a bit of stuff.

Link to pattern: https://crochetbag.einsnummer.com/puff-stitch-market-bag-pattern-free-easy-crochet/


Which patterns were your favorites? Any of them that have caught your eye or get you interested in recreating one of these? Let me know in the comments below!

Make sure to follow me on Facebook for daily updates and if you want to see any of my projects that I’m currently working on!

Posted in Arts and Crafts, Crochet, Top Projects for Crochet/Knitting

Crafty Sassy – Top 10 Crochet Valentine’s Day Projects

Hey Dearies! With Valentine’s Day just around the corner, I figured I would find some free patterns for this lovely holiday! Even if you don’t do anything, these ideas are perfect to make for the kiddos of your family!

Note: These aren’t my patterns, but free patterns that I have found and will have the website link for that pattern. All rights go to the creators of these patterns!

1. Valentine’s Day Cat

2020-02-04 (2).png

If you are a cat lover, then you should definitely add this to your do-to list! The cutest thing about this cat is that it’s shaped in a heart! Not to mention, you don’t have to sew on the whiskers, another option would use some puffy paint, but it can be challenging to do.

Valentine’s Day Cat crochet pattern


2. Valentine Heart Flap Hat

2020-02-04 (1).png

Super cute hat and since February can still be a little nippy out, these are a perfect gift to gift the kiddos for Valentine’s Day! The best part about these is that you can wear them for all the winter season.

https://classycrochet.wordpress.com/2014/01/21/free-pattern-crochet-valentine-heart-earflap-hat/


3. Crochet Rose Wreath

heart-flower-wreath-1-1.jpg

I’ve actually made a wreath, something like this, but it was so difficult to do and if you have been following me for a while, you’ll know that wreath, such as these, take a very long time to do, but once they are finished they are so worth all the hard work!

Crochet Rose Pattern: Learn How to Crochet a Rose Wreath!


4. C2C Heart Table Runner

ValentineC2C-728x991.jpg

As you know, I love to include kitchen sets, especially when it comes to holiday stuff like this! These are a super cute idea to have for the month of February! This also gives you more on practicing the C2C stitch and how to change colors.

Crochet C2C Valentine’s Heart Table Runner


5. Valentine’s Day Bag

DSC01413.jpg

This is another cute idea to make for the kiddos, especially perfect for putting in some chocolate kisses! This type of pattern is something that you can also use to practice changing colors, as well as switching colors!

https://www.littledoolally.com/2014/02/valentines-day-gift-bag.html


6. Valentine’s Day Mini Gift Bags

VdayGiftBag2wm-1024x711.jpg

When I saw these, all I could think of was what a great idea these would be for teachers! These are small but super easy to make and to make many of these! I’ve always wanted to be a teacher and if  I prepared myself, I would have these for my students!

Valentine’s Day Mini Treat Bags


7. Heart Butterfly

Crochet-butterfly-applique-free-pattern-1.jpg

These are more for decoration when it comes to placemats, blankets, clothing, and even bibs. However, they are also perfect for making them into magnets! Not to mention, these are perfect practice for those that learning to sew pieces of their projects together!

Crochet Butterfly Applique


8. Valentine Bear

2020-02-04.png

I know, this bear is too cute! The best part about this pattern is that there is a FREE PDF print out! Which makes them perfect to add to your binder of patterns! These bears are super soft and perfect for those babies that were born or will be born around Valentine’s Day!

https://www.yarnspirations.com/bernat-velvet-valentine-crochet-bear/BRC0334-012696M.html?utm_source=pinterest&utm_medium=social&utm_campaign=2019_02_Curated_Valentines&utm_content=BernatVelvetValentineCrochetBear


9. Light Heart Valentine Dishcloth

crochet-light-heart-dishcloth-naztazia_small2.jpg

From one of my favorite crochet YouTubers, Naztazia has created this amazing pattern that is perfect for Valentine’s Day or for people who have a theme of Hearts for their kitchen! The best part, there is a video to show you how to create this amazing dishcloth!

https://www.ravelry.com/patterns/library/893330


10. Heart-Shaped Bookmark

20180821_123805.jpg

Doesn’t this one look familiar? It should because this was the first pattern that I have EVER created and posted on my website! If you have been following me since day one, this was when I was first starting out or getting into crocheting! This is perfect for beginners!

https://katiesblog96971617.com/2018/08/21/crafty-sassy-how-to-make-a-heart-shape-bookmark-for-beginners/


Which ones were your favorites? Which one would you love to create for yourself? Let me know in the comments!

Make sure you like my Facebook page! I post updates on my blog, Youtube channel, and anything else on there!

https://www.facebook.com/katiesblog96971617/

Posted in Crochet

Crafty Sassy 2019 Pattern Recap

Hey Dearies! Sadly, 2019 is coming to the end and I posted my final pattern for this year, but I wanted to do a recap on all the patterns that I have shared with you for the year of 2019!

I will be doing a mini description of them and adding the link, just in case you would like to check out that post or you missed it.

Crochet Mug/Coffee Cozy w/ Pocket

20190108_121100.jpg

This one was super fun to make! I wanted to have a mug cozy that worked for both mugs and regular coffee cups, not to mention, having a pocket for holding sugar or a tea packet, especially if you are on the go!


Crochet Coin/Gift Card Purse

20190205_210348.jpg

I came up with this idea for my daughter since she was only a year old, this purse fit her size. Not to mention, I wanted to make sure it would fit the size for a gift card because I didn’t find any patterns that looked this cute!


Crochet Stuffed Easter Egg

20190226_112352.jpg

This one I thought about selling these with a basket that I made during Easter, but they were a pain in the butt to make, so I decided to have the pattern free for all of you! They look perfect for baby’s first Easter!


Crochet Tablet Cover 

20190312_090346.jpg

I made this for my kindle, since the case it came in was very broken, not to mention, I wanted to try this pattern out for it. However, I made it too small, as to why I choose to work around it with a different color. But in the end, I came out really cute!


Crochet Completely Solid Granny Square

20190416_084708.jpg

I wasn’t going to post this pattern, but at the time, I was working on a project and was looking everywhere for a pattern of a completely solid granny square. I figured there was someone else that was looking for the same thing. These are perfect for creating a pixel blanket, however, it will take forever to sew them together.


Crochet Adult Size Dragon Ball Z Hat

20190521_164846.jpg

My fiance requested this one, saw it on Pinterest and I had to make him one. Sadly, the owner of the original hat didn’t sell the pattern, but the hats themselves, so I decided to create it but looking at the picture, which is harder than it looks, but not impossible.


Crochet Ice Pop Cozy

20190611_101847.jpg

These were pretty simple to make and when I first got into crocheting, ice pop cozies are one of the basic projects that every beginner should make because they not only give you some practice working in rounds but are really easy and quick to make quickly for a craft fair.


Crochet Striped Washcloth

20190709_123421.jpg

Usually, washcloths are the first thing beginners make, when they first start to get into crocheting, but I didn’t make one until a customer asked me. Don’t get me wrong, making washcloths were on my list to make, but I wanted to do something that was a challenge for myself.


Crochet Circle Coaster 

20190716_095621.jpg

Coasters are another fun and cool idea to make, if you have been following for a while, you know that I love to crochet coasters! The only downfall with some of these coasters that they have out there, they don’t make them big enough for a normal size mug, I make sure to make my coasters to be as big, if not bigger, for all mug sizes.


Crochet C2C Phone Case

20190723_094737.jpg

Ever since I learned the C2C stitch, I love working with it! It’s just so much fun to create and so many ideas I can’t wait to make in the future with it! Once you know how to work with the C2C stitch, the ideas of making pixel designs are endless!


Crochet C2C Wrist Pocket

20190730_085129.jpg

Again, this year I was trying out new patterns that had to do with the C2C stitch. I figured this idea would be useful for holding cash, when out and about. Or for kids who lose their teeth. Another idea would be to use this to hold your buttons or stitch markers as you crochet or knit!


Crochet Can Cozies

20190806_162214.jpg

Cozies are also one of my favorite things to make, as well! Whether they are for cans, mugs, or coffee cups, I love to decorate my drinks, cold or hot! Don’t be surprised to see some more of them coming up in 2020.


Crochet Basic Square Coaster

20190813_083031.jpg

As I have said, I love making coasters! You’ll be most likely seeing more of them in the new year, but I want to make it more creative and festive for all the seasons and holidays.


Crochet Travel Bag

20190816_160820.jpg

Crocheted bags and purses are always something that I loved to see made, they aren’t always the easiest bags to make, but seeing how creative some of the bags come out is so amazing! Made this one for my niece, she loved it!


Crochet Halloween Coaster

20191001_160937.jpg

These coasters aren’t just for Halloween, but if you try out different colors, you can make them for any time of year! This one goes with a placemat, which I love the placemat sets that have coasters!


Crochet Halloween Placemat

20191009_130822.jpg

Placemats are another pattern that I hope you will see this new year! These aren’t the ones you see all the time, but placemats are something that I think brings out a kitchen or dining room nicely.


Crochet C2C Scarf

20191213_205336.jpg

Scarfs are a first for me to make this year and I hope to come up with more fun and bright ideas as well! This idea came from the C2C Grinch scarf but made it like a candy cane or peppermint stick.


Crochet Child Size Mittens

20191213_205605.jpg

Are these super cute? Yes, but they were a real pain in the butt to make, especially when it came to the thumb part of the mitten. Not to mention, I wanted to make my nieces and nephews all a set, but because of how I don’t like working in small circles, I ended up making something else instead.


Crochet Child Size Hat w/ Pom Pom

20191213_205419.jpg

Last, but not least, the hats! These are based on how the Dragon Ball Z hat, but sized to fit a child. When it comes to hats, go bigger than the actual size. Going bigger isn’t a bad idea because, knowing how fast kids grow, they can just grow into them.


There they are! All the patterns from 2019! I know I haven’t been as active as I wanted to, but with starting college and being a stay at home mom with a 2-year-old, it’s been really busy!

However, I am planning out how I want to be more active for 2020. If you have any ideas or have something you would like me to create or come up with, feel free to let me know!

And as always, make sure to follow me on my Facebook page, Instagram, and Twitter. I’m more active on my Facebook, so make sure you are following!

I hope you all have a wonderful rest of the year and we will see you all back in 2020 for new patterns, crafts, stories, and so much more!

Posted in Crochet, Easy Patterns

Crafty Sassy: Crochet C2C Wrist Pocket (Easy)

Hey Dearies! So, I’ve got another super fun project to show you guys! This one is another c2c pattern and since I created a c2c phone case, I figured we do another pattern using the c2c stitch!

This idea happened to show up, while I was on Pinterest, which is usually where I get a vast majority of patterns or ideas. I saw that they had a wrist pocket and I wanted to try it with more of a C2C kick to it!

20190730_085030.jpg

These are perfect for going to amusement parks or just a hike or just in case you don’t want to have to take your purse/wallet with you. Plus they can look pretty stylish too!

Let’s talk about what you’ll need:

  • 5.0 mm hook
  • Medium Size Yarn
    • I’m using a Red Heart Brand. I’m not sure what the color is labeled, but it does look like hot pink!
  • Sewing Needle
  • Button

Before we begin, if you don’t know how to do a C2C stitch, here is a link to a video on how to do so, if you need to visually see how to do the stitch. This is NOT my video, all credit goes to Heart Hook Home.

Now, let’s begin!

C2C Base

Chain 5. 

Row 1: Double crochet into the 3 chain space from the hook. Double crochet in the last 2 chains.

Row 2: Chain 5. Double crochet into the 3rd chain space. Double crochet in the next 2 spaces. Turn your square and slip stitch in the chain 3, from the previous stitch. Chain 2. Work 3 double crochets in that same stitch where you did your slip stitch.

Row 3: Repeat Row 2.

We are now going to end the top row. If you want to make it thicker, add another row or repeat Row 3.

Row 4: Turn your work and slip stitch in the next 3 stitches. *Chain 2. Make 3 double crochet in the chain 3 gap.* Repeat until you reach the other side. Chain 5.

Row 5: Double crochet into the 3rd chain from the hook. Double crochet in the next 2 chains. Slip stitch into the chain 3 gap. *Chain 2. Make 3 double crochet in the chain 3 gap.* Repeat until you reach the other side. Chain 5.

Repeat this process until your work can wrap around your wrist. Make sure you add another row, for when we add the button.

Remember: To end a side, after you finish your double crochets, slip stitch in the top 3 holes to end the side. Look back into the video for more help!

Once you end your base, single crochet around it. Make sure to make 3 single crochets in each of the corners.

Button Hole

On one of the shorter sides, single crochet together in the first two stitches. Half double crochet in the next stitch. Double crochet in the next stitch. Treble crochet in the same stitch as your double crochet.

Chain 3. Treble crochet in the next stitch. Double crochet in the same stitch as the treble crochet. Half double crochet in the next stitch. End the last two stitches with single crochet together.

Pocket

Row 1: Chain 9. Single crochet in the second chain from your hook and single crochet across. You should have 8 stitches. Chain 1 and turn.

Row 2-8: Single crochet across. Chain 1 and turn. Fasten off and weave in ends.

Note: I made this to be about the same size as the width of the wrist base. You can make yours bigger if you need to. 

Attach this to the wrist base by sewing it on. Only sew 3 of the sides. Weave off any ends.

Pocket Button Hole

Slip stitch into the top of the base, right above where your pocket opens up.

Row 1-3: Chain 1 and single crochet across the length of the pocket. Turn. Repeat.

Row 4: Chain 1. Single crochet in the first 2 stitches. Chain 3. Single crochet into the last 2 stitches. Turn.

Row 5: Chain 1. Single crochet into the first 2 stitches. Single crochet in the chain space 3 times. Single crochet into the last 2 stitches. Fasten off and weave in any ends.

Sew on the buttons for the pocket and wrist base and you are all set!

This slideshow requires JavaScript.

There you have it! This is another pattern that is perfect to practice, especially if you want to get into C2C stitches.

Make sure you follow my Facebook page for updates on my blog and more extra fun stuff! I do lots of giveaways!

https://www.facebook.com/katiesblog96971617/?ref=bookmarks


Posted in Crochet, Easy Patterns

Crafty Sassy: Crochet C2C Phone Case (Easy)

Hey Dearies! I’ve got another free pattern for you guys and I can’t wait to show it to you all! So, as you all know, if you follow me on Instagram, I showed you one of my pieces that was a C2C (Otherwise called a Corner 2 Corner), that I sadly rushed and didn’t pay attention to the details and ended up taking it apart.

Now, I am currently been practicing with the C2C stitch and I figured this pattern would be an awesome idea, especially if you want to try and make this particular stitch. This phone case is a basic ‘sleeve’ case.

For this case, I ended up pulling out an unused skein of yarn that has been sitting in my closet of yarn, that I got for Christmas. I also know a LOT of people and family members who just LOVE camo stuff and I figured, why not use it for this!

Let’s talk about what you will need:

  • Medium Yarn
    • I am using the Red Heart Super Saver in Camo.
    • You can use whatever colors you wish, but using a mixed colored yarn makes it more fun!
  • 5.0 mm hook
  • Sewing needle

Let’s Begin!

Making the Base

First thing is first, grab your yarn and make a slip knot onto your hook!

Row 1: Chain 5. Double crochet into the 3rd chain from the hook. Double crochet into the next 2 chain stitches.

Row 2: Repeat row 1. *Slip Stitch into the opening gap of the last square you made, in the chain 3 space. Chain 2. Make 3 double crochets in the same gap that you made your slip stitch in. * Repeat * one more. Turn your work.

Repeat Row 1 and Row 2 until you reach your desired height. Mine has 12 squares for my height, I wanted to make it a little bit bigger so it wasn’t so snugged tight. 

When you reach the desired height, turn your work and slip stitch into the next 3 stitches. After that, Chain 2 and make your 3 double crochets. You do this same thing for your width as well. (I did about 13, making sure it wrapped around my phone, but adding an extra row, making it 14 just so it wasn’t as snug.

I know this can sound confusing, but if you need to watch someone do this, I will be leaving a link from Heart Hook Home, that shows you what you need to do. If you are like me, you want to see what you need to do, but once you learn to do it, you’ll catch on pretty quick!

This video was SO helpful when I was looking for a good C2C teaching video. You see, when you do a normal C2C, they have you chain 6 instead of 5, making the project have more of a gap between squares.

Anyway, how long you want to make your width, is totally up to you. I based it on how long it needed to be to wrap around my phone, but I added another row so that it wouldn’t be so tight.

Here is what it will look like:

20190723_085157.jpg
As you can see, my length is about 12 squares going up and my width is about 14 squares going across. 

Border/Sewing Together (Optional)

Now, for the next part, you can do of 2 ways.

  1. Single crochet around the entire base. 
    1. I went with the first one because it does make it easier to add the buttonhole to the case itself. It also makes it look nice and neat.
    2. When you single crochet around, make sure to make 3 single crochets in all of the corners. You’ll see why when we come to the next step!
  2. Fold it and sew it together. 
    1. You can do the second way, but if you are looking for an easier, and simple way to sew them together, step one is the way to go! If you are set on step 2, just skip down to the buttonhole step.

Once you have finished with step 1, grab your sewing needle, sew in any loose ends before we begin. Get enough yarn, that you will think will be enough, and thread your needle.

Note: I usually grab more than necessary, but the extra yarn that is leftover, we are going to use for the buttonhole or you can use it for any scrap projects in the future! NEVER THROW YOUR SCRAPS!

Once your needle is threaded, line the two ends together and tie a know. This will make it so that our sewing is a little thicker. Then start sewing! I went back an forth, going through both of the stitches from the single crochet.

Sew ONLY 3 of the sides, one of the short sides will be the opening for the case itself. Cut any extra yarn and weave in any loose piece of yarn. Any extra yarn we will be using for our next step!

20190723_093834.jpg

Here is what mine looked like, once I sewed around it all!

Buttonhole and Button

By the opening at the top, find where you want to place your buttonhole.

Slip knot the extra yarn onto your hook and insert it onto the top. Single crochet in that same spot.

Chain 20.

Note: You can chain more or less, depending on where you want your button to be, just remember, you need to make sure that it will reach the button. You can always sew the button to where you want it to be and then create the buttonhole. 

Single crochet into the next stitch/and or place.

Fasten off and weave the ends. Add your button and you are done!

20190723_094737.jpg
This is what mine turned out to be!

There you have it! I think these would be perfect gifts for stocking stuffers for the teens or adults. I won’t be surprised if you can fit a PSP or DS in these no problem!

Don’t forget to follow me on Instagram or like my page on Facebook. I update my Facebook page, a lot, so if you are wondering when I’ll have a new post or when I go live, that is the place to check out!

https://www.facebook.com/katiesblog96971617/?ref=bookmarks

Posted in Arts and Crafts, Beginner Patterns, Crochet

Crafty Sassy: Crochet Ice Pop Cozies (Beginner)

Hey Dearies! So, since we are in summer, I wanted to give you all a pattern that was perfect for this season! As I was growing up, one of the favorite cold treat to have on a hot day, other than ice cream, was freeze pops!

We would always have so many of them that the only ones that were left in the fridge were the colors that we didn’t care to have. My favorites were red, pink, and of course blue!

These cozies are not only super cute, but they are perfect for the little ones and those who don’t like holding cold stuff in their hands. These are just a simple and very basic to make, so if you are short on time, these can be finished within a  few minutes, depending on how fast you crochet.

I have also included two sets of the same pattern, one for switching colors and the other one for making just solid colors. The color switching one will be first and the solid color one will be after that.

Here’s what you will need:

  • Medium Yarn (In any color you would like, or have two colors for more fun!)
  • 4.5 mm hook
  • Stitch Markers (This is optional, but if you are a beginner, I highly recommend to use.)
  • Sewing Needle

Let’s Begin! (Color Switching)

20190611_101902.jpg

Chain 13 and slip stitch into the first ch to create a ring.

Round 1: Ch 2. 13 half double crochet in the ring, slip stitch on the top of your ch 2 to close. Work each round continuously; use a stitch marker to help keep track of the rounds.

Round 2: 13 half double crochet around.

Round 3: 13 half double crochet around.

Round 4: 13 half double crochet around. (This is where you can choose to switch colors if you like.)

Round 5: 13 half double crochet around.

Round 6: 13 half double crochet around.

Round 7: 13 half double crochet around. (This is where you would switch your colors again.)

Round 8: 13 half double crochet around.

Round 9: 13 half double crochet around.

Finish off and sew in ends.


Let’s Begin! (Solid Color)

20190611_101853.jpg

Chain 13 and slip stitch into the first ch to create a ring.

Round 1: Ch 2. 13 half double crochet in the ring, slip stitch on the top of your ch 2 to close. Work each round continuously; use a stitch marker to help keep track of the rounds.

Round 2-9: 13 half double crochet.

Finish off and sew in ends.

This is something that can be done very quickly and it’s also fun to mix the colors around. These are also perfect for selling at craft fairs since it is something simple to create!

Also, if you don’t like the size of the cozie, you can always add more rows to make it longer.

Another thing, if you wanted it to sit at the end of the freeze pop, you can always sew the bottom of it. However, I like the cozy being the size it is since it’s easier to move and adjust when you are eating the freeze pop.


Don’t forget to check out my Facebook page! I try to go live on Tuesdays and if you like my page, I do polls and free giveaways as well! Also, this is usually the first place that I post updates on my blog as well!

https://www.facebook.com/katiesblog96971617/


Posted in Arts and Crafts, Beginner Patterns, Crochet

Crafty Sassy: Crocheting a Completely Solid Mini Granny Square (Beginner)

Hey Dearies! I wanted to show you how to make a solid granny square, but this one is an actually solid granny square. The reason why I wanted to show you what a complete solid granny looks like, I wanted to also kinda see what I’m going to use it for.

The question I know I’m going to get asked is, ‘What’s the difference between a solid granny square and a completely solid granny square?’

Well, let me show you!

The purple square is a completely solid granny square. The blue one is a granny square, which is actually what I used to make my temperature blanket. The difference is that you can’t see the holes that are made for making the granny square.

*Note* They are NOT the same size. The completely solid granny square or the purple one is only 2 rows. While the other square has 5 rows.  

I actually found the pattern on Youtube because I was looking for it for one of my ‘big’ projects. Needless to say, I got very lucky and it just happened to be in my suggestions for videos to watch.

Here is the link for the video: https://www.youtube.com/watch?v=d3TElIayQS8&t=640s

Now, you are probably wondering, ‘What project were you going to use to make with these?’

Well, here’s the thing. I love making stuff for others and I wanted to make my mother a blanket for her birthday, but I ended up going with the C2C method. The only problem was that I jumped into it and made a lot of mistakes.

To the point where I ALMOST finished it, but instead of printing out another sheet and20190416_084725.jpg ripping it, I decided to just rip it and got granny square small instead. Which is why I suggest to really pay attention when it comes to C2C and learn as much as you can!

With that being said, I am currently, been making a bunch of tiny granny squares. You are also probably thinking that I’m crazy for doing so, but in the end, it will look awesome!


However, you don’t need to make a bunch of small ones, as I did. Anyway, let’s get down to what you need for this pattern:

  • Medium Yarn or Size 4
    • I’ve been using Red Heart Super Saver since it’s what I’ve been using for the project itself.
  • 5.0mm hook
    • You can use any size, depending on the size yarn you are using.
  • Marker
    • These are a must when it comes to doing this the first time! Especially if you plan on making these squares bigger!
  • Sewing needle

The pattern is pretty simple, but it can get confusing, let’s begin!

You can either start with a magic circle or a chain 4. The difference between the two is that the chain 4, you have to make a slip stitch to start. Which

Row 1 ( If you used a Magic Circle to start): Chain 2.(counts as your first stitch) Make 2 double crochets in the circle. *1 treble crochet. 3 double crochets.* Repeat from * until you have 4 corners. Join with a slip stitch at the top of the chain 2. Place a marker at the top of each of your treble crochets.  

Row 1 (If you chained 4 to start): Make 2 double crochets in the last chain from your hook (You’ll be working in this chain). *Make 1 treble crochet. 3 Double crochet.* Repeat from * until you have 4 corners. Join with a slip stitch at the top of the chain. Place a marker at the top of each of your treble crochets. 

The next row is the same for both the magic circle and chain 4.

Row 2: Chain 2. *Double crochet in the next stitches, until you reach your stitch marker or first corner, remove it and remember to put it back for each treble crochet stitch. Make 2 double crochets where your stit marker was. Make treble crochet in that same stitch and another 2 double crochets in that same stitch.* Repeat from *. Join with a slip stitch in the top of your chain 2.

Repeat Row 2 until you have reached the desired size. Fasten off and weave ends in. 

There you have it! I will also make sure that I update you on my current project that I’m working on for my mom!

Make sure you are following my Facebook page! I do free giveaways on some stuff that I have made! Here’s the link: https://www.facebook.com/katiesblog96971617/


Posted in Arts and Crafts, Crochet, Easy Patterns

Crafty Sassy: Crochet Towel Topper (Easy)

44664318_1911676305807353_5391009887280955392_n

Hey dearies! I wanted to give you guys an updated pattern on the towel topper! I finally mastered it to my liking and I wanted to share it with you guys. If you didn’t know, my great-grandmother has been making these towels since I was really little and I’ve always wanted to know how.

Now that I have more knowledge on how to make them, I created a pattern that is, to me, perfect. Not too much yarn, but just enough to complete the towel itself. As you can see in the picture above, one of them is very long, that was one of my trial ones that I practiced on.

We are going to be making these ones:

20181024_121320.jpg

What you will need:

  • Medium Yarn
    • Find a color that you would think, would go good with the towel.
  • 2 different sizes of crochet hooks. You don’t have to use just one size, you can use whatever size you would like, these are what I prefer to use.
    • 5.0mm – This one, we will use to crochet the actual towel.
    • 3.0mm – This one, we will use to start off the towel.
  • Towel
  • A button, color of your choice
    • The size can be whatever size you would like, but nothing smaller than an inch.
  • Sewing needle
  • Ruler (Optional)
  • Black Marker (Optional)

Let’s begin!

Part 1: Starting the towel –

The first thing we need to do it cut the towel in half, like this:43592885_483374518835072_2761795955673006080_n

As you can see, mine, isn’t completely even, which in normal because of the brand of towel I am using. It doesn’t have to be perfect!

Take one of the sides, of the towel, that you want to work with and lay it flat in front of you. If this is your very first time making this towel, I suggest grabbing a fine point black marker, it will make this next part easier.

Starting from the right side, take a ruler and measure 1/4 of an inch, place a dot with your marker and do that all across the towel. Make sure you are also 1/4 of an inch away from the top of your towel.

Untitled.png
If you aren’t good with measurements, here is 1/4 of an inch on a ruler.

Once you are done making the dots, you can begin! Take the smaller crochet hook (3.0mm) and some yarn. Poke your crochet hook in the very first dot, where you started on the right, pull some yarn threw that first hole and slip stitch (sl st) to lock in the yarn.

You are going to do this all across the towel, until you reach the end. Be careful that you don’t snag any of the towel strings, it can happen for some towel, especially for thin ones.

20181024_130853.jpg
This is what it should look like after you finish the first part.

When you reach the end, turn your work and switch the crochet hook to a bigger hook (5.0mm), and chain 1.

Part 2: Crocheting the towel –

Row 1 – Single crochet (sc) in between each stitch. Chain (ch) 1.

*Note – I am considering this as the first row because this is when we are actually starting to crochet.

Row 2 – Double crochet together (dc2tog) for the entire row. If you end up with an extra stitch that you can’t double crochet together, just do a simple double crochet (dc). Turn your work and chain (ch) 1.

Row 3 – Double crochet (dc) across. Turn your work and chain (ch) 1.

Row 4 – Single crochet (sc) across. Turn your work and chain (ch) 1.

Row 5 – Double crochet together (dc2tog) across. Turn your work and chain (ch) 1.

Row 6 – Single crochet (sc) across. Turn your work and chain (ch) 1.

Row 7 – Double crochet together (dc2tog) across. Turn your work and chain (ch) 1.

Row 8 – Single crochet (ch) across. You should end up with 8 stitches. This is needed for the button hole!

  • If you have 1 extra: Make a single crochet together (sc2tog) in the last two stitches.
  • If you are missing a stitch: Add another single crochet (sc) in that last stitch.

Turn your work and chain (ch) 1.

Row 9-13 – Double crochet (dc) across. Make sure that each row still ends with 8 stitches. Turn your work and chain (ch) 1.

Row 14 – For the last row, I’m going to break it down:

  • Single crochet together (sc2tog) in the first 2 stitches.
  • Half double crochet (hdc) in the next stitch.
  • Double crochet (dc) in the next stitch.
  • In the same stitch you just made the double crochet (dc), treble crochet (tr) in that same stitch. Chain (ch) 3.
  • In the next stitch, make a treble crochet (tr) and in that same stitch, make a double crochet (dc).
  • Half double crochet (hdc) in the next.
  • Single crochet together (sc2tog) in the last 2 stitches.

Fasten off and weave in any extra strands.

Part 3 – Button

Sew on the button in between the middle of the 8th row. Make sure that it is in the middle.

And you are finished!

These are a perfect gift to make for anyone! Especially, for craft fairs and such. Enjoy this pattern and if you make one of these towels using my pattern, please feel free to tag me on Instagram by using the hash tag #KatiePurrPurr.

*I created this pattern to my own liking, I do own it and you are more than welcome to use it or share it, but please do not take this pattern to sell as your own. When sharing this pattern, please make sure that you link it back to my blog. Any questions on the pattern, feel free to contact me*