Hey Dearies!
It has been a rough beginning of the year for us in Maine. We have had to deal with snow longer than I wanted to deal with it. I don’t mind snow for two holidays, Christmas and New Year’s Eve. At the end of January, I’m over it and want Spring!
This past week, we finally started to see temperatures in the 50s and 60s, which to us Mainers is shorts and tank top weather. That’s also when our ice cream places open up, and a few of our favorite seasonal restaurants start to open up as well.
Anyway, once my oldest daughter knows those are opening up, she starts asking the big question: “When can we order the butterflies?”
For the past 4-5 years, every time during springtime, I have ordered a butterfly kit, and we watch as the caterpillars transform into butterflies, and then we release them once they are ready to fly away. My oldest gets so excited for them, and honestly, I do too!
We used to do this in elementary school, I can’t remember what grade, but it was amazing to watch them transform. It was one of the coolest things we got to do at school. I had bought a kit for my niece years ago, and she got to do it as well, so when I found on Amazon that you can buy the entire kit, I had to try it out!
Since I’ve done this for a few years, I can sort of consider myself a pro, but I do buy extra caterpillars since we had a year where only 3 out of the 10 I got survived. Plus, I always read the instructions, just in case they changed or added anything new.
The best part about doing these kits is that there isn’t much you have to do for them, which, for us moms, is a score! Don’t worry, I’m going to include previous photos of last year’s butterflies and how easy it is!
Please Note: I’m not sponsored to promote this kit. I wanted to share one of my kids’ and my favorite activities to do once the weather gets warmer!
What’s Included In The Kit:
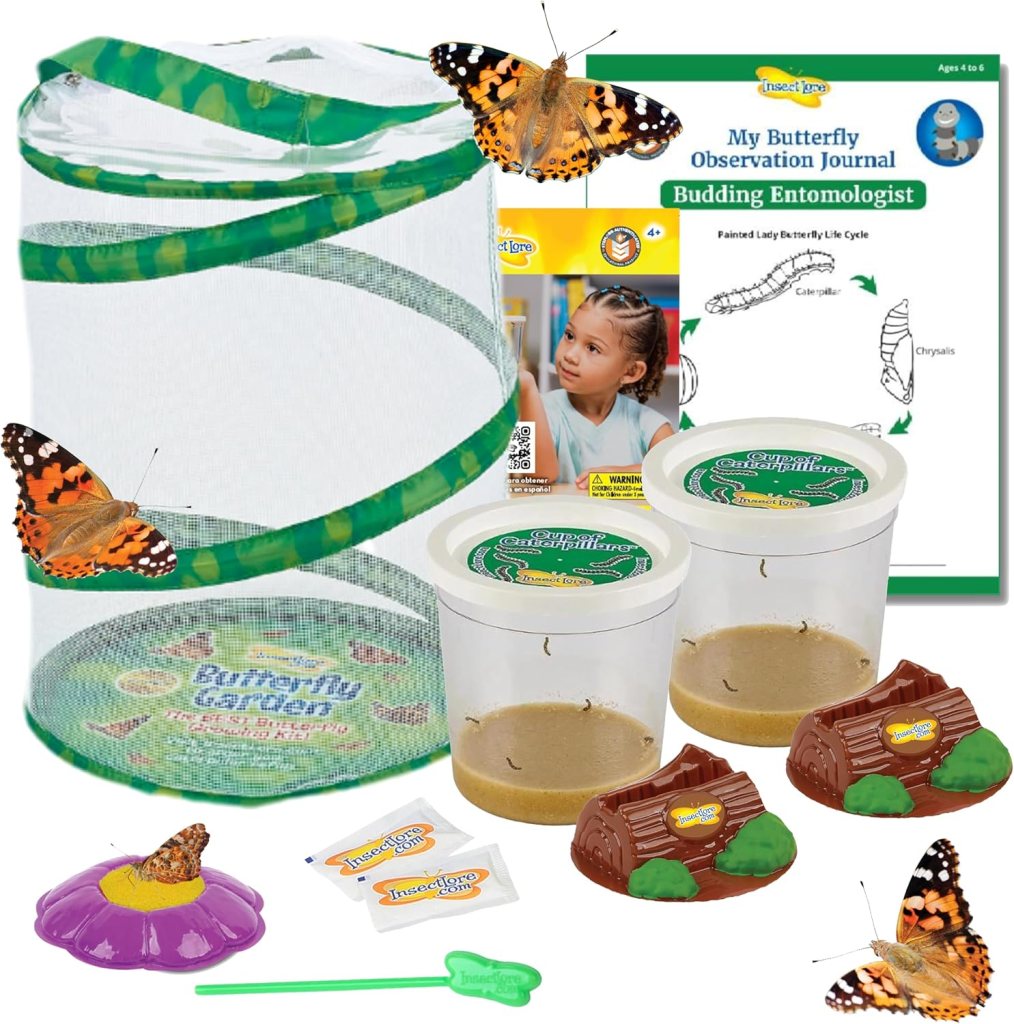
If you are getting the kit I have left the link for, this is all that’s included:
–2 Cup of Caterpillars (Each of them will include 5 caterpillars)
–Butterfly Pop-up Tent
–2 Cover Stands
–1 Butterfly Feeder with Dispenser
–2 Sugar Packets (They aren’t for your coffee!)
–Manual and an Observation Journal
I honestly love the fact that there’s an Observation Journal included, especially if you have kids in school. It gives them something fun to be excited to fill out when they first wake up or when they get home from school.
Stage 1: Caterpillar Stage
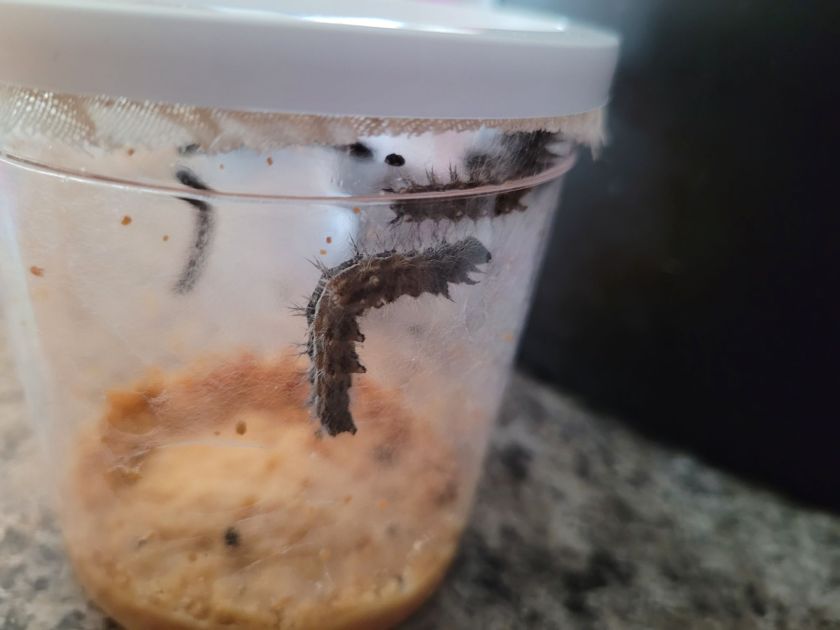
I didn’t have a picture with them really small in the cups, but they pretty much chill in here until they start forming their chrysalis. In this stage, you just have to sit back and watch them grow! You don’t have to worry about feeding them, as the brown stuff on the bottom is their food.
Once they get big and fat enough, they will slowly start to go to the top of the cup and start forming their chrysalides. Don’t open the container until all of them have completely formed their chrysalides!
I usually give them about a day or two; it honestly depends on the caterpillars. I’ve had some that were quick to get up there, others that took their sweet time, and then others died while upside down, and I couldn’t do anything until the rest of them had formed.
Don’t be alarmed if something like that happens or if some of the caterpillars stop moving completely! It sometimes happens!
I think the one tip that helped me when it came to that was making sure you are ordering them when the temperatures are what the caterpillars need in order to survive. I think the one that we lost almost all, but 3 of them were when I jumped the gun and ordered them too soon, and it was too cold.
Since I live in Maine, I wait until the temperatures are above 50 degrees. Usually, the best time I will order them is when it’s 60 degrees. Check the temperature for the week in your area first, before you order!
Stage 2: Chrysalis Stage/Moving into the Butterfly Tent
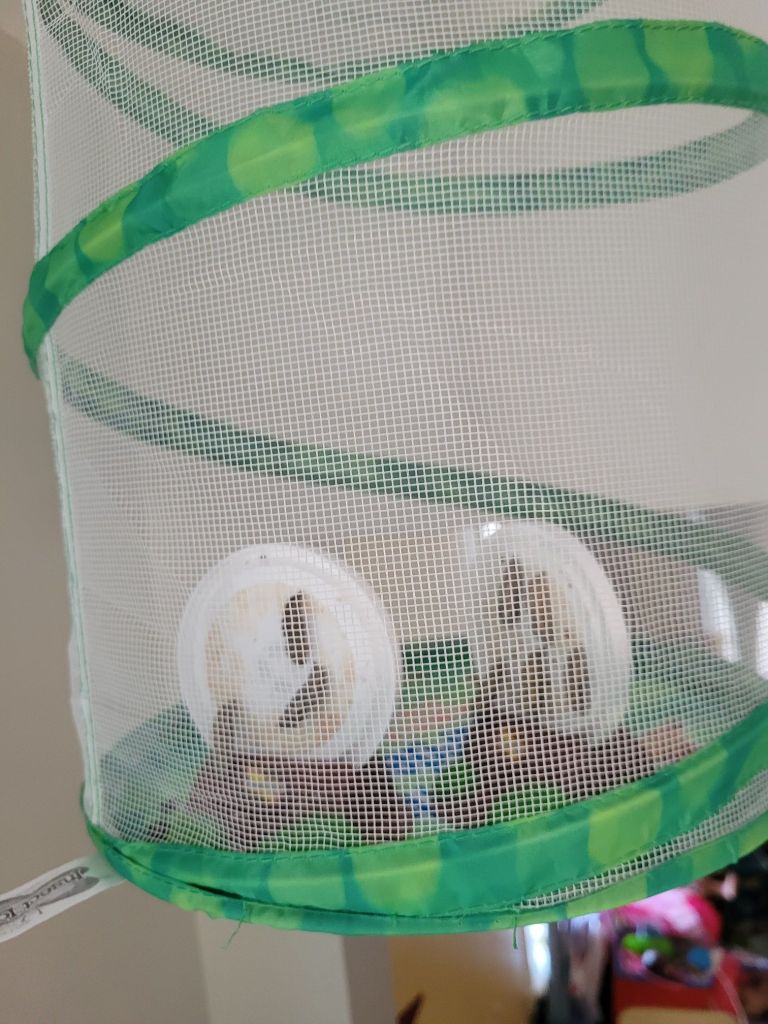
Once all your butterflies are completely in their chrysalis, give them an extra day or two because you don’t want to move them when they are in the middle of forming that. If they fell off the top of the cover, that’s okay! I’ve had it happen at least once or twice.
Don’t pick them up with your fingers if they fell off the cover! The best way I’ve moved them was by taking the cup and putting it upside down on the bottom of the butterfly tent.
This is when those handy-dandy cup cover stands come into place! Carefully, remove the cover. It will be a pain to remove. I advise not to let the kids do this part because caterpillars WILL move when you slowly remove the cover, and you don’t want them to move a lot, but don’t be surprised or shocked if they do!
There will be netting, or webbing, that might make it a little bit of a challenge, too. Just be slow and steady as much as you can. Then, carefully stand the cover standing upright into the cover stand. I sometimes have to rotate my cover so that the caterpillars won’t get in the way when placing the cover on the stand.
Now, this is where the butterfly pop-up tent comes into play. Let the kids have it pop-up and ready while you get the caterpillars on the cover stands. Then, carefully place the stands inside the pop-up tent.
After they are inside, make sure to keep the tent away from the little ones and animals. You want to make sure they don’t have a lot of movement when they are transforming!
You might have impatient kiddos when waiting for them to finish transforming, but have them check the net every day to see any changes!
Stage 3: Transformation Stage/Feeding and Releasing
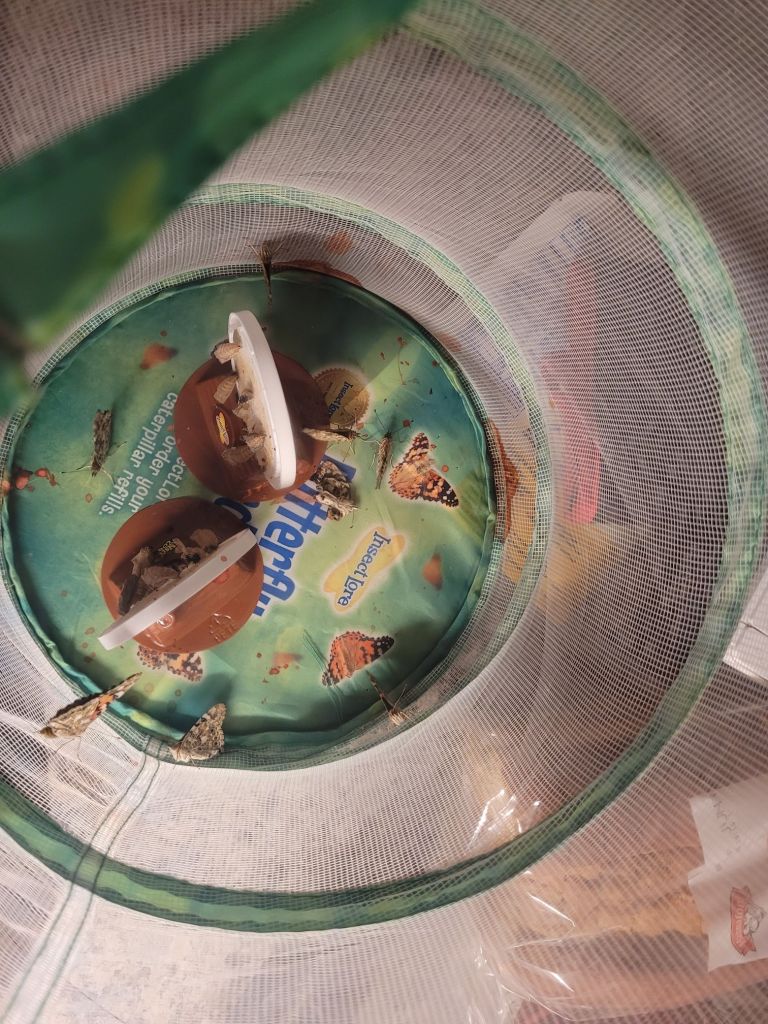
Now, the picture above is the one year we had all, but 1 that made it. The one on the very bottom that’s lying upside down, it was alive, but struggled to get out of the chrysalis. I tried my best to help him, but I wasn’t able to get his wings completely out of the chrysalis.
This is also the fun part of watching them transform! My oldest was so excited to see that once one came out, she would go to school and find another one or two had come out of their chrysalis, transformed!
If you have animals, especially cats, BEFORE the butterflies come out, I would make sure you have a place that is high enough to hang your butterfly tent. I know this from the experience of putting them on the top of my fridge, thinking the cats wouldn’t get to them, and they did. We now hang them from the ceiling on a hook where they can’t get to them.
Once you see that one has come out, I would get the sugar water ready and the feeder set up before more get in there, and then risk having one escape into the house. The mixture is pretty simple, just sugar and water. Then you take the dropped, fill it up with the sugar water, and squeeze it onto the yellow sponge that’s in the middle of the feeder.
Remember: Don’t oversoak the sponge, you want there to be enough to keep the sponge wet. You don’t want to fill it up to the top since the butterflies could get their wings wet again.
Let the kids do this step! My daughter always gets excited to do this step, but she refuses to put her hand inside the butterfly tent since she doesn’t want to let them go, or she’s afraid the one that is in there will touch her when she does!
Usually, it doesn’t take them long to come out of their chrysalis, but once they all do, I go in there to grab the stands, since they aren’t needed, and it gives the butterflies some extra room to dry their wings and practice flying.
I also give them a few days to dry their wings before releasing them. This is also the only time you would need to check on them, especially making sure they always have enough sugar water.
Then, once they are ready or when your kids are ready to set them free, you just bring them outside, open the top, and watch them go! Some might just be ready to book it outta there, but others will take their sweet time. I will take out the feeder before letting them go so that they don’t get their wings wet. (I usually put the butterfly net on its side to let them go if they are taking their time.)
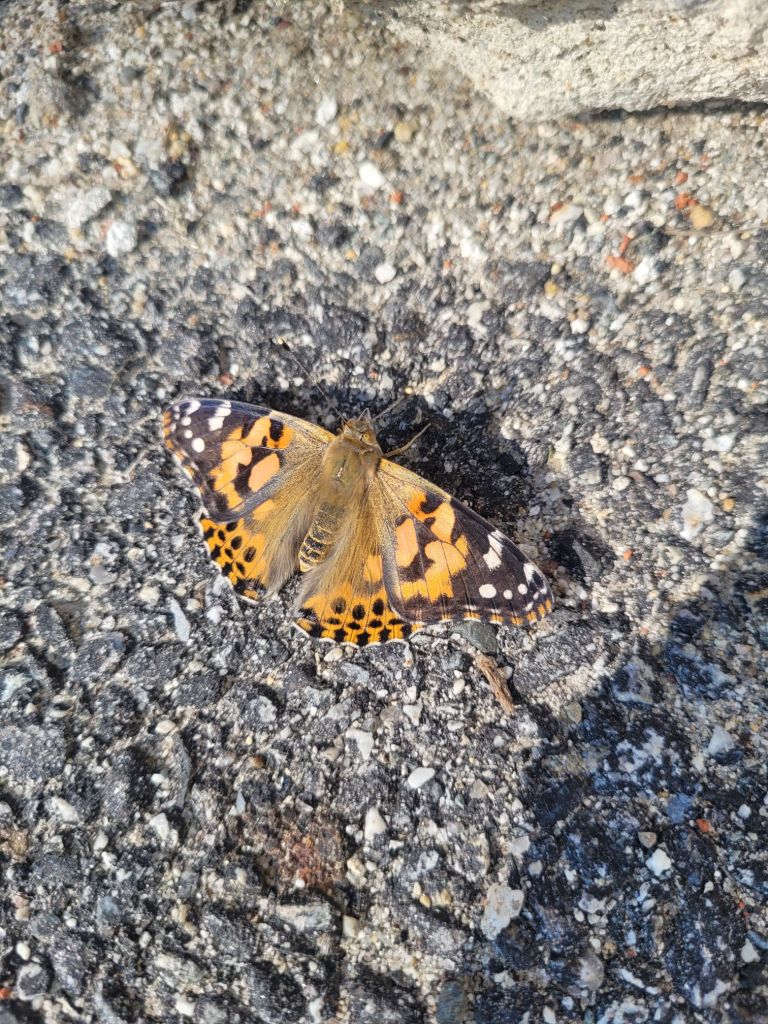
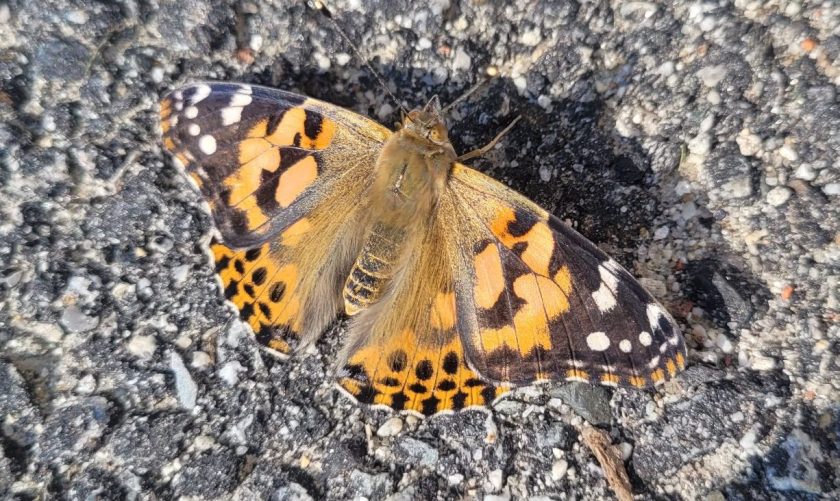
The picture above is one of the first butterfly kits we did. I got lucky enough to get a really good picture of this one just chilling on our driveway! It was definitely bittersweet to watch them fly off, but I know my oldest loved watching them grow and transform!
Although I was really grateful towards the end of having butterflies, because once they started coming out, my cats went crazy for them! Especially, when they were flying around the butterfly tent, they were meowing and hoping one of them would come out to play!
They even get excited once we pop up the butterfly tent because they know it’s coming! I’m not sure how dogs will react to it. I don’t see them getting as crazy as cats would, but if anyone has done this kit with other animals, it would be awesome to know what their reactions are!
Overall, this was definitely worth getting, and I plan on getting another kit in the next week or so, once the temperatures are in my favor to do so!
If you aren’t a fan of butterflies, Insect Lore also has kits for both ladybugs and ants! I haven’t tried those ones yet, but the ladybugs one is something I definitely want to try out for sure!
Let me know in the comments if you want to try this kit out or have already done so!